Order Desk can pull your print on demand orders in from your shopping cart(s), sync your print details into them, and then submit them to Bay Photo. As Bay Photo fulfills the orders, the shipment details will be pulled back into Order Desk and sent back to the original shopping cart if your store is set up for it.
This guide explains how to set up and use the Bay Photo integration.
Setup
To use the Bay Photo integration in Order Desk, you will need Bay Photo to approve you as a Fulfillment Partner prior to set up.
Once that is taken care of, to enable the integration in Order Desk, click on Manage Integrations in the left sidebar. Under the Print on Demand tab, find and enable the Bay Photo integration.
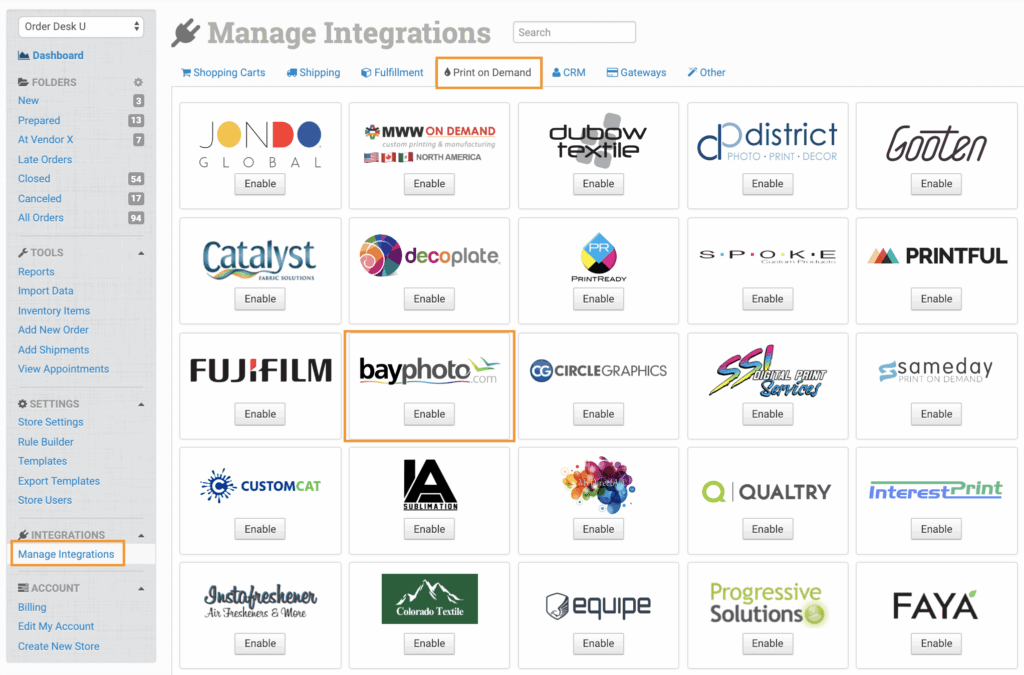
Alternatively, search for Bay Photo from the available integration search.

Enter your API Token from Bay Photo and connect the integration.
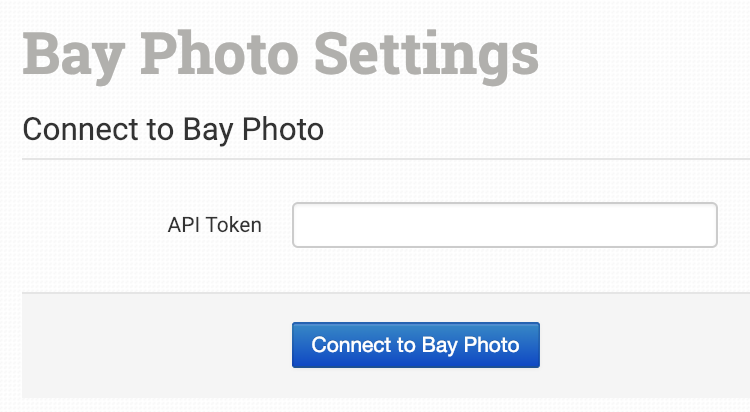
Please note that Order Desk isn’t able to help find or reset your credentials, as they can only be provided by Bay Photo.
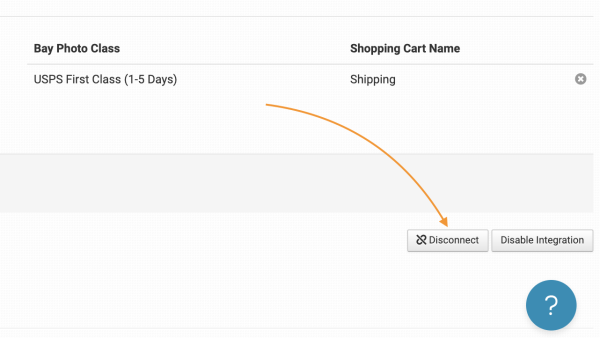
Reset API Token
If your API token with Bay Photo Lab needs to be updated, scroll down to the bottom of your integration settings and click the Disconnect button. Then, go through the above setup process to integrate Bay Photo Lab again with your new API token.
Integration Settings
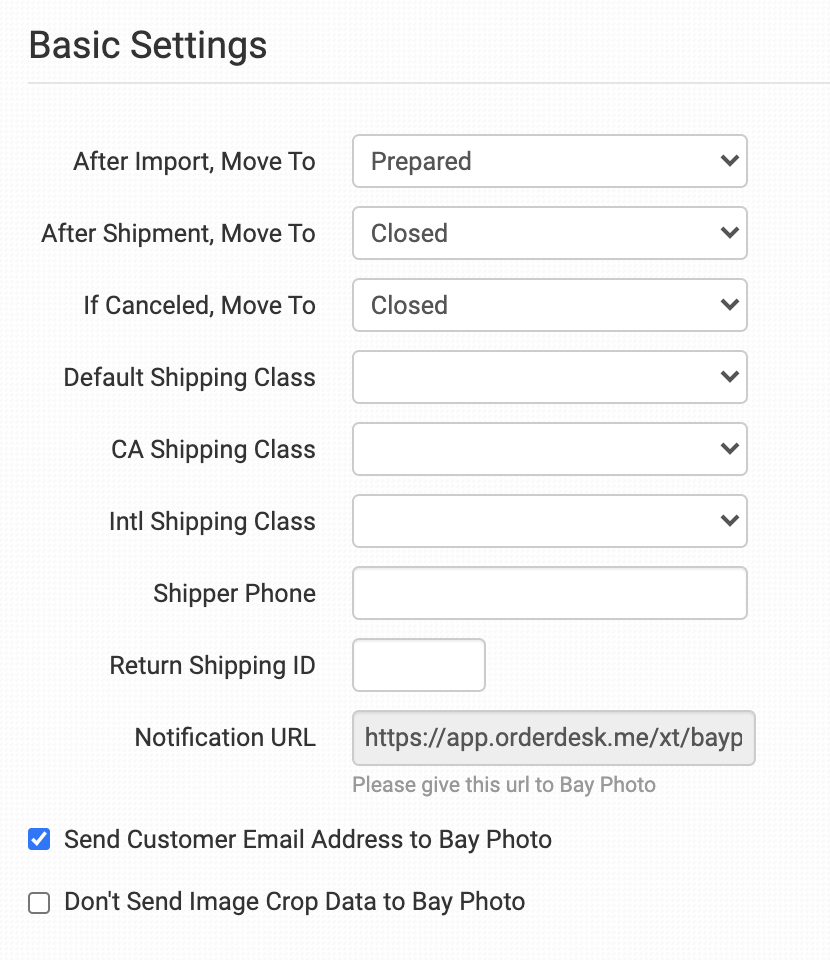
After Import, Move To
Select the folder you want orders to be moved into after they are successfully sent to Bay Photo.
You can use one of the default folders already in your store or create your own. Read the Working with Folders guide for more information.
After Shipment, Move To
Select the folder you want orders to be moved into as Bay Photo sends back shipment details.
If Canceled, Move To
Select the folder you want orders to be moved into if they are canceled at Bay Photo.
Default Shipping Classes
Choose the shipping classes you want Bay Photo to use for your domestic, Canadian and International orders.
If you need to apply specific methods for certain orders, match your method names to Bay Photo’s names in the Shipping Class Match section below.
Shipper Phone
Some shipping companies require a phone number. Add your phone number here as a backup in case a customer left theirs off the order.
Return Shipping ID
If Bay Photo has given you a Return Shipping ID for customized shipping labels, add that here.
This can also be set directly on an order. Details in the Preparing Orders section below.
Notification URL
Give this notification URL to Bay Photo. They will use it to connect to your Order Desk account and send shipment details back to your orders automatically.
Send Customer Email Address to Bay Photo
If you would like the customer’s email address to be sent with the order details, select this option.
Don’t Send Image Crop Data to Bay Photo
Enable this setting if you are rendering your artwork images to size or aspect ratio and you do not need Bay Photo to crop or rotate the images before printing.
If you leave this disabled, Order Desk will apply the default crop and rotate information on your items unless specified on a per-item basis. Default information and how to override it are explained in more detail below.
Product Settings

For more information on what the product settings within the Bay Photo integration do, please read the Print on Demand Product Settings guide.
Shipping Class Match

If the shipping methods you set up in your shopping cart(s) don’t match the shipping method names Bay Photo uses, they won’t know what methods you intend for them to use. When this happens, the default mail classes applied above will be used instead for all of your orders.
To tell Bay Photo what methods you want them to use, you will need to match your method names to theirs. This can be done in the shipping class match section. For detailed instructions on setting this up, please read through the shipping class match guide.
Custom Details for Bay Photo
Getting your orders ready to send to Bay Photo will take some set up time. For a detailed walkthrough of how to use Order Desk with your Print on Demand orders, please read through our Print on Demand Fulfillment guide.
Order Level Details
Bay Photo will not accept the same order twice so be careful that it only gets submitted once.
All orders will be submitted with the drop ship value set to true to remove branding and the pickup value set to false.
If you’d like to send custom data about the order to Bay Photo, you can set the following checkout data field:
| Field Name | Field Description |
| ReturnShippingID | Set the return shipping ID on an individual order. |
| OrderServices | If Bay Photo provides any service IDs for you to use with your orders, set those here as a single number or a list of numbers separated by a comma. Example, set 21285 for the Bay Photo service ID for Ship in Tube. |
| GiftMessageImage | Set a link to an image file with the gift message on it for Bay Photo to print out and include with the order. |
If you are unfamiliar with checkout data, please read the How to Work with Checkout Data guide.
Item Level Details
The following fields can be set as variations or item metadata for each order item. Replace “x” with a value specified in the table, i.e. print_url_1 or print_url_2.
| Field Name | Field Description |
| print_sku | Internal Bay Photo product SKU (integer). |
| print_services | If Bay Photo has provided service IDs to perform on the order, please enter these IDs separated by a comma. |
| print_url_x | The publicly available URL from which your artwork can be downloaded. Only used for DigitalPrint. |
| print_location_x | The Node UID for the location of this print. In most cases it is 1. If you do not include it, 1 will be used. |
| crop_height_x | Height percentage, 100 by default if not included. If you do not need images cropped, enable the Don’t Send Image Crop Data to Bay Photo setting above. |
| crop_width_x | Width percentage, 100 by default if not included. If you do not need images cropped, enable the Don’t Send Image Crop Data to Bay Photo setting above. |
| crop_x_x | Crop location vertically, 50 is center and will be used if not included. The second x should be 1, 2, 3 etc. to number which print should be affected. If you do not need images cropped, enable the Don’t Send Image Crop Data to Bay Photo setting above. |
| crop_y_x | Crop location horizontally, 50 is center and will be used if not included. The x should be 1, 2, 3 etc. to number which print should be affected. If you do not need images cropped, enable the Don’t Send Image Crop Data to Bay Photo setting above. |
| degrees_rotated_x | The degrees that the original artwork should be rotated. If nothing is entered 0 will be used. If you do not need images rotated, enable the Don’t Send Image Crop Data to Bay Photo setting above. |