Order Desk can import orders from your shopping cart(s), sync in your print details and then automatically send them on to Dreamship for fulfillment. When orders are shipped, the tracking details will be sent back to Order Desk automatically.
Setup
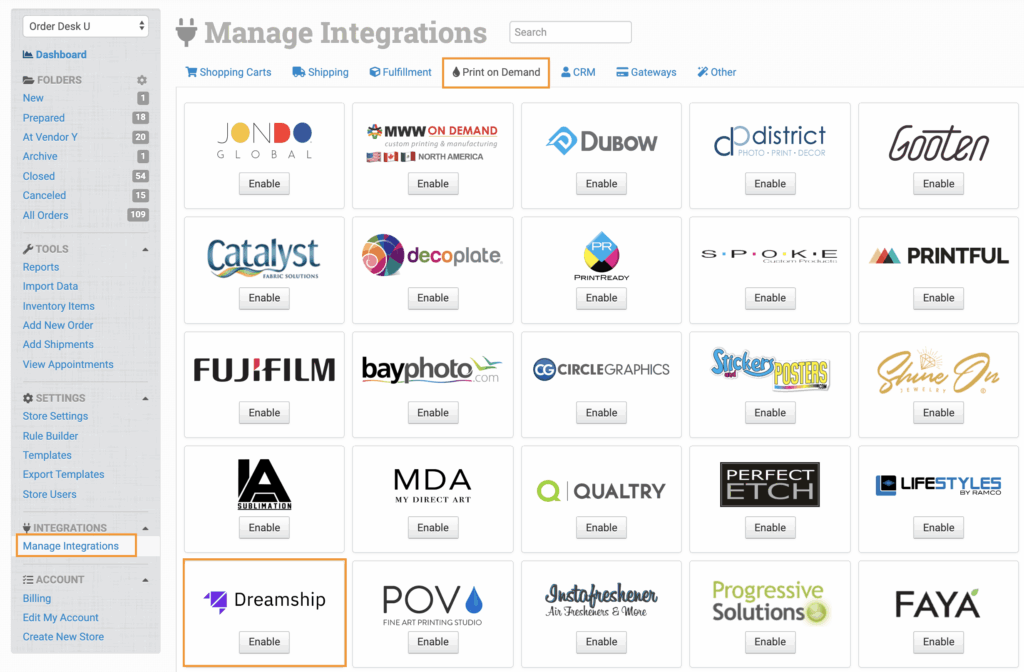
To connect to Dreamship, click on the Manage Integrations link in the left sidebar. Under the Print on Demand tab find and enable Dreamship.

Enter your API Key from Dreamship to complete the connection.

To find your Dreamship credentials, please contact your rep from Dreamship. Order Desk support is not able to help with finding or resetting your Dreamship credentials, as they are created and provided by Dreamship.
Integration Settings

Once you have successfully connected to the Dreamship integration, set your preferences
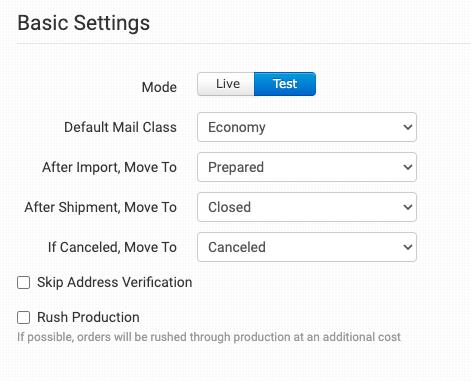
Mode
Select which mode your Dreamship connection should be in, Live or Test.
After Import, Move To
Select the folder you want orders to be moved into after they are successfully sent to Dreamship.
You can use one of the default folders already in your store or create your own. Read the Working with Folders guide for more information.
After Shipment, Move To
Select the folder you want orders to be moved into when Dreamship sends tracking details back.
If Canceled, Move To
Select the folder you want orders to be moved into if they are canceled at Dreamship.
Skip Address Verification
Select to have shipments attempted regardless of address verification.
Rush Production
Select to have orders rushed through production, if possible. Please note, this will come at an additional cost charged by Dreamship.
Product Settings

For more information on what the product settings within the Dreamship integration do, please read the Print on Demand Product Settings guide.
Sending Orders to Dreamship
Getting your orders ready to send to Dreamship will take some set up time. For a detailed walkthrough of how to use Order Desk with your Print on Demand orders, please read through our Print on Demand Fulfillment guide.
Preparing Item Details
The following fields can be set as variations or item metadata for each item in an order:
| Field Name | Field Value |
| print_sku | Use either print_sku or print_design_id to tell Dreamship what product is being ordered. The print_sku is the item variant number of a blank product. |
| print_design_id | Use either print_sku or print_design_id to tell Dreamship what product is being ordered. The print_design_id is a product variant prebuilt into the Dreamship system. |
| print_url_1 | Link to the artwork file. Up to 5 links accepted for multi-print items, formatted as print_url_1 through print_url_5. |
| print_location_1 | Each print_url needs a corresponding print_location (formatted as print_location_1 through print_location_5). Set each to the location or size of the print, such as front, back, 11oz, 15oz, 10×8, or 24×16. |
| position_x | Used to describe the artwork scaling action. Options are top_left, top_center, top_right, center_left, center_center, center_right, bottom_left, bottom_center or bottom_right. |
| resize_x | If position is included, resize must be as well. Options are fit, fill or file. |
Custom Order Details
The following fields can be set as order metadata or checkout data:
| Field Name | Description |
| RushProduction | Use to flag an order for rush production. |
| ShippingLabel | Use to set a URL for the shipping label. Required if setting a value in the ShippingLabelCarrier field. |
| ShippingLabelCarrier | Use to set the carrier for your shipping label. Required if setting a value in the ShippingLabel field. |
| 48HourFulfillment | Set with a value of 1 for expedited tracking. |