If you work with more than one fulfillment service or vendor, you can use Order Desk to send dropship emails to each separate service for the items they need to fulfill. For this to happen, you will need to set up your Order Desk store to split your orders whenever an order has items for more than one fulfillment service. Once split, order details can be emailed to each separate fulfillment service.
This guide will walk you through the steps for setting up your products so Order Desk knows which items are for which vendors, and then will give instructions for splitting orders, creating email templates and sending out email notifications about new orders that need to be fulfilled.IMPORTANT
If you use Shopify or BigCommerce, make sure you’re following the instructions in our How to Split by Vendor with Shopify and BigCommerce guides.
Add Inventory to Order Desk
To properly split orders and notify your vendors that they have items to fulfill, you’ll need to first add your inventory to Order Desk.
Order Desk Inventory
Let’s first look at where inventory is stored in Order Desk and what each item should look like.
Click on Inventory Items under the Tools menu in the left sidebar.
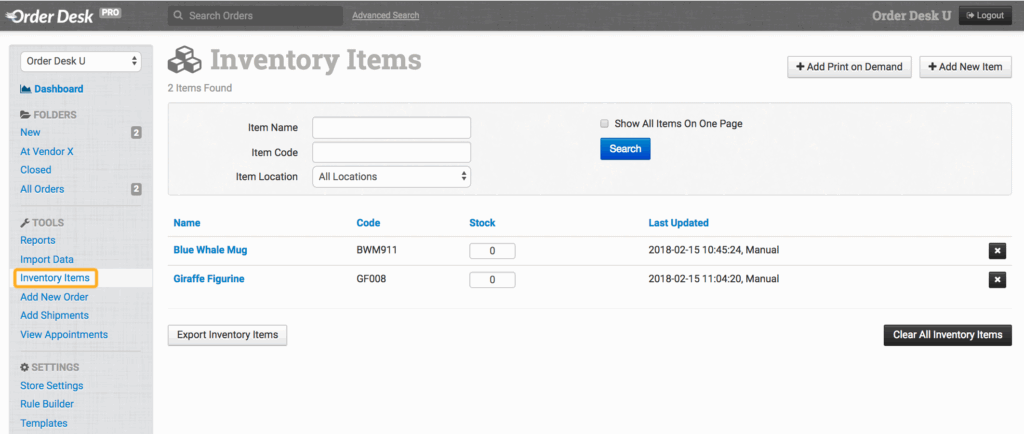
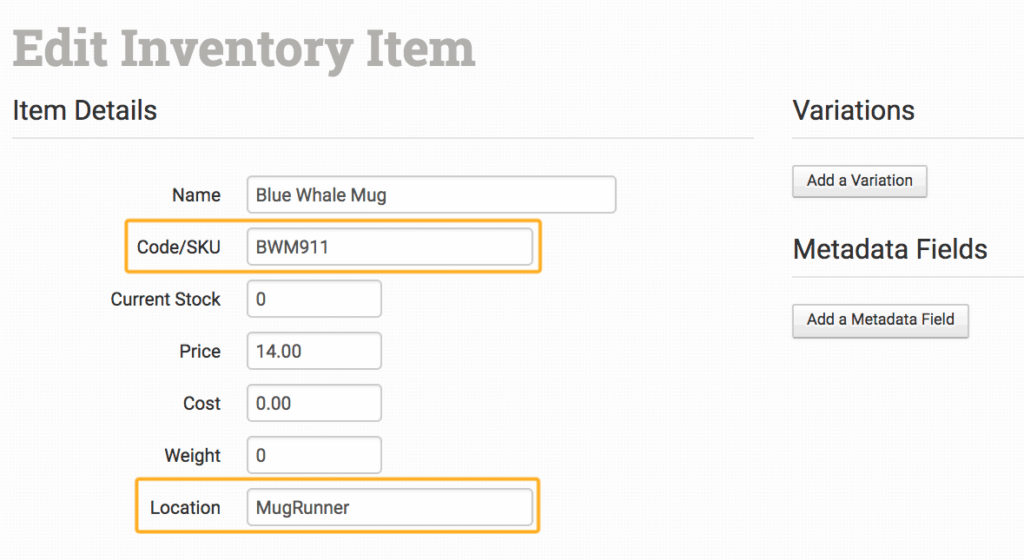
In our example store, we have two items, Blue Whale Mug and Giraffe Figurine. We can click on the item name to look at the details saved to it. Every item needs to have two main details: a unique Code/SKU that isn’t shared with any other product you sell and a Location name, which is the name of the vendor or fulfillment service
For the Blue Whale Mug, the SKU is BWM911 and the vendor’s name is MugRunner, set in the Location field:
For the Giraffe Figurine, the SKU is GF008 and the vendor’s name is Safari Depot, set in the Location field:

A unique SKU is needed for each item because this is how Order Desk matches the items in the order with the items saved here. When the SKUs match, the extra details saved to the item will be synced into the order, so each item in the order will include the vendor location.
IMPORTANT
To sync inventory details into your orders when they import, make sure Add Inventory Details to Order Items in your Store Settings is enabled. For instructions, please refer to our Store Settings guide.
Make sure the vendor location name is consistent on all products for that vendor. Using Safari Depot as an example, all products should say “Safari Depot”. If some products are Safari Depot, others are safari depot, others are SafariDepot, etc., they will technically be different names from each other. It doesn’t matter what you use for the location name, just as long as you use the same spelling, punctuation, capitalization and spaces on each.
Adding Inventory to Order Desk
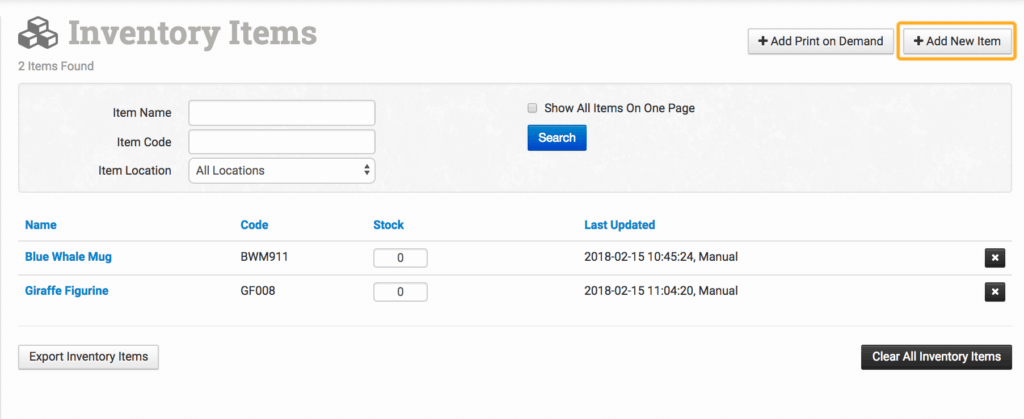
There are a few ways to add your inventory to Order Desk. You can add products one at a time from the Inventory Items page by clicking on the +Add New Item button in the top right.
Or, if you have a large number of products, you can add them all at once from a spreadsheet using an import template. Please read this guide for instructions on how to create an import template to match your file so you can add your items to Order Desk.
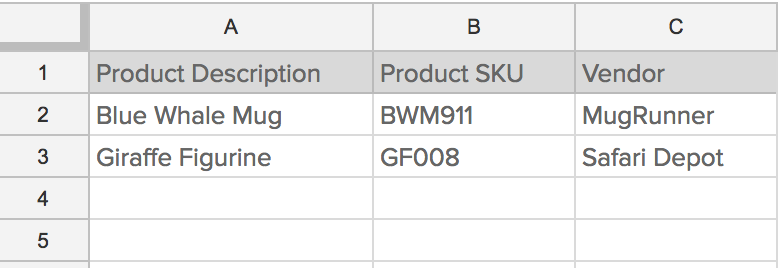
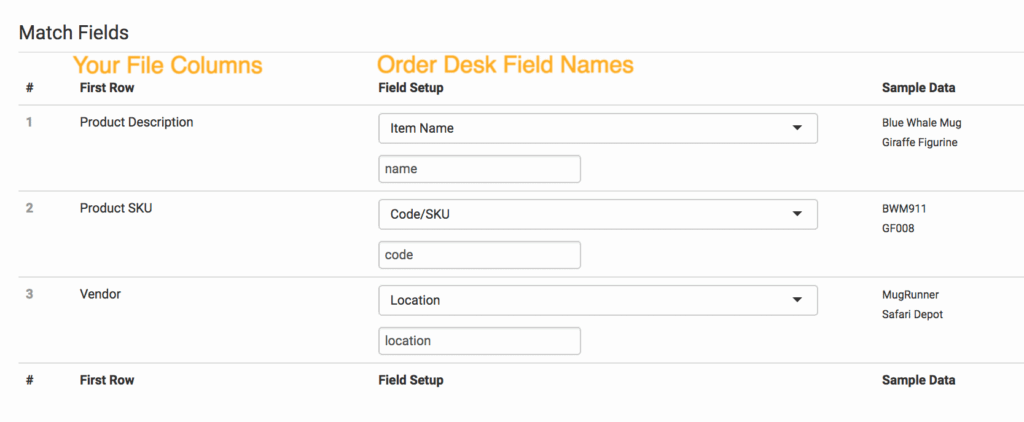
Be sure that your file includes a column with the location name. You may need other fields as well, depending on the data you want to save to your items, but the fields you will definitely want to include are the item name, the SKU and the location:
When setting up your import template, you will need to match each of the columns in your file that you want to import to the field names Order Desk uses. Make sure the vendor name is mapped to the location field:
Split Orders
Once your inventory is saved to Order Desk, you can set up your split rules.
The location that we set on each item is called item metadata—extra details added to the item. This is how you will split orders.
If you aren’t yet familiar with the Order Desk Rule Builder, please take a few minutes to read through this guide for a brief overview of what the rule builder does and how it works before continuing on with the instructions in this guide.
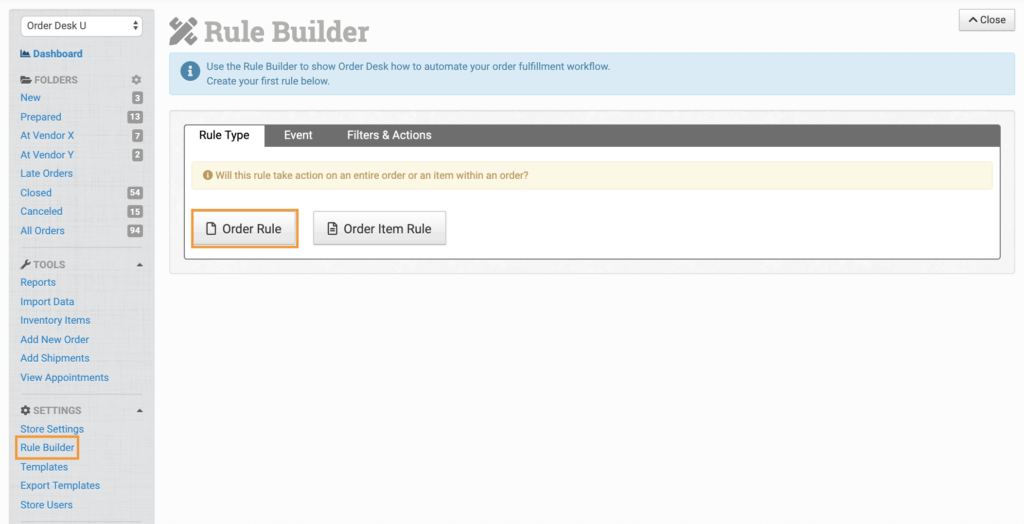
To create your split rules, in the Rule Builder create an Order Rule rule type:
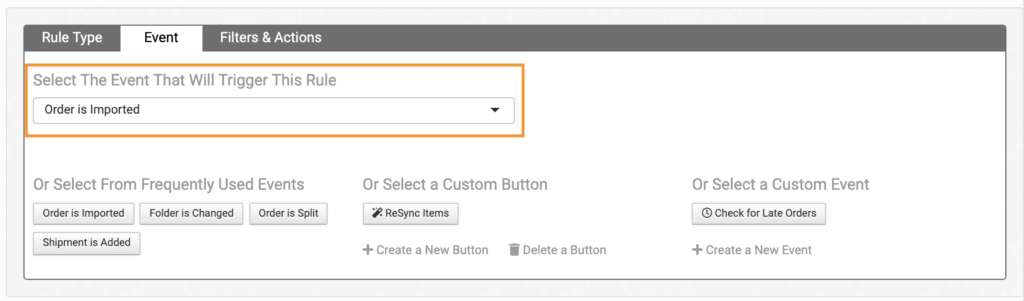
And then select Order is Imported for the event:
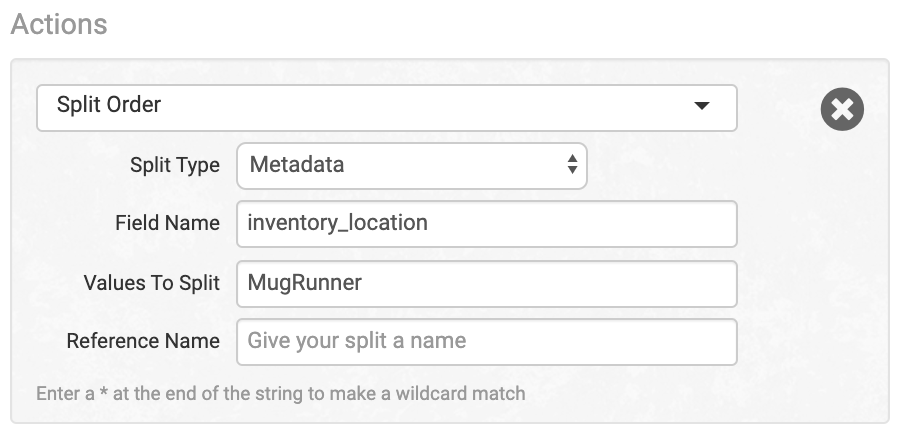
Under the Filters & Actions tab, select Split Order as the action.
For the Split Type, choose Metadata.
In Field Name, type in inventory_location.
In Values To Split, type in your vendor name. For instance, a rule to split out MugRunner products would be:
You can set up a separate split rule for each separate vendor, or you can split all orders by the inventory_location field by leaving the Values To Split field empty. This allows you to split several vendors without setting up a separate rule for each, though be careful that all items have the inventory_location name filled out appropriately. These fields are case sensitive, so mugrunner and MugRunnder would split into separate orders.
The Reference Name field is optional. When a split rule runs, a split_title will be added to the order metadata. If the Reference Name is filled out, the name will be added to the split_title info added in the order metadata.
Create Dropship Email Templates
If you aren’t familiar with email templates, please read our Working with Email Templates guide before continuing with the instructions in this section.
Follow the instructions for creating an email template in the Working with Email Templates guide. The default template created will be a shipment notification template. For this template, we will be using our Dropship Email Template code instead.
To add this code to your email template, delete all of the text in the existing template:
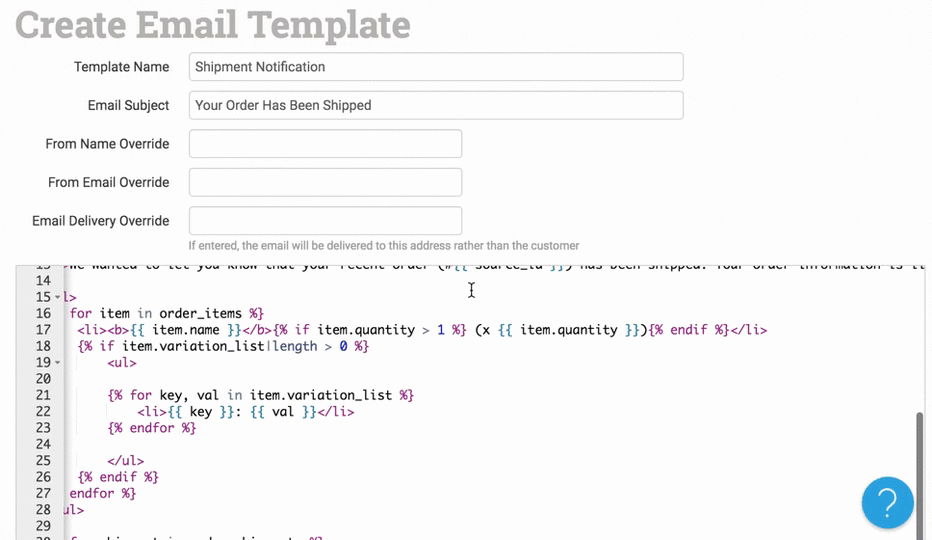
Go to our Dropship Email Template guide and copy the entire email from line 1 through line 52. Paste this into the template that you just deleted.
You can see that your new email template now has information about the order that needs to be shipped, including a line asking your vendor to fulfill the order.
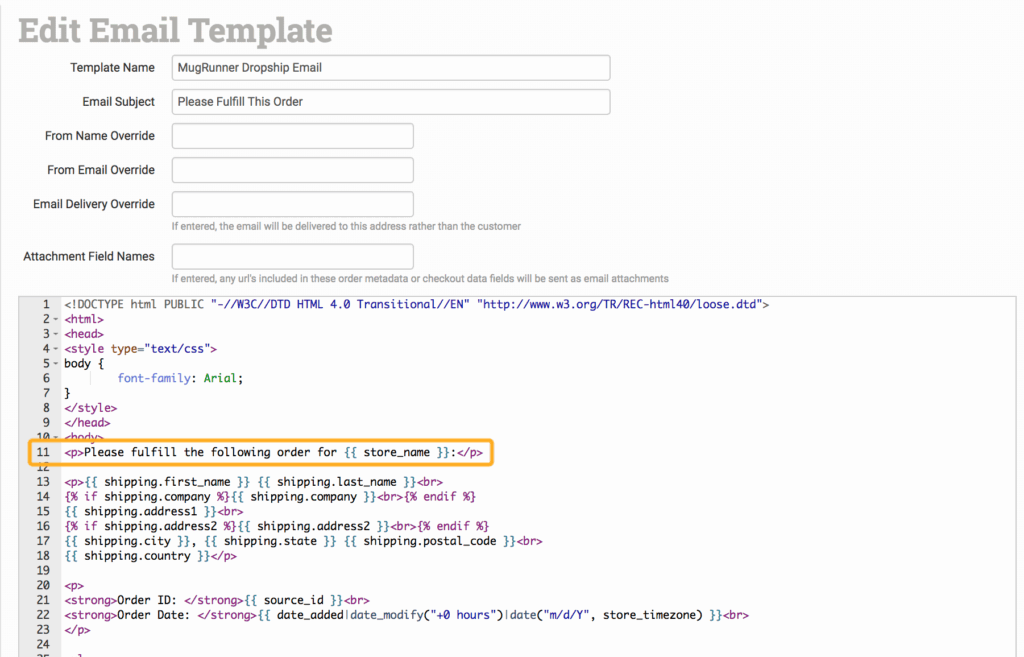
You can leave this template the way it is or customize it so it says exactly what you need it to say. You may want to add your vendor’s name or put in some other personal information. For example:
<p>Hi Tom, please fulfill the following order for {{ store_name }}:</p>
There are instructions in the Sample Dropshipping Email Template guide for how to include a link to a printable packing slip in your vendor email template.
IMPORTANT
If you are not familiar with code, be careful to only edit the text. Leave any tags and code as they are in the template. These format the email and automatically pull in the store and order information.
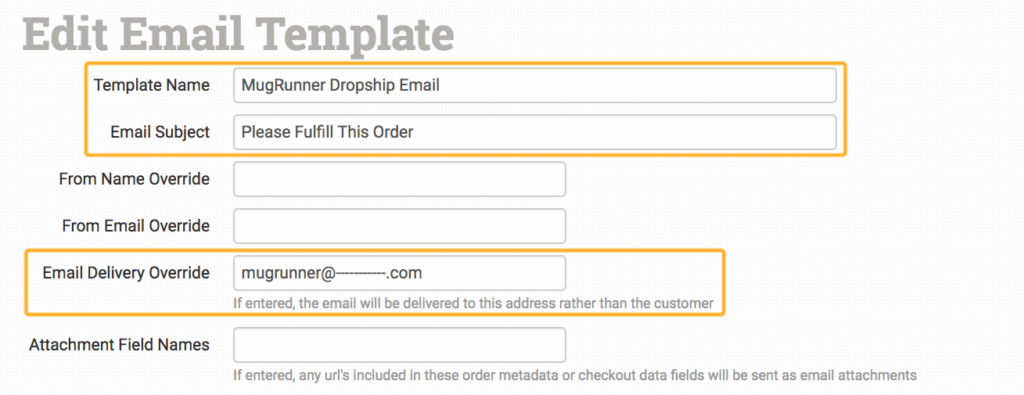
Next, change the Template Name, Email Subject and add your vendor’s email address to the Email Delivery Override.
Make any other changes necessary following the Working with Email Templates guide for more information.
Once finished, click Add New Template below the email to save your template.
Create a separate email template for each vendor you use. You can do this by clicking on the copy button for your existing template:
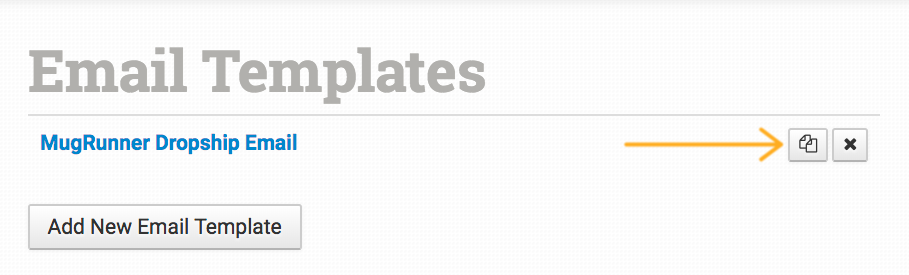
Edit the details in any copied templates for your other vendors.
Create Email Rules
Now that your inventory is saved in Order Desk, your orders are splitting by vendor location and you have email templates created, you can create the rules that will email your vendors about their orders.
Head back into the Rule Builder and create a rule for the event When Order is Split.
Add a filter for this rule, replacing XXX with your vendor name exactly as it is written in the location field on those products, that says:
If Item Metadata Field inventory_location Equals XXX
Set up two actions. First, select the Send Email To Customer action and select that vendor’s dropship email template that you created in the last step. If you set the vendor’s email address as the delivery override in the template, the email will go to the vendor instead of the customer.
Second, add the Change Folder action and select the folder you want these orders to move into after the vendor is emailed. You may choose to move all of your orders to Prepared, or you may want to set up separate folders for each vendor called At MugRunner and At Safari Depot, etc., so you know which orders are still being fulfilled by specific vendors.
Your rule will look like this:
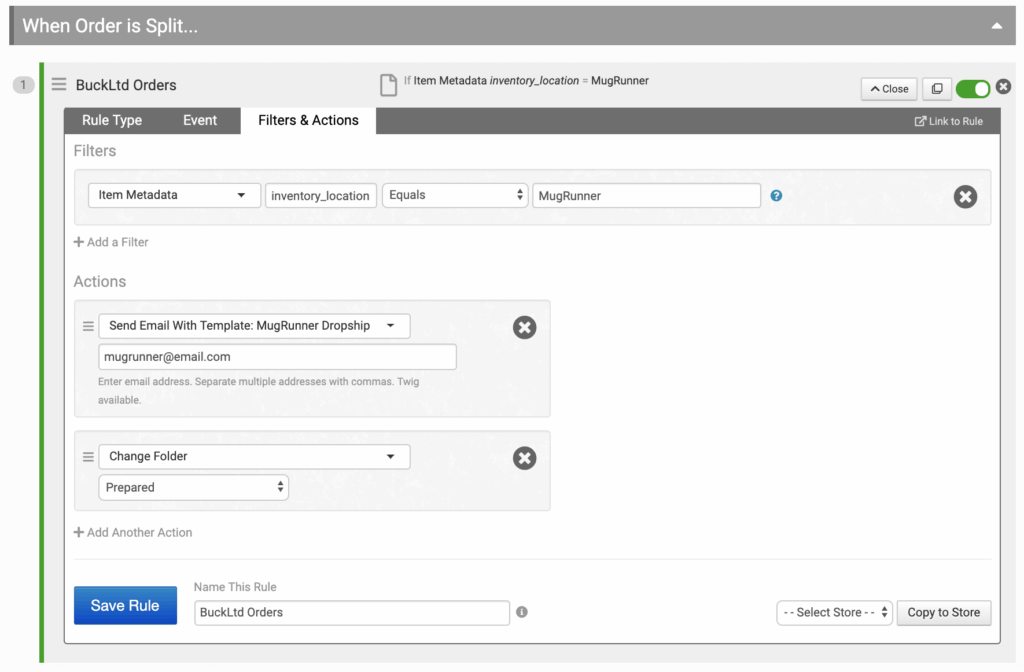
Set up a separate rule for each vendor.
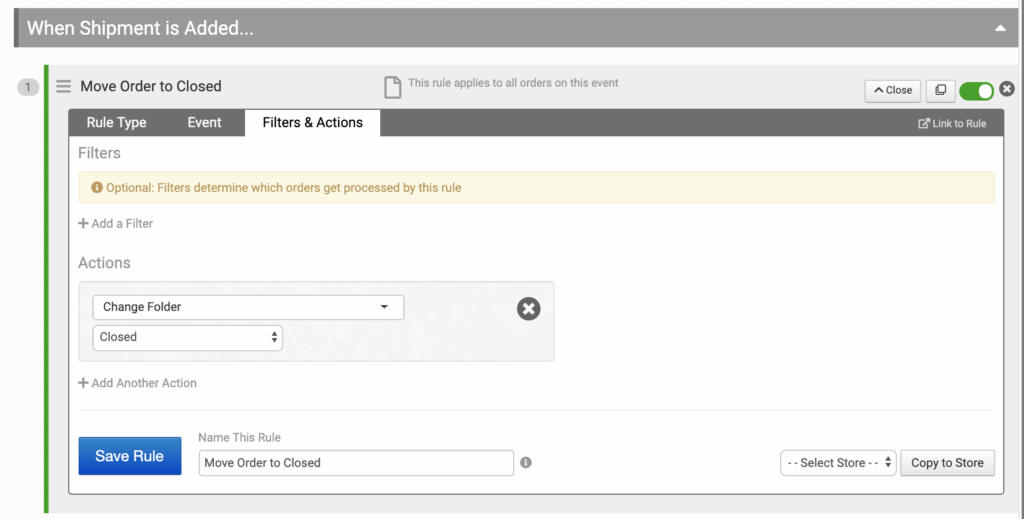
Get Tracking Details
The dropship email template you send to your vendors provides them with a link to click to add shipment details to each order. When they add the details, they will automatically be updated on the order in Order Desk.
Set up one last rule to move these orders to the Closed folder when shipment is added:
Check your shopping cart integration settings to see if you can sync tracking numbers back to the cart to notify your customer and close the order. You can also email your customer from Order Desk to notify them about the shipment.
FAQ
I have several vendors. Some require an email like this guide explains, but others require orders be sent to them in an exported file or through an integration directly. How do I do that?
In this guide, we discuss how to set up different rules to email different vendors. Instead of choosing the email action in the rule for a vendor that is already integrated with Order Desk, choose the Submit to Vendor action instead.
For vendors that require an exported template, choose the Change Folder action and select the folder that your export template will pull orders from for that vendor. See our Export Templates guide for more information.
What do I do with any split orders that I don’t need to have fulfilled through Order Desk?
Instead of selecting an action that will email or submit these orders to a vendor, select the action to Change Folder and move them to the Closed folder.