Build your own customized CSV, XLSX, or TXT files with the export template feature in Order Desk. These files can be used to send orders or other information to third party vendors or for keeping more detailed records and custom reports for your store.
An export template lets you indicate the information you want in your file. You can create as many different export templates as you need.
To access export templates in Order Desk, click on Export Templates under the Settings menu in the left sidebar.

If you already have export templates, they’ll be listed on the page with the option to create a new one at the bottom of the list.

If you haven’t created any yet, click on the Add New Export Template button to begin creating a new template.

This guide will go over all of the settings in an export template and what they mean, Template Details, Template Actions, Automatic Processing, Selected and Available Fields and Field Filters, and it will cover how to export files once you have a template created.
Create Your Template: Details

Name
Give your a template a unique and easily identifiable name so you can differentiate between multiple templates if you create more than one.
File Name
Choose your file name if you want to change it from the default.
Set {datetime} in the file name for it to display the date and time.
Set {date} in the file name for it to display the date only.
Set {date1} in the file name for it to display the date in yyyymmdd format.
Set {weekdayname} in the file name for it to display the name of the weekday the file is exported.
Set {storename} in the file name for it to display the name of the store.
Set {sequence} in the file name to append a new sequential number to each exported file.
Set {ordercount} in the file name to add the number of orders in the file. You can also use {ordercount-pad3} to pad the number by up to 2 zeros before the number, or use {ordercount-pad5} to add up to 4 zeros.
To export a TXT file instead of a CSV file, change the extension to .txt in the file name.
To export an XLSX file, change the extension to .xlsx and add XLSX as a custom parameter to the template.
One Line Per
Order
If no product fields are added to the template, set to One Line Per Order.
Each separate order will be on its own line, and the product information from the orders won’t be included:

Order Item
If you add any product fields to the template (fields specifically about the items that were ordered), you must choose One Line Per Order Item, so an order with more than one item in it will export each item on a separate line in the file.
Each separate item (product) in an order will get its own line in the exported file:
Shipment
Set to One Line Per Shipment if your file will be exporting the shipment info from the Order Shipment Fields:

If you are exporting a Shipment type file but an exported order does not have any shipment info in it, the entire line for that order (regardless of what other fields are being exported) will be empty. The order will not export in that file.
Delimiter
The delimiter is how the data is separated in a file. Most files use comma separated values (CSV), even if you can’t see the commas when looking at a spreadsheet. If you don’t know what delimiter you need, it’s usually safe to keep it set to comma. You can always adjust this setting later if you find out the file needs a different delimiter type.
Custom Parameters
For some added functionality, these parameters can be used in the custom parameters field in an export template. If using more than one parameter, separate them with a space.
| Custom Parameter | Description |
| NO-TITLE-LINE | Skip the title line |
| CRLF | Use Windows line endings (\r\n), default is Unix (\n) |
| NO-BOM | Skip the UTF-8 encoding characters placed at the front of the document |
| XLSX | Use to export an XLSX file. You will also need to change the file name extension to .xlsx |
| ISO-8859-1 | Convert the character encoding from UTF-8 to ISO-8859-1 |
| NO-WEEKEND | Do not run the report on Saturday or Sunday local store time |
| NO-SUNDAY | Do not run the report on Sunday local store time |
| FORCE-QUOTES | Put quotes around all fields regardless of whether they are actually required |
| LITERAL-HEADER-QUOTES | Quotes added if they are typed into a header |
| MAX5K | Override the 2000 order limit; export up to 5000 orders |
| EACH-LINE-TOTAL | Order totals shown on each line item when more than one item per order |
| COLUMN-NAME-FILTERING | Run filters against column names as well as field names |
| ORDER-DETAILS-ONCE | Export order details only once; extra lines per order will be item details only |
| ORDER-BY-SOURCE-ID | Orders will be sorted by source ID as text. This will only work for files with fewer than 500 records. |
| ORDER-BY-CODE | Orders with more than one item will have the lines arranged alphabetically by the code/SKU. |
| ORDER-BY-NAME | Orders with more than one item will have the lines arranged alphabetically by the product name. |
| CUSTOM-DELIMITER:* | If your file does not use comma, tab, pipe or semicolon as the delimiter, use CUSTOM-DELIMITER:* and replace the * with the delimiter, e.g. CUSTOM-DELIMITER:^, CUSTOM-DELIMITER::, or CUSTOM-DELIMITER:- |
Inventory Location Match
Inventory location is a field that can be set on individual inventory items in Order Desk.
You can set the inventory location name in the inventory location match field of an export template to include only items with that location name. If any orders selected for export have items that do not match this inventory location, they will not be included in the file.
Add Lines Per File | Add Lines Per Order | Add Lines Per Order Item
If you need to add a line in the exported file, set this up with the Add Line Per File option.

The exported file will have this information added in an extra line:

If you need extra lines per order or per order item, you can set this up with the Add Lines Per Order and Add Lines Per Order Item settings.
Select the option(s) you need and add the field names to the corresponding box in the layout in which it should be exported. Separate columns with a comma. New lines will be created in the exported file for each new line added in the box.
For example, if you need the item name and SKU on the first line and the item price on the second line, set it up as:

This would be exported into a file as:

Use the field names that are in the Available Fields section below.
Create Your Template: Actions
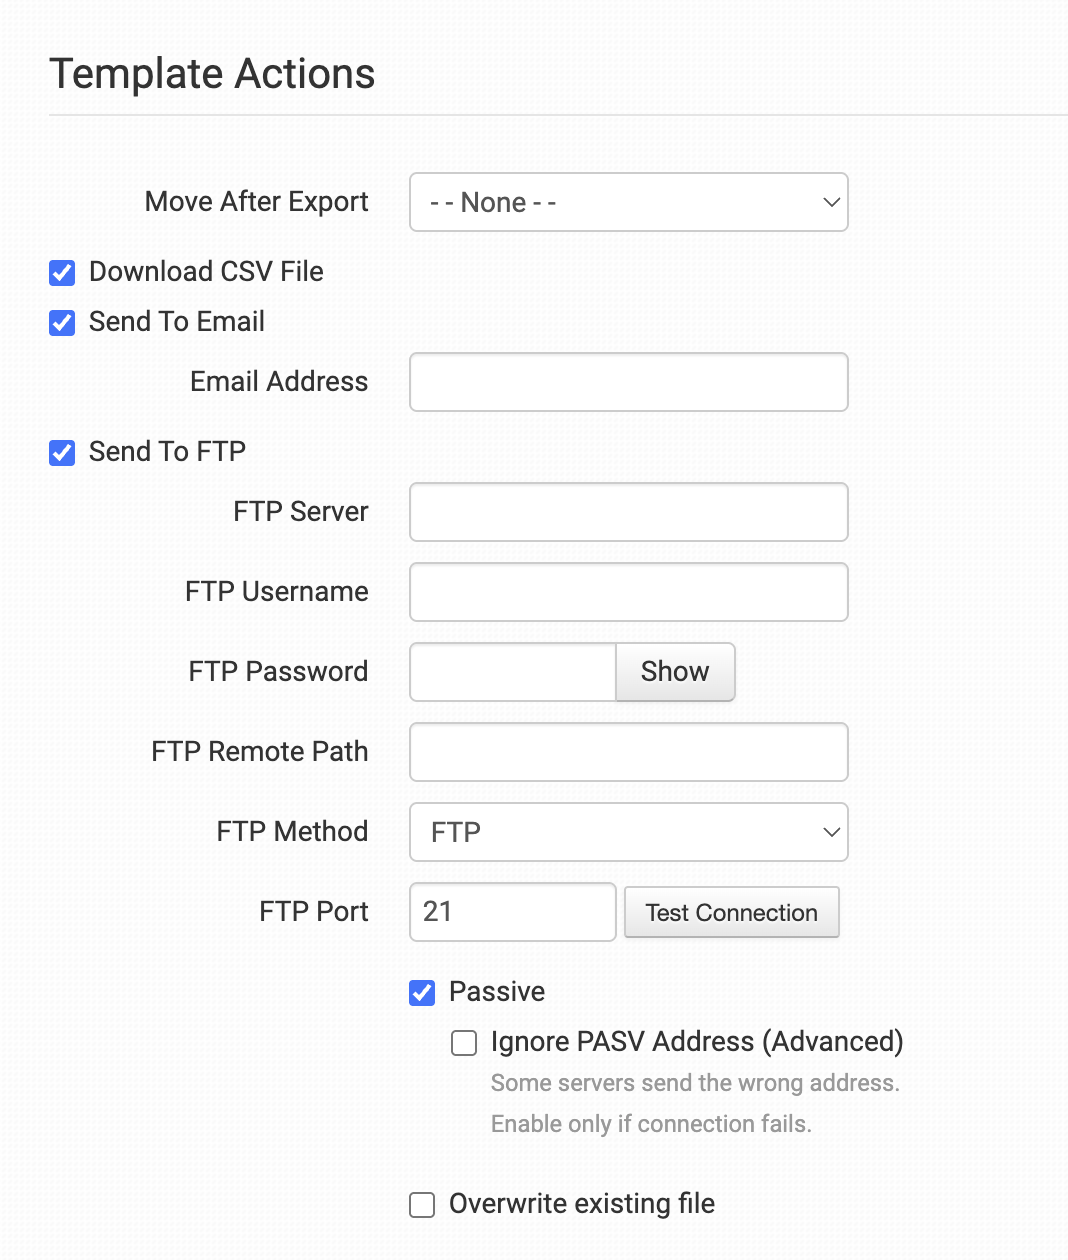
Move After Export
Select the folder you want to move orders to after this export template is run. If you don’t want your orders to move, keep this set to –None–.
IMPORTANT
If you set up your template to run automatically, it will export the same orders over and over unless you move them into another folder after the export runs.
Download CSV File
If this setting is enabled, when you manually run an export, the file will download to your computer.
If the export template is running automatically and you also have this setting enabled, the file will not download automatically, but you can download it from your completed exports, accessible by clicking on Show All Completed Exports from the export templates page.

Send To Email
If you want to send the exported file to a specific email address, set it here. Multiple email addresses can be separated with a comma.
The file will be emailed as an attachment. The email that is sent can be customized from the templates page under the Order Export Email Templates section. If you have created any custom templates, you’ll be able to choose from a dropdown under the email address which template to use. If you have not created any custom templates, the default template will be used and you will not see a dropdown here.
For more information on working with email templates, please refer to this guide.
Send To FTP
If exporting the file through FTP, set the FTP credentials here:
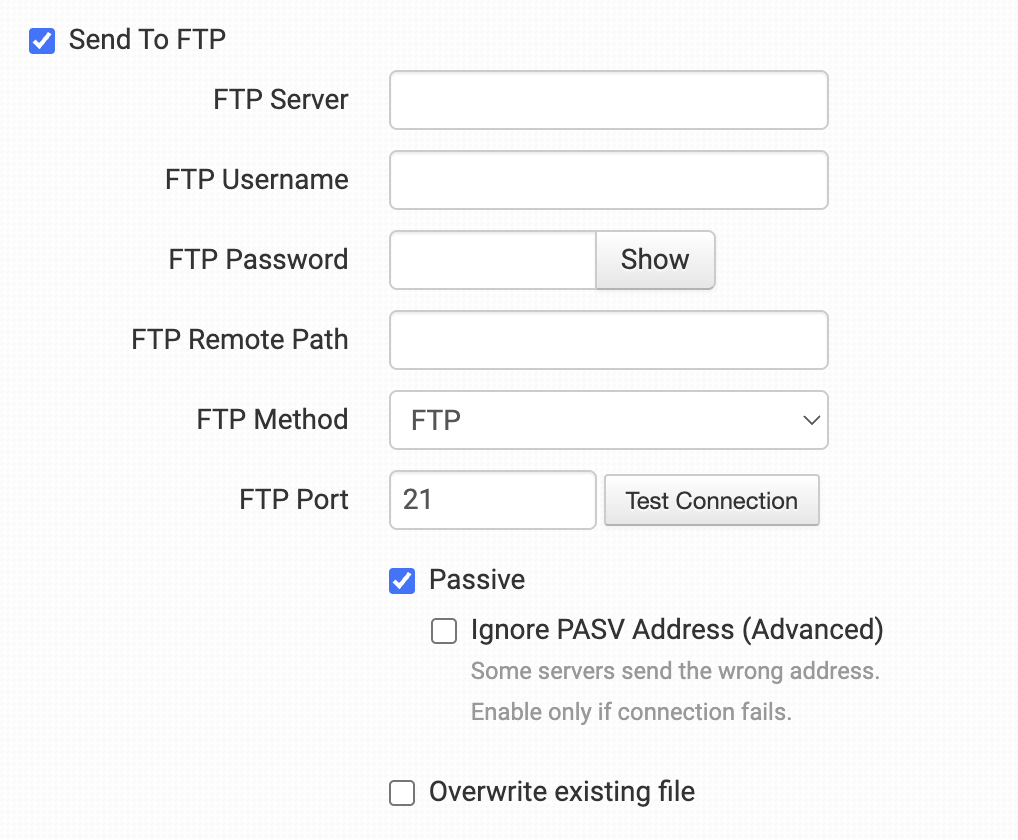
TIP: TESTING YOUR FTP CONNECTION
After entering your credentials, you can test your FTP connection by clicking Test Connection.
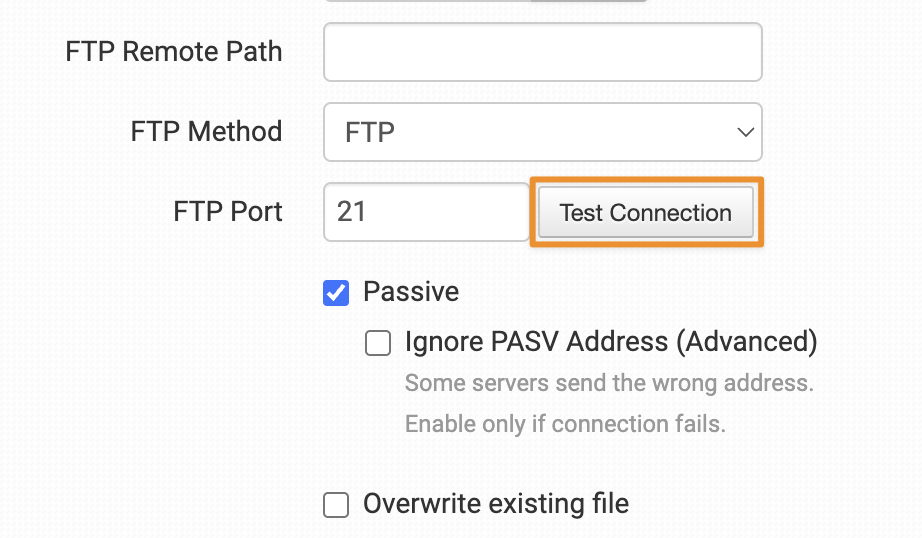
A dialog will appear where Order Desk attempts to connect to your FTP server. After a few seconds, you’ll see a message confirming whether the connection was successful.

This provides a handy way to verify and troubleshoot any connection issues before starting your actual exports.
Create Your Template: Automatic Processing

If you want your export template to run automatically on a schedule, select the Process This Export Automatically option. For automatic processing to work, your template actions must be set to either send a file through email or FTP.
Schedule
Select the schedule to tell the template how often to run automatically. Options are: Hourly, Four Times Daily, Twice Daily, Daily, Weekly and Monthly.
IMPORTANT
The Four Times Daily schedule will run every six hours. The Twice Daily option will run every twelve hours. If you need to run your exports at specific times outside of those intervals, copy your template and set each copy to run Daily at the specific times.
Folder
Select the folder from which the export template should pull orders. If there are no orders in the folder, the template will not run.
If you are running the template automatically, you will probably want to move the orders into another folder after they export. Set this in the Move After Export dropdown in the Template Actions.
Start Date
The appointment will run on the schedule starting from when the template is created. If you need the appointment to run at a specific time, adjust the start date and time to your preference.
Need to update the schedule for a template that has already been running?
If so, please change the time for the template in this setting and not from the appointments page. Make sure to also update the date, as a date in the past will never start running at a new time. For all the features Order Desk offers, time travel is not one of them.
Create Your Template: Fields
Available Fields
Your export template will need some fields in it—the data that will be exported into your file.
Add, customize, and arrange these fields under the Selected Fields section. You can choose your fields by selecting them from the drop down options and clicking Add.

Rearrange the fields into the order you want by dragging them into place:

Rename the fields if you need them to have specific names.
As an example, if you need the code field to be called “SKU” or the name to be “PRODUCT” in the title line of the exported file, edit the default names that were added by Order Desk:

The value field can be left alone unless you need to combine data or customize any metadata, variations or checkout data.
For example, if you need the Shipping First Name and Shipping Last Name to be in the same column in your file, add both fields to the same value box: {shipping_first_name} {shipping_last_name}. You can rename the field to “Shipping Name”. Don’t forget to remove the Shipping Last Name column now that both names are in the same column.

To add individual metadata, variation or checkout data fields to the file, select the appropriate field from the available fields and adjust the value to match the specific name you have set for the metadata, variation or checkout data.
For example, let’s say you have two variations on some of your products, specifically Color and Pattern:

Choose Single Variation from the available fields for as many variations as you want to include in the exported file. In this example, we’ll add it twice, one for Color and one for Pattern.
The title will say Single Variation and the value will be {variation_list|?}.

These need to be tweaked to fit your specifications. In our example, we’ll change the names to Color and Pattern, and we need to swap out the ? with the actual variation name. The variation name replacing the ? will need to be an exact match and case sensitive. These two variations will look like this in the template:

Do the same for any metadata and checkout data fields that will be added to your template.
IMPORTANT
If you add any product fields to your template, make sure your template is One Line Per Order Item. If set to One Line Per Order, product details will be left out of the file.
Custom Fields
There are some custom fields that can also be used in your export template, though they aren’t listed under Available Fields. These fields are listed below with a description of each. Remember to set them inside {curly braces}.
| empty | Keeps the field empty in the file. The field can also be left blank for it to stay empty. |
| today | Adds the current date of the day the file is exported. |
| yesterday | Adds the date of the day before the file is exported. |
| tomorrow | Adds the date of the day after the file is exported. |
| line_number | Numbers each of the line items in an order starting at 1. |
| order_line_number | Counts the number of orders in the file but adds repeat numbers for orders with multiple line items. |
| current_line_number | Shows the current file line number, starting with 1 and going through the number of lines the file has. |
| current_line_item | This references the current item being looked at in a one-line-per-item export. |
| shipping_country_abbr | Use for the two digit country code. |
| shipping_country_abbr_three | Use for the three digit country abbreviation. |
| shipping_state_abbr | Use the two digit state code. |
| shipping_country_full | Use for the full country name. |
| coupon_list | Lists all coupon/discounts used on order. |
Create Your Template: Filters

For instructions on how to work with the field filters in an export template, please refer to the Export Template Field Filters guide.
Special and custom fields are also covered.
Copy Templates from Other Stores
If you have more than one Order Desk store, you can copy any of your export templates into another one of your stores. To do this, go into the store you want to copy a template into, and on the Export Templates page, look underneath any export templates you may already have.
The dropdown will show a list of all export templates for each store you have. Select the template you want to copy into your current store and click Import To This Store.

Export Files
Now that you have an export template created, you can begin to export your files.
If an exported file includes more than 500 records, it will be queued and completed by background services to prevent a timeout that could keep you waiting. When complete, the file will be processed as normal, unless set to download, in which case it will be emailed to the Order Desk store admin email.
Automatic Exports
If you’ve set up the template to export automatically, it will begin exporting on the schedule you chose. You won’t need to do anything else. However, if you ever want to run the template ahead of schedule, you can do so from your View Appointments page. Find the appointment for your export template and click on Run.

Manual Exports
Before doing a manual export, don’t forget that if your export template has the Move After Export option set to a specific folder, any orders you export, even manually, will be moved into that folder after the file is sent. If you don’t want your orders to move into another folder, make sure this is set to –None–.
To manually export orders, select the orders you want to export and then click the Export Checked button and choose the export template you want to use.

Alternatively, you can export an entire folder by clicking the Export All Pages button while viewing that folder. Select the template you want to export.
