# Order Desk Knowledge Base

## <i class="fa-books">:books:</i> Order Desk Knowledge Base <a href="#s-hero" id="s-hero"></a>

In your own words, tell us what you’re trying to do. We’ve written <mark style="color:$info;">**400+**</mark> guides and counting. We should be able to point you to the right one.

<button type="button" class="button primary" data-action="ask" data-icon="gitbook-assistant">Ask a question…</button>

<button type="button" class="button secondary medium" data-action="ask" data-query="How do I connect an integration" data-icon="gitbook-assistant">Connect an integration</button> <button type="button" class="button secondary medium" data-action="ask" data-query="How do I split an order in Order Desk" data-icon="gitbook-assistant">Split an order</button> <button type="button" class="button secondary medium" data-action="ask" data-query="I&#x27;d like to import a spreadsheet file into Order Desk." data-icon="gitbook-assistant">Import a file</button> <button type="button" class="button secondary medium" data-action="ask" data-query="How do I export a spreadsheet or csv file from Order Desk" data-icon="gitbook-assistant">Export a file</button><button type="button" class="button secondary medium" data-action="ask" data-query="I&#x27;d like to send an email from Order Desk" data-icon="gitbook-assistant">Send an email</button>

### Not sure where to start?

<table data-card-size="large" data-view="cards"><thead><tr><th></th><th></th><th data-hidden data-card-target data-type="content-ref"></th><th data-hidden data-card-cover data-type="image">Cover image</th></tr></thead><tbody><tr><td><h4>Learn the basics</h4></td><td>If you’re setting up a store for the very first time, this is a great place to start.</td><td><a href="/start-here/learn-the-basics">Learn the basics</a></td><td><a href="https://251457507-files.gitbook.io/~/files/v0/b/gitbook-x-prod.appspot.com/o/spaces%2FAQOLMUJWMYtrpQ7Oxxca%2Fuploads%2Fp7y0gtKh9y0GGsquqYTj%2Fkb-od101.png?alt=media&#x26;token=0e4e46e0-9c80-413d-93e2-1e515395e947">https://251457507-files.gitbook.io/~/files/v0/b/gitbook-x-prod.appspot.com/o/spaces%2FAQOLMUJWMYtrpQ7Oxxca%2Fuploads%2Fp7y0gtKh9y0GGsquqYTj%2Fkb-od101.png?alt=media&#x26;token=0e4e46e0-9c80-413d-93e2-1e515395e947</a></td></tr><tr><td><h4>Guided walkthroughs</h4></td><td>Step by step instructions that include video tutorials, webinars, pro-tips, and more.</td><td><a href="/guided-walkthroughs/using-order-desk">Using Order Desk</a></td><td><a href="https://251457507-files.gitbook.io/~/files/v0/b/gitbook-x-prod.appspot.com/o/spaces%2FAQOLMUJWMYtrpQ7Oxxca%2Fuploads%2Fai0kFISwNpTS8sCQMrQu%2Fkb-guided.png?alt=media&#x26;token=1519c0bf-7b44-49ce-87a8-324f0231be6e">https://251457507-files.gitbook.io/~/files/v0/b/gitbook-x-prod.appspot.com/o/spaces%2FAQOLMUJWMYtrpQ7Oxxca%2Fuploads%2Fai0kFISwNpTS8sCQMrQu%2Fkb-guided.png?alt=media&#x26;token=1519c0bf-7b44-49ce-87a8-324f0231be6e</a></td></tr><tr><td><h4>Integration setup guides</h4></td><td>Learn everything about how to connect your specific integrations to Order Desk.</td><td><a href="/integration-setup-guides/find-an-integration">Find an Integration</a></td><td><a href="https://251457507-files.gitbook.io/~/files/v0/b/gitbook-x-prod.appspot.com/o/spaces%2FAQOLMUJWMYtrpQ7Oxxca%2Fuploads%2FwlwbyuFBZzZ2fIfW0v6Q%2Fkb-integrations.png?alt=media&#x26;token=f7a5d0c6-48be-4184-9f84-c937cfc43262">https://251457507-files.gitbook.io/~/files/v0/b/gitbook-x-prod.appspot.com/o/spaces%2FAQOLMUJWMYtrpQ7Oxxca%2Fuploads%2FwlwbyuFBZzZ2fIfW0v6Q%2Fkb-integrations.png?alt=media&#x26;token=f7a5d0c6-48be-4184-9f84-c937cfc43262</a></td></tr><tr><td><h4>Technical documentation</h4></td><td>Learn the ins and outs of every feature in Order Desk with our thorough technical documents.</td><td><a href="/technical-documentation/templates-and-documents">Templates and Documents</a></td><td><a href="https://251457507-files.gitbook.io/~/files/v0/b/gitbook-x-prod.appspot.com/o/spaces%2FAQOLMUJWMYtrpQ7Oxxca%2Fuploads%2FlI1UJrkCDg1VYDtFce5P%2Fkb-technical.png?alt=media&#x26;token=6c1792d6-aabe-4c8a-956c-d6b47e257af3">https://251457507-files.gitbook.io/~/files/v0/b/gitbook-x-prod.appspot.com/o/spaces%2FAQOLMUJWMYtrpQ7Oxxca%2Fuploads%2FlI1UJrkCDg1VYDtFce5P%2Fkb-technical.png?alt=media&#x26;token=6c1792d6-aabe-4c8a-956c-d6b47e257af3</a></td></tr></tbody></table>

***

<table data-card-size="large" data-card-wrap="false" data-view="cards"><thead><tr><th><select><option value="6kSX428fOB5M" label="MOST POPULAR GUIDES" color="blue"></option><option value="g33sG5pI385x" label="RECENT GUIDES" color="blue"></option></select></th><th></th><th data-hidden data-card-target data-type="content-ref"></th></tr></thead><tbody><tr><td><span data-option="6kSX428fOB5M">MOST POPULAR GUIDES</span></td><td><p><a href="/guided-walkthroughs/print-on-demand-walkthrough/print-on-demand-fulfillment">Print On Demand Fulfillment</a></p><p><a href="/integration-setup-guides/print-on-demand/gelato-integration">Gelato Integration</a></p><p><a href="/integration-setup-guides/fulfillment-services/fragrancex-integration">FragranceX Integration</a></p><p><a href="/integration-setup-guides/print-on-demand/lulu-direct-integration">Lulu Direct Integration</a></p><p><a href="/guided-walkthroughs/templates-emails-and-order-documents/how-to-create-pdf-files-for-order-documents">How to Create PDF Files for Order Documents</a></p></td><td></td></tr><tr><td><span data-option="g33sG5pI385x">RECENT GUIDES</span></td><td><p><a href="/guided-walkthroughs/integration-specific-walkthroughs/using-gelato-with-order-desk">Using Gelato With Order Desk</a></p><p><a href="/integration-setup-guides/print-on-demand/pictorem-integration">Pictorem Integration</a></p><p><a href="/integration-setup-guides/print-on-demand/ready2hangart-integration">Ready2HangArt Integration</a></p><p><a href="/guided-walkthroughs/integration-specific-walkthroughs/how-to-match-shopify-to-amazon-mcf-skus">How to Match Shopify to Amazon MCF SKUs</a></p><p><a href="/start-here/getting-started-video-series/how-to-use-rules-video">How to use Rules Video</a></p></td><td></td></tr></tbody></table>

***

{% columns %}
{% column valign="middle" %}

<figure><img src="https://251457507-files.gitbook.io/~/files/v0/b/gitbook-x-prod.appspot.com/o/spaces%2FAQOLMUJWMYtrpQ7Oxxca%2Fuploads%2FuRMDEIDTnfmzppAz2fqw%2Fexec-3dd1afb3-f5ba-4cce-b20a-e0f3873ac438.png?alt=media&amp;token=416644e5-9e13-4510-98b9-edfd440d5c4f" alt=""><figcaption></figcaption></figure>
{% endcolumn %}

{% column valign="middle" %}

### Still stuck?

We wrote every guide here and we answer emails too. If something here is confusing, out of date, or just missing something you need, let us know. We’d rather fix the guide than have you fight with it.

Email us at <support@orderdesk.com>.
{% endcolumn %}
{% endcolumns %}

{% hint style="info" %}
Some links on this website may contain referral codes. Order Desk may earn a small commission when certain links are clicked.
{% endhint %}


# Learn the basics

<table data-card-size="large" data-view="cards"><thead><tr><th></th><th></th><th></th><th data-hidden data-card-cover data-type="image">Cover image</th></tr></thead><tbody><tr><td><h4>New to Order Desk?</h4></td><td>Start here if you have never used Order Desk before.</td><td><p><a href="/start-here/learn-the-basics/what-is-order-management">What is Order Management?</a></p><p><a href="/start-here/learn-the-basics/what-is-order-desk">What is Order Desk?</a></p><p><a href="/start-here/learn-the-basics/what-are-integrations">What are integrations?</a></p><p><a href="/start-here/learn-the-basics/how-does-order-desks-pricing-work">How does Order Desk pricing work?</a></p></td><td><a href="https://251457507-files.gitbook.io/~/files/v0/b/gitbook-x-prod.appspot.com/o/spaces%2FAQOLMUJWMYtrpQ7Oxxca%2Fuploads%2FhrvaxVUVFEH9KsUAOwVw%2Fkb-questions.png?alt=media&amp;token=e5394705-4d0c-4c18-9920-b9aed2376693">kb-questions.png</a></td></tr></tbody></table>

***

## Set up your store

<table data-card-size="large" data-view="cards"><thead><tr><th></th><th></th><th data-hidden data-card-target data-type="content-ref"></th><th data-hidden data-card-cover data-type="image">Cover image</th></tr></thead><tbody><tr><td><h4>Get Organized</h4></td><td><p><a href="/guided-walkthroughs/using-order-desk/how-to-add-your-team-to-your-store">Add Your Team To Your Store</a></p><p><a href="/guided-walkthroughs/orders-and-folders/organizing-orders-with-folders">Organizing Orders With Folders</a></p><p><a href="/guided-walkthroughs/using-order-desk/how-to-configure-your-store-settings">Configure Your Store Settings</a></p></td><td><a href="/guided-walkthroughs/using-order-desk/how-to-add-your-team-to-your-store">How to Add Your Team To Your Store</a></td><td><a href="https://251457507-files.gitbook.io/~/files/v0/b/gitbook-x-prod.appspot.com/o/spaces%2FAQOLMUJWMYtrpQ7Oxxca%2Fuploads%2FVFYU0suuE7LsMVoZGFEU%2Fkb-organized.png?alt=media&amp;token=05427153-72b0-4a07-a2af-0686626c4028">kb-organized.png</a></td></tr><tr><td><h4>Begin Your Setup</h4></td><td><p><a href="/guided-walkthroughs/integration-specific-walkthroughs/how-to-use-integrations">How to use integrations</a></p><p><a href="/guided-walkthroughs/rules-and-automations/how-to-create-your-first-automation">Create your first automation</a></p><p><a href="/guided-walkthroughs/orders-and-folders/how-to-begin-importing-orders">Begin importing orders</a></p></td><td><a href="/guided-walkthroughs/integration-specific-walkthroughs/how-to-use-integrations">How To Use Integrations</a></td><td><a href="https://251457507-files.gitbook.io/~/files/v0/b/gitbook-x-prod.appspot.com/o/spaces%2FAQOLMUJWMYtrpQ7Oxxca%2Fuploads%2FO9uA8ibA5pVWw29vRbwx%2Fkb-beginsetup.png?alt=media&amp;token=0b8b19fd-81ea-4b0e-93b6-d81757e1dab1">kb-beginsetup.png</a></td></tr><tr><td><h4>Last Steps</h4></td><td><p><a href="/guided-walkthroughs/products-and-inventory/add-your-inventory">Add your inventory</a></p><p><a href="/guided-walkthroughs/shipping-fulfillment-and-returns/how-to-send-orders-for-fulfillment">Sending orders for fulfillment</a></p><p><a href="/guided-walkthroughs/using-order-desk/my-store-is-set-up-now-what">My store is set up. Now what?</a></p></td><td><a href="/guided-walkthroughs/products-and-inventory/add-your-inventory">Add Your Inventory</a></td><td><a href="https://251457507-files.gitbook.io/~/files/v0/b/gitbook-x-prod.appspot.com/o/spaces%2FAQOLMUJWMYtrpQ7Oxxca%2Fuploads%2FJ44LFHwBHGByI3UU7gQw%2Fkb-laststeps.png?alt=media&amp;token=aeedbac7-4b77-4d20-b88f-60dc082b25bc">kb-laststeps.png</a></td></tr></tbody></table>

### Setting up a specialized workflow?

* [Getting started for printers](/start-here/getting-started-series/getting-started-for-printers)
* [Getting started for suppliers](/start-here/getting-started-series/getting-started-for-suppliers)

{% hint style="info" icon="circle-question" %}
**Not sure which guide applies?** [Contact Order Desk support](https://www.orderdesk.com/contact/).
{% endhint %}


# What Is Order Desk?

![](https://251457507-files.gitbook.io/~/files/v0/b/gitbook-x-prod.appspot.com/o/spaces%2FAQOLMUJWMYtrpQ7Oxxca%2Fuploads%2FpyMeVpWaKUfSqTzBKWPM%2Fmigration-probe.png?alt=media)

Order Desk is an order management system (OMS) that helps ecommerce businesses streamline and automate their order operations. It connects sales channels, fulfillment services, and other tools into a centralized, customizable workflow, giving you more control over how orders are handled from start to finish.

Workflows in Order Desk are customizable through rule-based automation with our **Rule Builder**. Using the Rule Builder, you can set conditions to tag orders, split shipments, send emails, apply custom packing slips, or trigger other actions to take place, helping you to create an enterprise-level workflows at an accessible cost.

If you’re selling across multiple platforms, working with multiple fulfillment partners, or selling in multiple locations, managing the flow of orders can quickly end up becoming complicated and lead to many mistakes and delays over time. Order Desk solves this by bringing everything into one place, and automating the steps that typically require manual input.

### Watch And Learn

Are you a visual learner? Watch below for a top-level view of how Order Desk helps businesses succeed.

{% embed url="<https://vimeo.com/601795734?fe=cm&fl=pl>" %}

### What Is an Order Management System?

An order management system is software that assists you with the end-to-end handling of your orders. It acts as the backbone between where orders are placed and how they are fulfilled, helping you keep everything organized as you grow.

It connects all of your services together, pulling in order data, running them through custom automation, and routing the orders accordingly. This not only helps minimize errors, it also allows you to spend less time managing logistics so you can spend more time focusing on your other business needs.

### Who Is Order Desk For?

Whether you’re processing tens of thousands of orders a month, or working with a few hundred, Order Desk is designed for businesses of any size that want a way to manage and optimize their order workflow. This includes merchants who sell directly to customers, print companies that produce on-demand products for other sellers, and suppliers who fulfill orders from their own warehouses.

### Why Businesses Value Order Desk

As your business grows, so does its complexities. Instead of patching together workarounds, you’ll want to tap into a powerful, accessible system that grows right along with them, and that’s where Order Desk comes in. Our most notable benefits include:

* Automating repetitive tasks, saving time and improving accuracy.
* Features that help you build custom logic for your order automation, no matter how complex.
* A single dashboard that provides insight across all sales channels and fulfillment providers.
* Flexible pricing, and a top-rated support team.

If you haven’t signed up for a free trial of Order Desk yet, you can do so by visiting [this link](https://app.orderdesk.me/account-setup).

### Need Help?

If you have any questions about any of the information in this guide, we’re here to help!

[Click here](https://www.orderdesk.com/contact) to email Order Desk support.


# What Is Order Management?

If you sell a product then you’re already doing order management, even if you’ve never heard that term before.

Every sale your business makes involves a process that gets your product from “ordered” to “delivered”. That could include receiving a notification via email when a new order is placed, adding orders to a spreadsheet, placing a shipping label on a box, and many often overlooked aspects that can go into your customer receiving what they bought. That entire process is called order management.

At its most basic, order management helps keep track of what was sold, who bought it, and making sure the correct item goes to the right customer. But as your business grows, it can get more complicated do this manually, especially if you begin selling across multiple locations. You may have orders coming from different sources, being sent to multiple fulfillment partners or print-on-demand companies, and seemingly out of nowhere, you might find yourself spending more time trying to keep your head above water instead of focusing on your business.

Every business has different order management needs, but on average they typically include a few key aspects.

Starting with *order capture*, this involves where and how you’re receiving the order. This could be in your Shopify dashboard, and yes, even your spreadsheet. This is simply the process of recording that an order was placed.

You’ll also need to check your inventory counts to ensure that the ordered item is in stock and available for your customer. Then comes prepping and packaging the order, getting it ready for shipping with a label and tracking information, coordinating a pickup, and even extending to the post-fulfillment experience, like returns and refunds.

This is where implementing an **order management system** (commonly abbreviated to “OMS”) is key. Automating all of these small (but important) tasks drastically reduces the margin of error, saving time and money in the process.

## Need Help?

If you have any questions about any of the information in this guide, we’re here to help!

[Click here](https://www.orderdesk.com/contact) to email Order Desk support.


# What Are Integrations?

Software integrations allow different applications to connect and share data. In ecommerce, they’re most often used to move key information like order details, customer data, shipping and tracking info, and inventory levels between platforms automatically.

### Watch And Learn

Visual learner? Here’s a video explaining how integrations work on Order Desk.

{% embed url="<https://vimeo.com/604143848?fe=cm&fl=pl>" %}

### How Do They Work?

Each piece of software is built with its own internal systems and terminology. Let’s look at two fulfillment companies as an example:

*Donut Warrior* and *Bunches Of Bagels*. Both offer 2-3 day expedited shipping options, but *Donut Warrior* calls theirs “Glazing Fast” while *Bunches of Bagels* calls the same shipping option “Toasted Turbo”. If a store has sold an item via their sales channel that included expedited shipping under a third name, none of the services would immediately understand which shipping option to assign to the order.

That’s where an API integration comes in handy.

### What Is An API?

An **API**, or Application Programming Interface, is what allows one service to make parts of its data available in a structured way. APIs define what information can be shared and how other software should request it. Here’s an example of what data might look like via an API:

![](https://251457507-files.gitbook.io/~/files/v0/b/gitbook-x-prod.appspot.com/o/spaces%2FAQOLMUJWMYtrpQ7Oxxca%2Fuploads%2FOVODPbjpuXus40d4k8uA%2Flegacy-3952d25c16b36c6f5b9a.png?alt=media)

An integration will take that data and present it in a way that is easier to understand, essentially acting as a translator for the raw data. The API allows another piece of software to access to specific data in its system, and the integration is what translates it into something other systems can use.

Order Desk builds the majority of its integrations by connecting to their APIs, though some older services use a different method for sharing data: **EDI**, or Electronic Data Interchange. EDIs are often found in industries like manufacturing and freight, and while they aren’t commonly used with Order Desk, they serve a similar purpose: standardizing how businesses share data between systems.

### Need Help?

If you have any questions about any of the information in this guide, we’re here to help!

[Click here](https://www.orderdesk.com/contact) to email Order Desk support.


# How Does Order Desk's Pricing Work?

Order Desk’s pricing model is designed to scale with order volume while keeping billing predictable and transparent. In that spirit, it’s important to go into detail about the differences between Order Desk subscriptions, how order counts are calculated, and how billing is handled for businesses who manage multiple stores.

## Watch And Learn

For a quick visual explanation of how billing functions at Order Desk, check out the following video:

{% embed url="<https://vimeo.com/604146955?fe=cm&fl=pl>" %}

## Monthly Plans Based on Order Volume

Every Order Desk subscription includes full access to the Order Desk platform; all integrations, automations, inventory tools, and more are available to anyone on a paid subscription, regardless of their plan level. While functionality remains consistent across tiers, higher subscription levels offer more flexibility and cost efficiency as their business demands grow.

## How Are Invoices Calculated?

Order Desk invoices are comprised of two parts: the monthly subscription and order fees.

The monthly subscription price covers the cost of using Order Desk. It is a base fee that will differ based on the features needed for the included store(s).

Order fees are a small fee for each order that is imported into Order Desk. These fees range from 5¢ to 25¢ per order depending on which subscription plan you’re on, and they cover the costs associated with storing the order data securely.

While we’re definitely able to offer a lot, we can’t predict the future (*yet*…), so order fees will always be retroactive: they are calculated based on the number of orders imported in the month prior. Subscription fees, on the other hand, address the upcoming month and gives you access to all of Order Desk’s features for the next 30 days.

## What Counts as an Order?

When an order is created in an Order Desk store, either from carts, marketplaces, and integrations, as well as those created manually, imported via CSV, or copied from another Order Desk store, it counts as one billable order. Even orders that are canceled or refunded at the sales channel count toward the monthly total, as pricing is based on data that is imported rather than the amount of orders fulfilled.

Luckily, many integrations include features that can be used to filter imports so that Order Desk only imports orders that need to be here.

## Contracts and Subscription Changes

Order Desk is built to scale with your business. So when the number of imported orders begins to consistently reach a point where a lower subscription level is cost prohibitive, changing plans is as easy as the click of a button.

The same applies to slower seasons. Most businesses aren’t going to hit viral levels of sales every month indefinitely, and some stores do most of their sales during specific seasonal periods. During the off-season or slower periods, subscriptions can be knocked down to less expensive levels until sales pick back up again.

If a subscription is canceled completely, the store data remains intact and the store can be reactivated at a later time by choosing a new plan.

## Managing Multiple Stores Under One Billing Account

There are different types of businesses that maintain multiple Order Desk stores.

Some companies opt to keep each store on its own individual subscription, which works great for agencies who are managing stores for multiple clients. In multi-store setups, invoices are grouped and itemized by store to give a clear breakdown of costs per location, but they’re consolidated under a single credit card and invoice for the convenience of the billing administrator who is paying for Order Desk.

Another added benefit of linking multiple stores together is the ability to quickly sync inventory counts and copy rules, templates, and orders across any connected stores.

## Free Trial Period

New stores receive a 30-day free trial with full access to all Order Desk features and integrations. No credit card is required to start the trial, and there is no obligation to subscribe after the trial ends. This provides an opportunity to evaluate the platform before making a financial commitment.

## Payment Processing and Security

Order Desk *never* sees card details from your customers. And for our own billing, we rely on a [secure payment partner](https://www.orderdesk.com/legal/subprocessors/) to process payments to ensure that your details are never stored.

We proactively and rigorously audit our security proactively to ensure that all data is kept securely and responsibly.

## Need Help?

If you have any questions about any of the information in this guide, we’re here to help!

[Click here](https://www.orderdesk.com/contact) to email Order Desk support.


# Getting Started Series


# Getting Started

If you’re new to Order Desk and not sure where to begin, or you’re just looking for a refresher on the basics, this guide is here to help you out. Here you’ll find a brief overview of the Order Desk app, along with some guidance on where to go next to begin the setup process.

The information outlined here is primarily focused on setting up your online store with Order Desk. We have separate guides for [suppliers](/start-here/getting-started-series/getting-started-for-suppliers) and [printers](/start-here/getting-started-series/getting-started-for-printers) for those interested in learning how they can use the Order Desk app with their clients.

#### What Order Desk Does

Think of Order Desk as your personal assistant; with the right guidance, it’ll take the busywork off of your already busy plate.

![](https://251457507-files.gitbook.io/~/files/v0/b/gitbook-x-prod.appspot.com/o/spaces%2FAQOLMUJWMYtrpQ7Oxxca%2Fuploads%2FC4ztBLcbDljOJkUd5cND%2Flegacy-0928c132d3140ec07f17.png?alt=media)

Your Order Desk store can automatically edit, split, and move orders exactly how you need them processed. It can also track inventory, send tracking updates back to your shopping carts, send custom email notifications, and create customized documents such as receipts, invoices, and packing slips.

Another big part of Order Desk is the wide selection of print on demand services we offer integrations for. A complete list is available [here](/integration-setup-guides/print-on-demand/print-on-demand-providers), or you can refer to our [Print on Demand Fulfillment guide](/guided-walkthroughs/print-on-demand-walkthrough/print-on-demand-fulfillment) for a thorough walkthrough on setting up a print on demand store.

#### Integrations

Order Desk connects to hundreds of integrations across the ecommerce industry. You can link your shopping carts, fulfillment services, printers, shipping apps, and more so all of your orders can be managed from one convenient place. Check out our ever-expanding list of integrations [here](https://www.orderdesk.com/integrations/).

Can’t find the integration you’re looking for? We’re always interested in learning what integrations our customers would like to see next. [Drop us a line](https://www.orderdesk.com/requests/) through our request form with some helpful details, such as links or API info, so our team can review it.

**No Integration? No Problem!**

While our selection of integrations is one of the highlights of the Order Desk app, it’s not the end of the world if you can’t find an integration for the service you want to work with. You can still automate much of the process by using import and/or export templates.

[Import templates](/guided-walkthroughs/templates-emails-and-order-documents/how-to-import-a-spreadsheet) let you import orders from a spreadsheet. Have a shopping cart we aren’t integrated with? If you can download a spreadsheet of your orders there, you can import them into Order Desk.

[Export templates](/guided-walkthroughs/templates-emails-and-order-documents/how-to-build-export-templates) let you export orders to a third party either through email or FTP. You can set these up to run automatically, so once the setup is done, the exported file will be pushed if orders are there to be sent, much like how an integration works.

If you export your orders this way to a printer, they can send a file back with the shipment details to be added to your orders.

#### Rules

Our Rule Builder is a customizable tool that lets you tell Order Desk exactly what to do with your orders, based on the filters you need to use.

If you want to split orders, move orders, submit orders, email customers or vendors, create a PDF, change the shipping method, add a timestamp, or do any other number of actions, you can make rules that will do this automatically for you.

For more information on the Rule Builder, read through the [Order Desk Rule Builder guide](/start-here/getting-started-series/quick-start-how-customizable-is-order-desk-really#the-order-desk-rule-builder).

#### Inventory

Inventory can be one of the most important aspects of managing your online store, whether you’re coordinating your print details or keeping your item info synced across platforms. Adding your inventory to Order Desk should be a priority during your initial setup.

Every product you add to Order Desk needs these required details to be sent to your printer:

![](https://s3.amazonaws.com/helpscout.net/docs/assets/57b0032590336059d4edf94f/images/5af9c41b042863158411bde2/file-oSzybHxkBW.png)

Some printers or products will have additional fields that may also be needed, such as **print\_location**, **print\_mode**, or **print\_design\_id**, to name a few. Check with your printer to find out what fields are required on their products, or refer to our integration guides to see what print details are supported for the integration you’re working with.

Once your inventory is stored in Order Desk, the SKUs in your orders will match up to the SKUs you added to Order Desk, and your print details, such as **print\_sku** and **print\_url**, will be synced into the order. After the print details are synced into an order, they will be sent to your printer for fulfillment. This entire process is automatic and nearly instant, so if you set up your store right, you won’t have to do anything to the orders but monitor them to make sure everything is running smoothly.

For instructions on how to add your inventory and print details to Order Desk, see the [Add Inventory section](/guided-walkthroughs/print-on-demand-walkthrough/print-on-demand-fulfillment#add-inventory-to-order-desk) of the Print on Demand Fulfillment guide.

To help point you in the right direction, we’ve gathered a list of some of our most essential guides that may help you navigate your way through the Order Desk app.

**General**

* Store Settings: An outline of all your store’s details and appearance, from setting your currency and contact info to customizing the folders that you sort your orders into.
* How to Work with Rules: How to use the Order Desk Rule Builder.
* How to Split Orders: Instructions on the different methods for splitting orders once they are in Order Desk.
* How to Split & Dropship Orders for Separate Vendors: An overview of how to split orders and send them to separate vendors.
* How to Work with Email Templates: How to work with emails using Order Desk.
* Customizable Receipts/Order Documents: Create your own customized order documents, such as receipts, packing slips, and invoices.
* How to Create PDF Files for Receipts and Invoices: Instructions for creating a PDF from a receipt template.
* Managing Your Account: How to manage your personal information, including login details and two-factor authentication settings.
* Common Errors from Integrations: An outline of the most common errors from integrations.

**Print on Demand**

* Print on Demand Providers: List of all printers integrated with Order Desk.
* Print on Demand Fulfillment: Step-by-step instructions for setting up your Order Desk store to work with printers and on-demand products.
* Print on Demand Order Syncing: Describes why order syncing is important and how to check for and fix errors.
* How to Set Up Shipping Class Matches: How to tell your printer your shipping preferences.
* How to Get Public Dropbox Links: How to get the Dropbox links you need for your artwork files.
* Dropbox Integration: How to use the Dropbox integration in Order Desk.
* Print on Demand Bundles: How to bundle print on demand items.

Don’t forget to search the help site for guides about your specific integrations. If available, more information will be provided in the integration guide.

#### What Next?

To review the steps you can take to set up your own store in Order Desk, continue on to our Quick Start guide.

Otherwise, we have an entire library of guides at your disposal covering just about every topic related to our app, including help articles for every integration we offer. Our support team is also available Monday through Friday from 8am to 8pm EST for all your other Order Desk related needs.


# Getting Started for Printers

This guide is for print companies interested in learning more about Order Desk. If you are an artist who sends your orders to a print company for fulfillment, please see the [Getting Started](/start-here/learn-the-basics) guide instead.

**What Order Desk Does**

Order Desk is an order management app that can be customized to support the unique workflows your customers have. If you are a supplier looking for a way to simplify and consolidate the transition of orders from your customers’ stores to your fulfillment service, Order Desk may be the solution.

With [dozens of shopping cart integrations](https://www.orderdesk.com/integrations/) available, Order Desk can connect to your customers’ stores and quickly download their orders so they can be sent to your company for fulfillment.

Each Order Desk store can be set up to edit, split, move and process orders exactly how the customer needs them to be handled. As orders are fulfilled, Order Desk can send tracking updates back into the original shopping carts.

**What Order Desk Really Does**

**Integrates**

Order Desk builds integrations to the APIs and webhooks of other services, allowing order data, inventory information and shipping and fulfillment details to be pushed and pulled between them. This lets a merchant or supplier compile everything they need to know about an order in one single hub, here in Order Desk, to facilitate and ease the management, communication and fulfillment process.

Order Desk has hundreds of integrations with more being added all the time. If you already have an Order Desk account, you can access the current list of available integrations by clicking on **Manage Integrations** in the left sidebar and navigating through the integration type tabs: Shopping Carts, Shipping, Fulfillment, etc.

![](https://251457507-files.gitbook.io/~/files/v0/b/gitbook-x-prod.appspot.com/o/spaces%2FAQOLMUJWMYtrpQ7Oxxca%2Fuploads%2F6km2dh8xHiBNv4mwBrSO%2Flegacy-0e5ef2e95e93ca3b6400.gif?alt=media)

A single Order Desk store can connect to as many integrations as needed, but it can only connect to *one instance of an integration*. For example, if your customer has two Shopify stores, they will need one Order Desk store for each API connection (each Shopify store), but orders can be copied or moved from one Order Desk store to another if necessary.

**Customizes**

If an integration doesn’t exist, this doesn’t necessarily mean that Order Desk can’t work. Order Desk can still be automated for as much of the fulfillment process as possible using import and export templates. We’ll cover that in more detail in the next section.

**And there’s more!**

Order Desk is more than just a hub connecting services to each other. With Order Desk, it’s possible to set up a [custom workflow](/start-here/getting-started-series/quick-start-overview#working-with-folders), use the [Rule Builder](/start-here/getting-started-series/quick-start-how-customizable-is-order-desk-really#the-order-desk-rule-builder) to automate most things, [split orders](/guided-walkthroughs/shipping-fulfillment-and-returns/how-to-split-and-dropship-orders-for-separate-vendors) for multiple vendors, [fix or set shipping preferences](/guided-walkthroughs/shipping-fulfillment-and-returns/how-to-set-up-shipping-class-matches), [communicate](/guided-walkthroughs/templates-emails-and-order-documents/how-to-work-with-email-templates) to customers, yourself or anyone else, create [custom order documents](/guided-walkthroughs/templates-emails-and-order-documents/how-to-create-pdf-files-for-order-documents) and [manage inventory](/guided-walkthroughs/products-and-inventory/how-to-work-with-inventory-details).

**Options to Integrate**

**API integration**

If you have an API, Order Desk can potentially build an integration directly to your service. To request a new integration, please fill out [this form](https://www.orderdesk.com/requests/), and someone from our integrations team will follow up with you about it soon.

**Import and Export Files**

If your company does not have an API, you can still communicate with Order Desk through import and export templates. Every Order Desk subscription offers the ability to build an export template that sends out order information in a file through email or FTP. Also included is the ability to send shipment files back into Order Desk via email or FTP by creating an import template.

To be able to send and receive information like this, simply create your own Order Desk account and test it out with a few of your customers. If, after using Order Desk and becoming familiar with how the platform works, you would like to discuss the possibility of turning this process into an integration—where the setup work is handled by the integration rather than with manually created import and export templates—please contact Order Desk support to begin that conversation.

For more information on this, please see [How to Build Export Templates](/guided-walkthroughs/templates-emails-and-order-documents/how-to-build-export-templates) and [How to Import a Spreadsheet](/guided-walkthroughs/templates-emails-and-order-documents/how-to-import-a-spreadsheet).

**Copy Orders into Primary Store**

Another option for companies that do not have an API is to use Order Desk as the fulfillment software by creating your own primary Order Desk store and having a secondary Order Desk store for each of your customers on your account. The secondary stores would import orders from the shopping carts and then copy those orders into your primary store. In the primary store, you can manage the orders and add shipments when they are fulfilled.

When shipments are added in your primary store, they will be copied back into the secondary stores automatically and sent back into the original shopping cart.

For more information on this, please see the [How to Manage Multiple Stores on One Account guide](/guided-walkthroughs/using-order-desk/how-to-manage-multiple-stores-on-one-account).

If, after using Order Desk and becoming familiar with how the platform works, you would like to discuss the possibility of turning this process into an integration, please contact Order Desk support to begin that conversation.

**Store Management**

Each of your customers will need their own Order Desk store to be able to connect to their shopping cart(s). A single customer that has multiple stores on one platform (such as multiple Shopify accounts) will need to have a separate Order Desk store to support each connection.

With this in mind, there are two ways you can use Order Desk to have your customers’ orders sent to you.

**1. You Manage Multiple Stores**

You can manage your customers’ stores for them with or without their involvement in the Order Desk process.

For this to work, they will need to either give you permission to access their shopping carts through integrations or provide spreadsheets of their orders to be imported into Order Desk.

If they will be providing access to their carts, these are your options to connect to their stores:

1. They can share their credentials with you so you can connect the integration.
2. If they are on Shopify, they can give you access through the private app method.
3. You can give them access to their own Order Desk store to set up the connection for you.

You can connect all of your customer stores to the billing plan on your primary store.

**2. Customers Manage Their Own Stores**

You can have your customers sign up for Order Desk on their own and ask them to use the app to send their orders to you through the option you have chosen to receive orders.

They can pay for their own stores this way, but if you still plan to cover their stores on your own Plus plan, they can [add you as a user](/guided-walkthroughs/using-order-desk/how-to-add-your-team-to-your-store) to their store so you can link it to your own billing.

**How Fulfillment Works**

This section explains how you can use Order Desk to help fulfill your customers’ orders and send shipment information back to their stores.

**Print Details**

Order Desk pulls orders in from shopping carts, lets merchants add extra details to the orders or items, and then sends the orders to the fulfillment service to be created and shipped.

**How does this work for your print business?**

Most shopping carts will not have a way to add print details to items, nor will most be able to connect directly to your company allowing your customer to quickly transfer orders to you for fulfillment.

Using Order Desk, they (or you) can connect their shopping cart(s) to Order Desk, where their inventory is already set up with the artwork files and your product codes for the items to be printed on. When orders come into Order Desk, the print details are automatically synced into the items in the orders, and the store can be set up to automatically send the orders to your company for fulfillment.

Keep in mind that Order Desk does not talk directly to your printing machines. All orders will be collected in a single location and the info will be translated, the print details attached, and the orders will be sent to your company through the method you select.

**Fulfillment and Tracking**

Once the orders have been sent to your company, you can fulfill them the way you normally do.

If your fulfillment service is integrated with Order Desk, tracking and fulfillment details will automatically be pulled back into orders in Order Desk.

If your service does not have an integration, you can still add tracking and shipment details to the orders in your stores a few different ways. The most efficient option is to [import a file](/guided-walkthroughs/templates-emails-and-order-documents/how-to-import-a-spreadsheet) with the tracking details.

If the settings are in place and the shopping cart integration allows for it, as an order is fulfilled in Order Desk, the fulfillment details will be pushed back into the shopping cart as a notification that the order has shipped and the order should be closed.

In some cases, you may want to [send shipment notification emails](/guided-walkthroughs/shipping-fulfillment-and-returns/how-to-print-thermal-labels/how-to-send-shipment-tracking-info-to-customers) directly from Order Desk.

**Pricing**

Order Desk has [three payment plans](https://www.orderdesk.com/pricing/) to choose from:

* **Starter Plan**: For stores that are just getting started and have a lower volume and/or that only need up to three integrations. $20/month + 25¢/order
* **Pro Plan**: For established stores with a volume under about 3,000 orders per month and that do not need more than three Order Desk stores. $60/month + 10¢/order per store.
* **Plus Plan**: For merchants or suppliers with more than 3,000 orders per month and/or a need for multiple Order Desk stores. $125/month + 5¢/order. Unlimited Pro stores.

Each Order Desk store can be set up under a different plan. However, as a supplier, you may find that the Plus Plan is your best option since it comes with unlimited Pro stores and has a discounted per order fee.

If you choose the Plus Plan, start by creating your own primary store where you can add your payment details. This is especially important if you plan to give your customers access to their own stores as it will keep your top level store and payment details separate from their stores and activity. As long as you do not give them access to your primary store, they will not be able to see your billing information or any of your other customers’ information.

**Billing**

Every Order Desk store has its own billing settings which can be accessed from the **Billing** link under the Account menu in the left sidebar.

Stores on the Plus Plan can have secondary stores linked to them from the billing page, and the orders from each store will be added to the bill.

If there will be separate billing plans and payment details for every store, visit the billing page in each store to choose the store’s plan and add payment details. If you add your customers as [store users](/guided-walkthroughs/using-order-desk/how-to-add-your-team-to-your-store), they will be able to handle the billing themselves.

**Important Guides**

Many of these guides are linked throughout this article, but here is a comprehensive list of Order Desk help guides to show you around the app and help you set up your stores:

* [Getting Started](/start-here/getting-started-series/quick-start-overview): General getting started guides that provide an overview of the app. Learn how to connect to integrations, add inventory, work with folders, submit orders, and get some tips on working with the Rule Builder.
* [Print on Demand Fulfillment](/guided-walkthroughs/print-on-demand-walkthrough/print-on-demand-fulfillment): This is the ultimate guide for Print on Demand stores so know how the print process works from beginning to end in Order Desk.
* [Getting Started for Artists](/start-here/learn-the-basics): This is the getting started guide to share with your own customers if they will be using Order Desk to send orders to you.
* [How to Work with Inventory Details](/guided-walkthroughs/products-and-inventory/how-to-work-with-inventory-details): See this guide for information on the different ways to work with inventory in Order Desk.
* [Print on Demand Integration Product Settings](/guided-walkthroughs/print-on-demand-walkthrough/print-on-demand-integration-product-settings): Need to swap a SKU, skip a SKU or work with gift messages or picklist messages? Read how in this guide.
* [Print on Demand Bundles](/guided-walkthroughs/products-and-inventory/how-to-use-code-replace#print-on-demand-bundles): This guide explains how to break apart bundles for print on demand items.
* [Print on Demand Order Syncing](/guided-walkthroughs/print-on-demand-walkthrough/print-on-demand-order-syncing): Learn how to sync the print details connected to inventory items into orders in this guide.
* [How to Work with Rules](/guided-walkthroughs/rules-and-automations/how-to-work-with-rules): How to use the Order Desk Rule Builder.
* [How to Set Up Shipping Class Matches](/guided-walkthroughs/shipping-fulfillment-and-returns/how-to-set-up-shipping-class-matches): Set shipping preferences in each fulfillment integration so orders are sent through with the right info.
* [Imports](/guided-walkthroughs/templates-emails-and-order-documents/how-to-import-a-spreadsheet): Import files of orders, shipments or inventory into Order Desk.
* [Exports](/guided-walkthroughs/templates-emails-and-order-documents/how-to-build-export-templates): Export any order data in the format and layout you need. Send files to yourself, to third parties or use them to create custom reports.
* [How to Split Orders](/guided-walkthroughs/orders-and-folders/how-to-split-orders): Instructions on the different methods for splitting orders once they are in Order Desk.
* [How to Split & Dropship Orders for Separate Vendors](/guided-walkthroughs/shipping-fulfillment-and-returns/how-to-split-and-dropship-orders-for-separate-vendors): Overview on how to split orders and send to separate vendors.
* [How to Work with Email Templates](/guided-walkthroughs/templates-emails-and-order-documents/how-to-work-with-email-templates): How to work with emails using Order Desk.
* [How to Send Shipment/Tracking Info to Customers](/guided-walkthroughs/shipping-fulfillment-and-returns/how-to-print-thermal-labels/how-to-send-shipment-tracking-info-to-customers): If you need to send customers tracking information as their orders ship, do so with Order Desk following the instructions in this guide.
* [Customizable Receipts/Order Documents](/guided-walkthroughs/templates-emails-and-order-documents/how-to-work-with-order-documents): Create your own customized order documents such as receipts, packing slips and invoices.
* [How to Create PDFs](/guided-walkthroughs/templates-emails-and-order-documents/how-to-create-pdf-files-for-order-documents): Instructions for creating a PDF from a receipt template.
* [Common Errors from Integrations](/technical-documentation/api-and-integration-reference/common-errors-from-integrations): A list of the most common errors received from integrations.
* [Multiple Stores on One Account](/guided-walkthroughs/using-order-desk/how-to-manage-multiple-stores-on-one-account): Set up and work with multiple stores on one Order Desk account.
* [How to Add Store Users & Permissions](/guided-walkthroughs/using-order-desk/how-to-add-your-team-to-your-store): Add users to a store and learn how to set their permissions.
* [How to Cancel an Order](/guided-walkthroughs/orders-and-folders/how-to-cancel-an-order): Not every order can be canceled or handled the same way in Order Desk. Read this guide for integration specifics as well as general advice on working with canceled orders.
* [How to Handle Returns](/guided-walkthroughs/shipping-fulfillment-and-returns/how-to-handle-returns): How to handle returns in Order Desk.

Don’t forget to search the help site for guides about the specific integrations you need to enable. If available, more information will be provided in the integration guide.

**FAQ**

**Do you communicate with our printing machine?**

Order Desk does not communicate directly to the machines that print your items; it sends order information to your company via API, FTP, email or directly within the Order Desk app, depending on the connection type being used. Once the orders are received by your company, you can then send the information to your printers in whichever manner you typically use.

**How will I charge my customers through you?**

Order Desk cannot charge your customers for you. You will need to continue to bill your customers the way you normally do, which must be handled outside of the Order Desk process.

**Will you build an integration to my service/software?**

Maybe! This depends on the technical details. To request a new integration, please fill out [this form](https://www.orderdesk.com/requests/), and someone from our integrations team will follow up with you about it soon.

If you plan to build your own API first, please refer to [these best practices](/technical-documentation/api-and-integration-reference/print-on-demand-api-best-practices).

**I want to have an integration built, but I don’t have an API. What can I do?**

Read through the non-API integration options in this guide to learn how you can still use Order Desk, even without an API.

**I haven’t used Order Desk before, but I want my company to be one of the non-API integrations. What are my options?**

The first step to getting an integration is to become familiar with the Order Desk app, learn how to use it and gain an understanding of how your customers will need to use it to connect with your company.

Once you have used Order Desk for awhile and determined that it’s an app you are happy with and want to use moving forward, please contact Order Desk support to begin that conversation and see if an integration will be possible.


# Getting Started for Suppliers

### What Order Desk Does

Order Desk is an order management app that can be customized to support the unique workflows your clients have. If you are a supplier looking for a way to simplify and consolidate the transition of orders from your clients’ stores to your fulfillment service, Order Desk may be your solution.

With [dozens of shopping cart integrations](https://www.orderdesk.com/integrations/) available, connect to your clients’ stores and pull their orders into Order Desk quickly and seamlessly so you can fulfill their orders.

You can set up each individual client store to edit, split, move and process orders exactly how they need to be handled. You can also keep track of inventory and send tracking updates back to the shopping carts as orders are fulfilled.

### What Order Desk Really Does

#### **Integrates**

Order Desk builds integrations to the APIs and webhooks of other services, allowing order data, inventory information and shipping and fulfillment details to be pushed and pulled between accounts. This lets you compile nearly everything in one single hub, here in Order Desk, to facilitate and ease the management, communication and fulfillment process for your clients’ orders.

Order Desk has hundreds of integrations with more being added all the time. You can access the current list of available integrations by clicking on **Manage Integrations** in the left sidebar and navigating through the integration type tabs: Shopping Carts, Shipping, Fulfillment, etc.:

![](https://251457507-files.gitbook.io/~/files/v0/b/gitbook-x-prod.appspot.com/o/spaces%2FAQOLMUJWMYtrpQ7Oxxca%2Fuploads%2FDtbUAOhWFVpK9cIyIZVd%2Flegacy-e1ecc9c44152b25c0a9c.gif?alt=media)

Connect to as many integrations as needed on a single store, but you can *only connect to one instance of an integration per Order Desk store*. For example, if your client has two Shopify stores, you will need one Order Desk store for each API connection (each Shopify store), but you can then copy or move the orders from one store to another if necessary.

#### Customizes

Don’t see a particular integration you need? Maybe you have to get orders from a shopping cart or send them to a separate fulfillment service, and there isn’t an integration for those services. This typically isn’t a problem. You can still automate as much of the process as possible using import and export templates.

[Import templates](/guided-walkthroughs/templates-emails-and-order-documents/how-to-import-a-spreadsheet) let you import orders, inventory items or shipments from a spreadsheet. If your client has a shopping cart we aren’t integrated with, as long as they can download a spreadsheet of their orders, you can import it directly into Order Desk.

[Export templates](/guided-walkthroughs/templates-emails-and-order-documents/how-to-build-export-templates) let you export orders to a third party either through email or FTP. You can set these up to run automatically, so once the setup is done, the exported file will be pushed if orders are there to be sent, much like how an integration works.

### And there’s more!

Order Desk is more than just a hub connecting services to each other. With Order Desk you can set up a [custom workflow](/start-here/getting-started-series/quick-start-overview#working-with-folders), use the [Rule Builder](/start-here/getting-started-series/quick-start-how-customizable-is-order-desk-really#the-order-desk-rule-builder) to automate most things, [split orders](/guided-walkthroughs/shipping-fulfillment-and-returns/how-to-split-and-dropship-orders-for-separate-vendors) for multiple vendors, [fix or set shipping preferences](/guided-walkthroughs/shipping-fulfillment-and-returns/how-to-set-up-shipping-class-matches), [communicate](/guided-walkthroughs/templates-emails-and-order-documents/how-to-work-with-email-templates) to customers, clients, yourself or anyone else, create [custom order documents](/guided-walkthroughs/templates-emails-and-order-documents/how-to-create-pdf-files-for-order-documents) and [manage inventory](/guided-walkthroughs/products-and-inventory/how-to-work-with-inventory-details).

#### **Manage Multiple Stores**

You will need to manage multiple stores on your account—one for each of your clients. You might also occasionally need more than one store for some clients.

You can keep each client store separate, with its own integrations, rules and order fulfillment process, or you can copy all of your clients’ orders from their individual stores into your own primary store. There’s no right or wrong way to set up your stores, just as long as the orders are being moved through the app the way you need to fit your fulfillment requirements.

Your Order Desk account is a user account, rather than a specific store, set up under your email address. If you create every store under the same email address, all of your stores will be linked to your user account allowing you to easily switch between them.

To switch between your stores, click the store dropdown in the upper left corner of the app and choose the store you want to switch to:

![](https://251457507-files.gitbook.io/~/files/v0/b/gitbook-x-prod.appspot.com/o/spaces%2FAQOLMUJWMYtrpQ7Oxxca%2Fuploads%2FGqZ0LDl0UEBqFkQjvzxQ%2Flegacy-886eb50000e28b7eb469.gif?alt=media)

For more information on how to create multiple stores under the same account, [see this guide](/guided-walkthroughs/using-order-desk/how-to-manage-multiple-stores-on-one-account).

#### Add Users to a Store

Some suppliers choose to manage each client store alone. Others prefer to add their clients as users on their own stores so they can be involved in the process. If you do want to add your clients, or anyone else such as colleagues or vendors, you can add their email address as a store user on the specific store where you want them to have access.

Apply special permissions for each user if you don’t want them to have full control or if you want to limit what they can see. If you are familiar with CSS, you can also create custom views for what they will and won’t be able to see while logged into Order Desk.

When you add store users, they can only access the store(s) where their email address has been added. They will *not* be able to access all the stores on your user account.

[See this guide](/guided-walkthroughs/using-order-desk/how-to-add-your-team-to-your-store) for more information on how to add store users and set their permissions and custom views.

### Pricing and Billing

#### Pricing

Order Desk has [three payment plans](https://www.orderdesk.com/pricing/) to choose from:

* **Starter Plan**: For stores that are just getting started and have a lower volume and/or that only need up to three integrations. $20/month + 25¢/order
* **Pro Plan**: For established stores with a volume under about 3,000 orders per month and that do not need more than three Order Desk stores. $60/month + 10¢/order per store.
* **Plus Plan**: For merchants or suppliers with more than 3,000 orders per month and/or a need for multiple Order Desk stores. $125/month + 5¢/order. Unlimited Pro stores.

Each of your Order Desk stores can be set up under a different pricing plan. However, as a supplier, you may find that the Plus Plan is your best option since it comes with unlimited Pro Plan stores and has a discounted per order fee.

If you choose the Plus Plan, set up your own primary store where you can add payment details, especially if you plan to give your clients access to their own stores. This will keep your top level store and payment details separate from their stores and activity.

#### Billing

Every Order Desk store has its own billing settings, which can be accessed from the **Billing** link under the Account menu in the left sidebar.

If you are on the Plus Plan, you can link each secondary store to your primary store from the billing page, and the orders from each store will be added to your bill.

If you are setting up separate billing plans and payment details for every store, visit the billing page in each store to choose the store’s plan and add payment details. If you add your clients as store users, they can handle the billing themselves.

#### Copy/Move Orders Between Stores

If you need to copy (or move) orders from one store to another, whether to combine a multi-store client’s orders in one place or to bring all of your clients’ orders into your own primary store, you can do so with a rule. Instructions for how to set this up can be found [in this guide](/guided-walkthroughs/using-order-desk/how-to-manage-multiple-stores-on-one-account#copying-and-moving-orders-between-stores).

Keep these points in mind when setting up copy or move rules:

* A moved order will be moved from one store to the other, breaking the link between the order and the shopping cart. You will not be able to automatically send fulfillment details back into the originating Order Desk store or to the shopping cart. This method is not recommended for orders that are being fulfilled and need to retain their connection with the shopping cart.
* A copied order will create a copy of the original order for the new store. If a copied order is fulfilled, it will automatically pass the fulfillment details back into the original order in Order Desk, and if the original store is set up for it, the order will be updated in the shopping cart as well.
* A copied order will count as a new, separate order. This means it will count as two orders for billing purposes, and both orders will be added to the monthly fee.

#### Fulfillment

If your fulfillment service is integrated with Order Desk, tracking and fulfillment details will automatically be pulled back into orders.

If your service does not have an integration, you can still add tracking and shipment details to the orders in your stores a few different ways. The most efficient option is to [import a file](/guided-walkthroughs/templates-emails-and-order-documents/how-to-import-a-spreadsheet) with the tracking details.

If the settings are in place and the shopping cart integration allows for it, as an order is fulfilled in Order Desk, the fulfillment details will be pushed back into the shopping cart to notify your clients’ customer that their order has shipped.

In some cases, you may want to [send shipment notification emails](/guided-walkthroughs/shipping-fulfillment-and-returns/how-to-print-thermal-labels/how-to-send-shipment-tracking-info-to-customers) directly from Order Desk.

#### Important Guides

Many of these guides are linked throughout this article, but here is a comprehensive list of Order Desk help guides to show you around the app and help you set up your stores:

* [Getting Started](/start-here/getting-started-series/quick-start-overview): General getting started guides that provide an overview of the app. Learn how to connect to integrations, add inventory, work with folders, submit orders, and get some tips on working with the Rule Builder.
* [Store Settings](/guided-walkthroughs/using-order-desk/manage-store-settings): You’ve got options. Learn what they are and how to set your preferences.
* [How to Work with Inventory Details](/guided-walkthroughs/products-and-inventory/how-to-work-with-inventory-details): See this guide for information on the different ways to work with inventory in Order Desk.
* [How to Work with Inventory Quantities](/guided-walkthroughs/products-and-inventory/how-to-work-with-inventory-quantities): If you need to manage inventory quantities in Order Desk, this guide covers how it works and provides some tips and special features.
* [How to Use Product Code Match, Skip and Replace](/guided-walkthroughs/products-and-inventory/how-to-use-code-replace): Need to swap a SKU, match a SKU, replace a SKU or work with bundles and kits? Read how in this guide.
* [How to Sync Item Details Into Orders](/guided-walkthroughs/products-and-inventory/how-to-sync-item-details-into-orders): If you have details saved to inventory items in Order Desk and need those details added to orders, learn how to sync inventory in this guide.
* [Inventory Helper](/integration-setup-guides/tools-and-productivity/inventory-helper-integration): Use the Inventory Helper integration to tell Order Desk when to send inventory re-order notifications.
* [How to Work with Rules](/guided-walkthroughs/rules-and-automations/how-to-work-with-rules): How to use the Order Desk Rule Builder.
* [How to Set Up Shipping Class Matches](/guided-walkthroughs/shipping-fulfillment-and-returns/how-to-set-up-shipping-class-matches): Set shipping preferences in each fulfillment integration so orders are sent through with the right info.
* [Imports](/guided-walkthroughs/templates-emails-and-order-documents/how-to-import-a-spreadsheet): Import files of orders, shipments or inventory into Order Desk.
* [Exports](/guided-walkthroughs/templates-emails-and-order-documents/how-to-build-export-templates): Export any order data in the format and layout you need. Send files to yourself, to third parties or use them to create custom reports.
* [How to Split Orders](/guided-walkthroughs/orders-and-folders/how-to-split-orders): Instructions on the different methods for splitting orders once they are in Order Desk.
* [How to Split & Dropship Orders for Separate Vendors](/guided-walkthroughs/shipping-fulfillment-and-returns/how-to-split-and-dropship-orders-for-separate-vendors): Overview on how to split orders and send to separate vendors.
* [How to Work with Email Templates](/guided-walkthroughs/templates-emails-and-order-documents/how-to-work-with-email-templates): How to work with emails using Order Desk.
* [How to Send Shipment/Tracking Info to Customers](/guided-walkthroughs/shipping-fulfillment-and-returns/how-to-print-thermal-labels/how-to-send-shipment-tracking-info-to-customers): If you need to send customers tracking information as their orders ship, do so with Order Desk following the instructions in this guide.
* [Customizable Receipts/Order Documents](/guided-walkthroughs/templates-emails-and-order-documents/how-to-work-with-order-documents): Create your own customized order documents such as receipts, packing slips and invoices.
* [How to Create PDFs](/guided-walkthroughs/templates-emails-and-order-documents/how-to-create-pdf-files-for-order-documents): Instructions for creating a PDF from a receipt template.
* [Common Errors from Integrations](/technical-documentation/api-and-integration-reference/common-errors-from-integrations): A list of the most common errors received from integrations.
* [Multiple Stores on One Account](/guided-walkthroughs/using-order-desk/how-to-manage-multiple-stores-on-one-account): Set up and work with multiple stores on one Order Desk account.
* [How to Add Store Users & Permissions](/guided-walkthroughs/using-order-desk/how-to-add-your-team-to-your-store): Add users to a store and learn how to set their permissions.
* [How to Cancel an Order](/guided-walkthroughs/orders-and-folders/how-to-cancel-an-order): Not every order can be canceled or handled the same way in Order Desk. Read this guide for integration specifics as well as general advice on working with canceled orders.
* [How to Handle Returns](/guided-walkthroughs/shipping-fulfillment-and-returns/how-to-handle-returns): How to handle returns in Order Desk.
* [How to Use Shopify Risk Scores to Stop Fraudulent Orders](/guided-walkthroughs/integration-specific-walkthroughs/how-to-use-shopify-risk-scores-to-stop-fraudulent-orders): If your client uses Shopify and wants you to monitor orders for potential fraud, follow these instructions.

Don’t forget to search the help site for guides about the specific integrations you need to enable. If available, more information will be provided in the integration guide.

### FAQ

#### Will you build an integration to my service/software?

Maybe! This depends on the technical details. To request a new integration, please fill out [this form](https://www.orderdesk.com/requests/), and someone from our integrations team will follow up with you about it soon.

#### My fulfillment company doesn’t have an API. Can we still use Order Desk to fulfill our clients’ orders?

Yes! As long as you can either accept emails (one per order) or files of batched orders, you can set up your clients’ stores to automatically send orders to you. Scroll up to the Customizes section above for more details.

For print on demand companies planning to build your own API, please refer to [these best practices](/technical-documentation/api-and-integration-reference/print-on-demand-api-best-practices).

#### My client won’t give me the credentials I need to enable an integration on their Order Desk store. What are my options?

If your client won’t provide you with private app credentials, the only way to gain access is to add the client as a store user to their own Order Desk store so they can enable the connection directly.

#### I don’t need all of my clients’ orders. They send some to other suppliers. How do I handle this?

Some integrations have vendor or country filters that can be used to bring in specific orders. Check the specific integration settings to see if this is an option for you. Shopify, specifically, has some [useful filter options](/integration-setup-guides/sales-channels/shopify-integration#vendor-filter).

If there are no filters for the integration you are using, or if the filters available won’t work for your purposes, you will need to [split orders](/guided-walkthroughs/shipping-fulfillment-and-returns/how-to-split-and-dropship-orders-for-separate-vendors) once they show up in Order Desk and only fulfill the orders meant for you.

For comprehensive instructions on splitting orders, see the [How to Split Orders guide](/guided-walkthroughs/orders-and-folders/how-to-split-orders).


# Quick Start: Overview

This guide covers some of the first steps you’ll need to take when setting up your Order Desk store.

#### Before You Begin

To help merchants and fulfillment providers new to Order Desk find their way around and quickly set up an account, we’ve created this short series of guides. If you haven’t done so already, we strongly recommend checking out our [Getting Started](/start-here/learn-the-basics) guide first, as it serves as a great starting point before you dive into the setup process.

In these guides we will cover a brief overview of the Order Desk app is, what it does, show you how to connect integrations, how to add and submit orders to different types of fulfillment services, how to add inventory items to Order Desk, and we’ll discuss how and where to customize Order Desk to make a powerful and functional app that runs automatically the way each individual store needs it to run.

This first guide will give an overview of Order Desk, connecting integrations and working with folders. The second guide covers Orders and Inventory, and the third guide is about Customizing Order Desk.

#### Connecting Integrations

Order Desk offers integrations with many other apps, websites and services. An integration isn’t necessary for using Order Desk, but it does make setup and fulfillment quite a bit easier. If you use any of our integrations, enable these first and adjust the settings of each one to your preferences.**IMPORTANT**\
Many integrations have an option to download or submit orders automatically. It’s best to leave these disabled until you are familiar with Order Desk. You can still download, move and submit orders manually until you are ready to automate your store.

To connect to an integration, look at the left sidebar of your screen and under the **Integrations** menu click on **Manage Integrations**:

![](https://251457507-files.gitbook.io/~/files/v0/b/gitbook-x-prod.appspot.com/o/spaces%2FAQOLMUJWMYtrpQ7Oxxca%2Fuploads%2FMFAASH9EvHrq4SHycOWd%2Flegacy-a01d1f99347587e98f9d.png?alt=media)

From the Manage Integrations page, select the integrations you want to enable and enter your credentials for each one to make the connection:

![](https://251457507-files.gitbook.io/~/files/v0/b/gitbook-x-prod.appspot.com/o/spaces%2FAQOLMUJWMYtrpQ7Oxxca%2Fuploads%2F525F95oP9M1TDKwRFjJy%2Flegacy-eb637ab8cd3cec888fbd.png?alt=media)

For more information on our different integrations and their settings, read through our integration specific help guides. We have a guide for most of our integrations, such as [Shopify](/integration-setup-guides/sales-channels/shopify-integration), [Etsy](/integration-setup-guides/sales-channels/etsy-integration), [Squarespace](/integration-setup-guides/sales-channels/squarespace-integration), [ShipStation](/integration-setup-guides/shipping-services/shipstation-integration-settings-and-features) and [MWW](/integration-setup-guides/print-on-demand/mww-on-demand-integration) to name a few. Search our [help site](/) for others. We are always working on updating and creating new guides, so keep checking back or contact Order Desk Support for any questions you can’t find answered in a guide.

#### Working with Folders

Every Order Desk store starts with a few default folders:

![](https://251457507-files.gitbook.io/~/files/v0/b/gitbook-x-prod.appspot.com/o/spaces%2FAQOLMUJWMYtrpQ7Oxxca%2Fuploads%2F1vBEA01d97w1Pa4d5RUk%2Flegacy-8e756bc320bade7b0a54.png?alt=media)

New orders will be added to the New folder by default. This can be changed with rules, which we’ll go over in the [last guide of this series](/start-here/getting-started-series/quick-start-how-customizable-is-order-desk-really), or with the settings in certain shopping cart integrations.

Some merchants find that these default folders work for their needs. Most, however, will add more folders. Think of folders as buckets where you can store files. If you need a simple or complex storage system for your orders, especially as they move through the submission process, consider creating new folders that fit into the workflow unique to your store.

Please note that moving an order into a folder does not automatically update the order status in any integrations. Check your integration settings and the Rule Builder to see what options your integrations have for when folders are changed.

**Create Folder**

To create a new folder, look under the **S** **ettings** menu in the left sidebar and click on **Store Settings**:

![](https://251457507-files.gitbook.io/~/files/v0/b/gitbook-x-prod.appspot.com/o/spaces%2FAQOLMUJWMYtrpQ7Oxxca%2Fuploads%2FvtF1PBESc73dJYqN5T0F%2Flegacy-3806821101e1d4770294.png?alt=media)

On the Store Settings page, click on **Folders** and then **Add Folder**:

![](https://251457507-files.gitbook.io/~/files/v0/b/gitbook-x-prod.appspot.com/o/spaces%2FAQOLMUJWMYtrpQ7Oxxca%2Fuploads%2FILf9sf6ovVnQBhHkSD2j%2Flegacy-e0608ecb57316848aa32.png?alt=media)

A good method for setting up your folders is to think of where an order currently is. For instance, if you send orders to more than one vendor or fulfillment/shipping integration, you can move orders into folders that say they’ve been sent but have not yet been fulfilled, such as “At Vendor X” or “At MWW” or “At ShipStation”.

![](https://251457507-files.gitbook.io/~/files/v0/b/gitbook-x-prod.appspot.com/o/spaces%2FAQOLMUJWMYtrpQ7Oxxca%2Fuploads%2FUZfswYxSZyPPXuMeRRqW%2Flegacy-f71bf943509987b19909.png?alt=media)

**Moving Orders Through Folders**

Orders won’t move on their own if your settings don’t tell them to move somewhere.

Many integration settings include an option for which folder to move orders to after being submitted, for instance:

![](https://251457507-files.gitbook.io/~/files/v0/b/gitbook-x-prod.appspot.com/o/spaces%2FAQOLMUJWMYtrpQ7Oxxca%2Fuploads%2FP4952b5ordXPmKQl76cP%2Flegacy-ec487e16e876aeb14ab4.png?alt=media)

If sending to a third party vendor through an [export template](/guided-walkthroughs/templates-emails-and-order-documents/how-to-build-export-templates), you can tell the export template where to send orders after they’re exported:

![](https://251457507-files.gitbook.io/~/files/v0/b/gitbook-x-prod.appspot.com/o/spaces%2FAQOLMUJWMYtrpQ7Oxxca%2Fuploads%2FvdT6eE494SSpF9jZ8Ls6%2Flegacy-a06f3fffca10a842694a.png?alt=media)

If sending a dropship email to a third party vendor, you can add an action in your rule to move the order after the email is sent:

![](https://251457507-files.gitbook.io/~/files/v0/b/gitbook-x-prod.appspot.com/o/spaces%2FAQOLMUJWMYtrpQ7Oxxca%2Fuploads%2FnPAVyAFU1qUBB2RhUnsB%2Flegacy-756df693c53d58f4a94b.png?alt=media)

If using an integration, check to see if you can change the folder when shipment is added. If that isn’t an option or you aren’t using an integration for some orders, you can set up a rule to move orders to the closed folder when shipment is added:

![](https://251457507-files.gitbook.io/~/files/v0/b/gitbook-x-prod.appspot.com/o/spaces%2FAQOLMUJWMYtrpQ7Oxxca%2Fuploads%2FcIoNKsjIsfUj6uEdbmlh%2Flegacy-d70aacbf948db8b9f971.png?alt=media)

Another good case for having custom folders is to filter orders, whether to flag them for review, assign them to a specific person on your team, or send them to a hold folder that sets them aside before they are ready to move to the next stage in the fulfillment process.

Once you create the folders you need, you can adjust them as you become more familiar with Order Desk and decide how you want to use the app to best process and fulfill each of your orders.


# Quick Start: Orders and Inventory

#### Working With Orders

Whether or not you have enabled any integrations, to get started with Order Desk, you’ll need some orders.

If you already have orders at one of the shopping carts we are integrated with, enable the integration to begin downloading orders. If you aren’t ready to start downloading orders automatically, you can manually pull in some orders with most integrations. Check your shopping cart integration settings to see if there is an Import Orders setting on the top right of the page:

![](https://251457507-files.gitbook.io/~/files/v0/b/gitbook-x-prod.appspot.com/o/spaces%2FAQOLMUJWMYtrpQ7Oxxca%2Fuploads%2F5XvVIJVzdx2nSDmOBwQF%2Flegacy-b662af1c5845c3819f72.png?alt=media)

If you don’t have orders or haven’t enabled any integrations yet, you can manually create real or test orders to begin exploring how Order Desk works. To manually create an order, click on **Add New Order** under the **Tools** menu in the left sidebar:

![](https://251457507-files.gitbook.io/~/files/v0/b/gitbook-x-prod.appspot.com/o/spaces%2FAQOLMUJWMYtrpQ7Oxxca%2Fuploads%2FururQhfCDNaNUEeVMLXC%2Flegacy-cfd31be5c000e80291ed.png?alt=media)

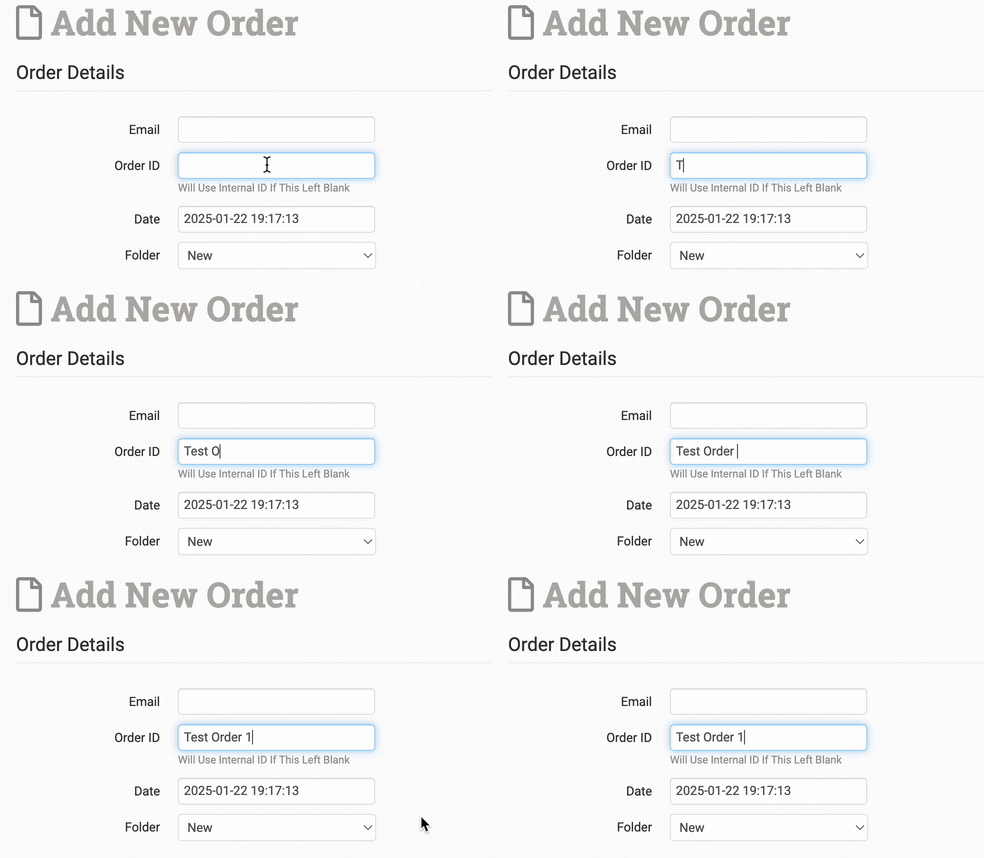
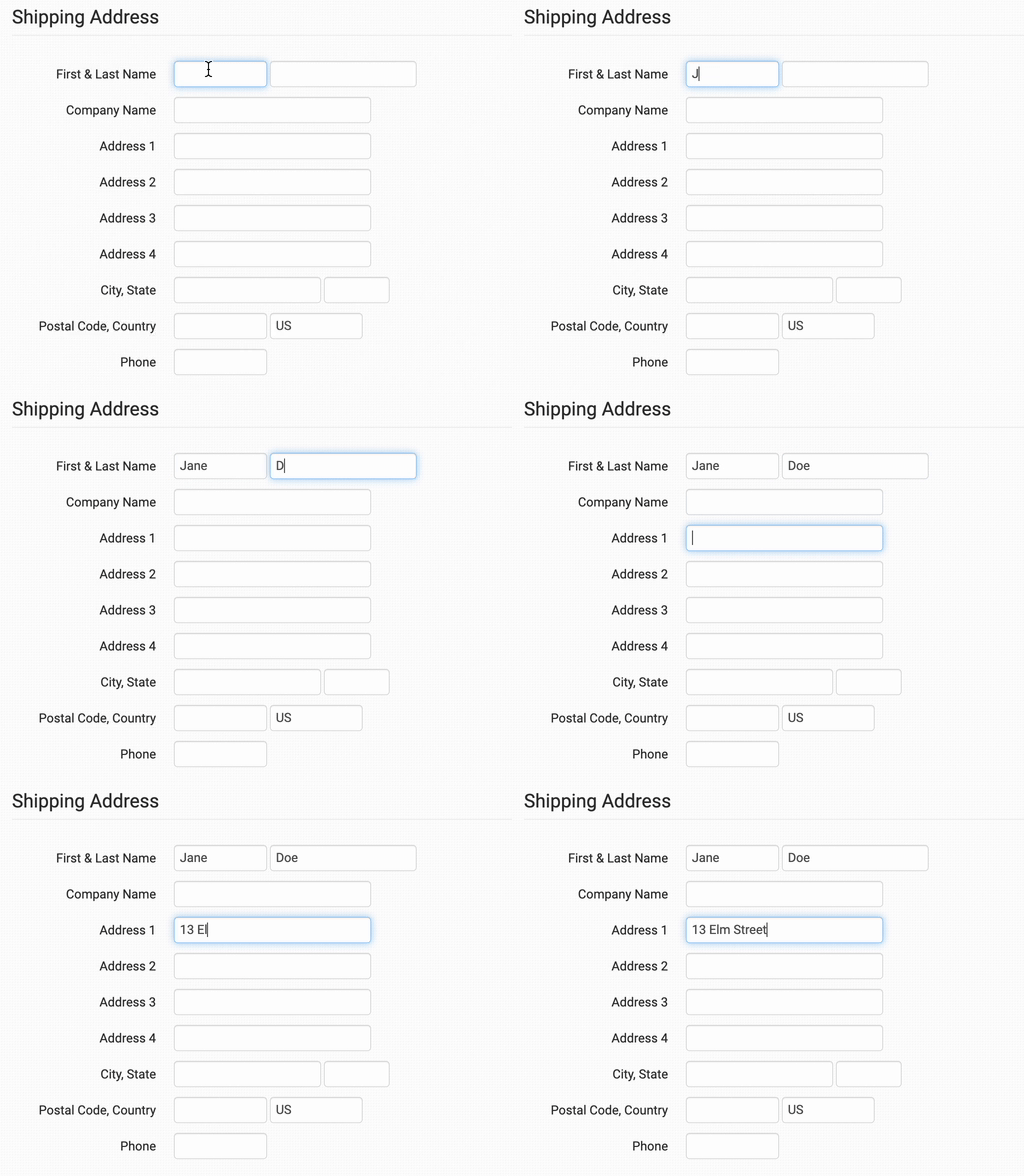
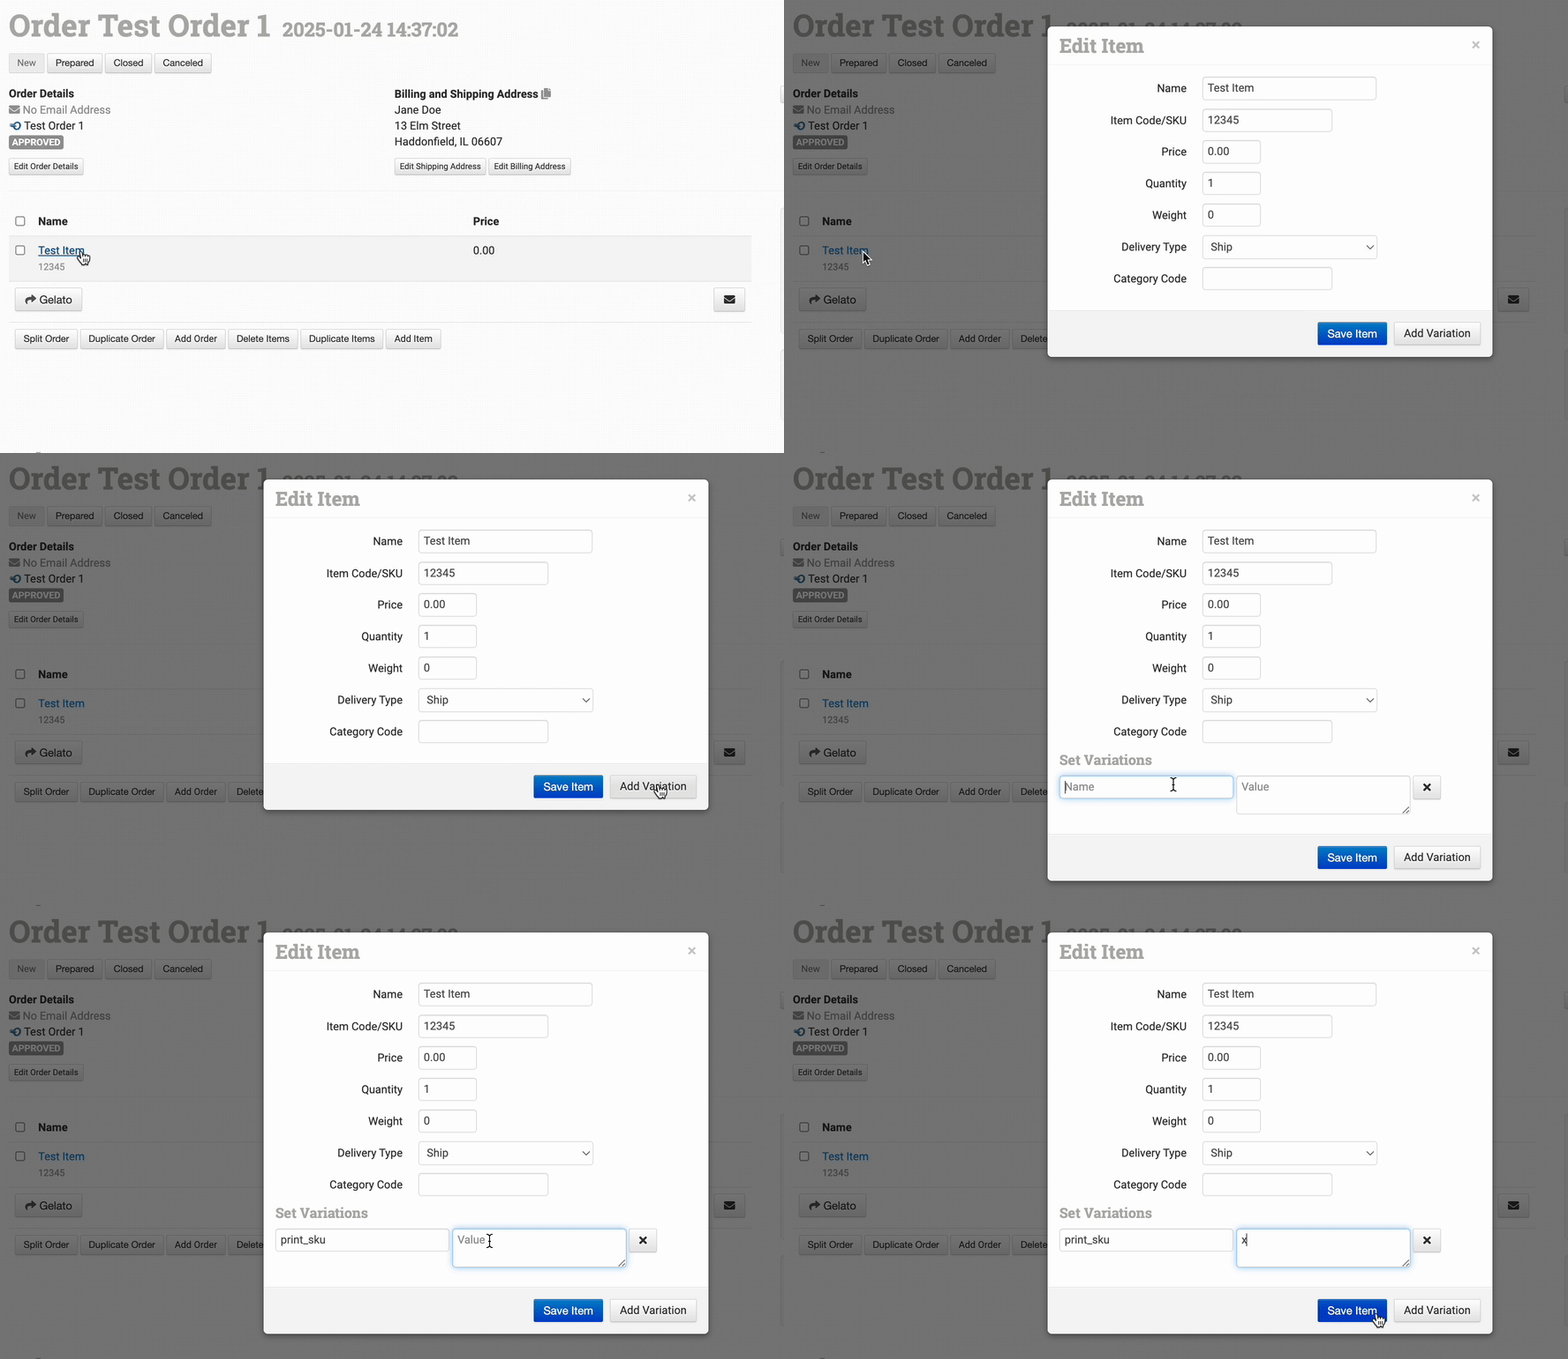
Fill out as many of the order details as you’d like. You can always edit or add information to an order later. You will need to add a Code/SKU for any item added as well as a shipping name or company name to create the order.

If you have a CSV file of some orders that you would like to add, you can import them after building an import template. This [How to Import a Spreadsheet Guide](/guided-walkthroughs/templates-emails-and-order-documents/how-to-import-a-spreadsheet) goes over that process in detail.

#### Working With Inventory

Adding inventory items to Order Desk may be necessary if you have a print on demand store or need to split your orders for different fulfillment providers. It can also be beneficial for record keeping purposes.

There are a few ways to add inventory to Order Desk.

**IMPORTANT** Each product needs to have an individual, unique SKU. If two items share the same SKU, only the most recently added item will be stored in Order Desk.

**Manually Add Items**

You can manually add products by going to **Inventory Items** under the Tools menu in the left sidebar. To add an item, click on the **Add New Item** button in the top right corner.

![](https://251457507-files.gitbook.io/~/files/v0/b/gitbook-x-prod.appspot.com/o/spaces%2FAQOLMUJWMYtrpQ7Oxxca%2Fuploads%2FJctzPT8ElHHGkGwrYXf8%2Flegacy-e88a3b2dff8a6f648c0e.png?alt=media)

When adding your items, you must include a code/SKU.

You can also add print on demand items manually by clicking on the **Add Print on Demand** button. Print on demand products need extra information included, specifically a link to the print file and the printer’s product code. This option prompts you to fill in all the necessary details, but you can use the Add New Item option if you prefer. For more information on manually adding print details to your items, read through [this section](/guided-walkthroughs/print-on-demand-walkthrough/print-on-demand-fulfillment#add-inventory-to-order-desk) of the print on demand fulfillment guide.

**Import File**

If you need to import multiple products at once, you can use a spreadsheet. This will require creating an import template in Order Desk so you can match the field names from your file to the field names used in Order Desk.

For detailed instructions on how to import your inventory from a file, read the [How to Import a Spreadsheet](/guided-walkthroughs/templates-emails-and-order-documents/how-to-import-a-spreadsheet) guide.

**Import with Orders**

Products can also be imported with your orders. When an order is added to Order Desk, if any items in the order are not yet stored here, they can be automatically added to the inventory.

To set up your Order Desk store to do this, go into your [store settings](/guided-walkthroughs/using-order-desk/manage-store-settings) page and look under the Inventory Settings section. Enable the **Update Stock Level as Orders are Added** and **Create Inventory Items as Orders are Added** settings:

![](https://251457507-files.gitbook.io/~/files/v0/b/gitbook-x-prod.appspot.com/o/spaces%2FAQOLMUJWMYtrpQ7Oxxca%2Fuploads%2FSN8ZUUxqqggGjUNKQ5MM%2Flegacy-6467fcf892919c6c4dde.png?alt=media)

Both settings need to be enabled for this to work. When you import, download or create a new order, any product in the order will automatically be added to your inventory in Order Desk if it doesn’t already exist.

**Import from Integration**

Items can be added from integrations. Not all integrations have this feature, so check the settings page of any integrations you have enabled for an inventory import button like this:

![](https://251457507-files.gitbook.io/~/files/v0/b/gitbook-x-prod.appspot.com/o/spaces%2FAQOLMUJWMYtrpQ7Oxxca%2Fuploads%2FqWnpZcnkoMzFmUJ8Oowa%2Flegacy-5a67f4cdeb1a58264545.png?alt=media)

If the integration you use supports this, you can manually import your inventory items by clicking this button.

**IMPORTANT** Integrations have limitations on what can be imported. For instance, Amazon MCF only sends the SKU and quantity, so your products will all be called “No Name”. We can only bring in the information supplied by the integrated service, so you may see differences from integration to integration.

**Export Inventory Per Page**

![](https://251457507-files.gitbook.io/~/files/v0/b/gitbook-x-prod.appspot.com/o/spaces%2FAQOLMUJWMYtrpQ7Oxxca%2Fuploads%2F9hL5cVqJotB31QaVbKd9%2Flegacy-fe9ea8c6b0942512efa6.png?alt=media)

Items can be exported by page using the **Export All Inventory Items** at the bottom of each page in your Inventory Items.

**Export Specific Inventory**

![](https://251457507-files.gitbook.io/~/files/v0/b/gitbook-x-prod.appspot.com/o/spaces%2FAQOLMUJWMYtrpQ7Oxxca%2Fuploads%2Fw10QA6eLWDYAM3ySjoRb%2Flegacy-ffed65a49032036894bc.png?alt=media)

Specific inventory items can be exported using the search function in your Inventory Items page. By adding search terms to the fields and clicking **Export**, only items in your inventory that meet the criteria will be exported.

For a more thorough overview of the Inventory Items page and working with your inventory once it has already been added to Order Desk, please refer to the [How to Work with Inventory Details guide](/guided-walkthroughs/products-and-inventory/how-to-work-with-inventory-details).

#### Send Orders

**To an Integration**

You can set up rules (which we’ll discuss in the [last getting started guide](/start-here/getting-started-series/quick-start-how-customizable-is-order-desk-really)) or adjust the settings in certain integrations to automatically submit orders. We recommend that you submit orders manually for the first few days until you have a better understanding of how the fulfillment process works in Order Desk. This also gives you the opportunity to correct any mistakes as you catch them, something that is harder to do when everything is running automatically.

After you are familiar with the flow of orders through Order Desk, have corrected any mistakes that cause errors, and you can trust that your integrations are set up properly by watching your orders pass through the app for a few days, it would be a good time to begin automating the process for your store. Before doing that, let’s look at how to submit orders manually.

To submit an order manually to an integration, open up the order and look under the order details for a little button with the name of the fulfillment service you are sending it to. Click the button to submit the order to that service. For this order, we want to send it to ShipStation, so we’ll click the submit to ShipStation button:

![](https://251457507-files.gitbook.io/~/files/v0/b/gitbook-x-prod.appspot.com/o/spaces%2FAQOLMUJWMYtrpQ7Oxxca%2Fuploads%2FkNYL7xL0N7Q15KY6UsO2%2Flegacy-490e638b8a4b9e6ec944.png?alt=media)

It’s that easy!

However, there may be issues when you first submit an order. When you click to submit, the order queues up to go through to your fulfillment service. If you check back (or refresh the page) after a few seconds, scroll down and look at the order history section at the bottom of the page to see if the order submitted or not.

![](https://251457507-files.gitbook.io/~/files/v0/b/gitbook-x-prod.appspot.com/o/spaces%2FAQOLMUJWMYtrpQ7Oxxca%2Fuploads%2FRO3Yyo0XxEt94pEtGd0E%2Flegacy-676f8002884c512aec42.png?alt=media)

In most cases orders submit without any issues, but occasionally an order is rejected because something is wrong in the order per the fulfillment service’s requirements for submission. When this happens, an error message is passed through to Order Desk from the fulfillment service that gives the reason the order was rejected:

![](https://251457507-files.gitbook.io/~/files/v0/b/gitbook-x-prod.appspot.com/o/spaces%2FAQOLMUJWMYtrpQ7Oxxca%2Fuploads%2FEom09aIZo0AEwRi3UKBY%2Flegacy-505e86a88ecfe464b72e.png?alt=media)

Some common errors include the address format being wrong, the SKU missing or being incorrect, the shipping country being unavailable for that fulfillment service, the shipping method not matching what the fulfillment service is expecting or the print file missing for print on demand items.

Based on the error message, fix the problem with the order and re-submit it. If the error message doesn’t make sense, you can reach out to Order Desk Support or to your fulfillment service for more help. In some cases, we may ask you to contact them, as we aren’t familiar with every error message we see from different services, but we’ll be happy to take a look at your order to help you figure out the problem.

**To a Third Party Vendor**

If you need to submit orders to a third party service that isn’t currently integrated with Order Desk, you can do this too. Typically the way Order Desk customers submit orders to third parties is to send them a dropship email with the order details. For more information on how to set up these emails, please review [this guide](/guided-walkthroughs/shipping-fulfillment-and-returns/how-to-split-and-dropship-orders-for-separate-vendors) on creating dropship email templates.

It isn’t necessary to create a rule yet to automate the process. If the email template has already been created, you can submit an order from the order details page by clicking on the email button and selecting the email template meant for your fulfillment service:

![](https://251457507-files.gitbook.io/~/files/v0/b/gitbook-x-prod.appspot.com/o/spaces%2FAQOLMUJWMYtrpQ7Oxxca%2Fuploads%2FFDgEwvCpMwCN9mBRVeMs%2Flegacy-e3b20e3a841093a63bb9.png?alt=media)

Another way to submit an order to a third party vendor is to export a CSV file. This is a more advanced option, requiring an export template to be created and sent through email or FTP. For more information on how to do this, please review this guide on [How to Building Export Templates](/guided-walkthroughs/templates-emails-and-order-documents/how-to-build-export-templates). If you need any help with this, please contact Order Desk Support.

***

Next: [How Customizable Is Order Desk Really?](/start-here/getting-started-series/quick-start-how-customizable-is-order-desk-really)

#### Related Articles

* Quick Start: Overview
* How to Work with Inventory Details


# Quick Start: How Customizable is Order Desk Really?

How customizable is Order Desk really? Well, in short, it’s really, *really* customizable! With Order Desk, you have the tools to think up and create ways to manage your workflow and the movement of your orders through separate channels, to and from integrations, and to dropship orders to third party fulfillment services, among many other possible scenarios.

Once your integrations are set up, you’ve had time to manually move orders through Order Desk and you’ve found and tweaked any little areas that are causing errors, it’s time to automate the process, customize your store and provide optional or additional details to your vendors and customers. This is where Order Desk becomes a powerful tool, taking over a lot of work that would otherwise be tedious and prone to human error.

Let’s look at some common areas of Order Desk where customization can be useful.

#### Using Custom Code in Order Desk

It helps to know some HTML/CSS while working in certain areas of the Order Desk app, but knowing code is not necessary for successfully setting up an account to run smoothly and automatically. The code comes in when you want to personalize your customizations – add your logo to an email template, completely customize the layout of the email or receipt template that is sent out to customers or vendors, or change the color scheme or permissions on an Order Desk store, to name a few examples.

{% hint style="warning" %}
**IMPORTANT**

If you need custom code help, please work with a designer or developer. We appreciate your understanding that our small team is unable to spend as much time on custom code questions as we will for other questions about Order Desk features. However, please don’t hesitate to ask if you need help with Order Desk field names in your templates.
{% endhint %}

**For more information on coding in Order Desk, see these guides:**

[How to Work with Email Templates](/guided-walkthroughs/templates-emails-and-order-documents/how-to-work-with-email-templates) – If you will be using email templates in Order Desk, this guide goes over how to create them and gives some code examples for customizing your templates.

[How to Build Custom Templates](/technical-documentation/templates-and-documents/how-to-build-custom-templates) – Customizing email templates that you send to vendors or customers requires some knowledge of code. Order Desk uses a template language called Twig. See this guide for links to more information.

[Order Desk Field Names Reference Guide](/resources/order-desk-field-names) – When building your custom templates, you may want to pull in information from your orders that aren’t in any of our sample templates. Use this reference guide to find the internal field names and structure of the most important data in the orders. If you need the name of something you don’t see in this guide, contact Order Desk Support.

– Examples of a few email templates that can be used. No code knowledge or customizations are necessary if using the sample templates, however feel free to edit them to create a custom template for your store.

[Adding a Packing Slip/Receipt to a Dropship Template](/technical-documentation/templates-and-documents/sample-dropship-email-template#printable-packing-slip) – If you want to add a link for the receipt template into the sample dropship template.

[How to Split and Dropship Orders for Separate Vendors](/guided-walkthroughs/shipping-fulfillment-and-returns/how-to-split-and-dropship-orders-for-separate-vendors) – For a detailed walkthrough on how to create a dropship email template, read this guide. This is good for anyone who isn’t comfortable with code but still wants to work with the email templates.

#### The Order Desk Rule Builder

The Rule Builder in Order Desk is necessary for automating a lot of the movement and fulfillment of orders, among other available actions. If your particular integration settings don’t move orders between folders, you may need to set up a rule to do this. The Rule Builder does more than just move orders, however. It is the foundation of what makes Order Desk unique and customizable. If you need to add data to an order, add a date or timestamp, flag the order for fraud risk, or create a PDF of the order details, set a shipping method, you can do all of this and more with the Rule Builder.

A rule in Order Desk is an *action* that takes place on an order for a specific *event* based on specific filters. With the number of events, filters and actions the Rule Builder has, the different possibilities are endless. You may want to create a rule that tags any order that is imported as red if the shipping address is to a specific country. That rule would look something like this:

**Event:** Order is Imported\
**Filter:** If Shipping Country equals FR\
**Action:** Tag Order Red

Or perhaps you want to automatically submit all orders for a specific third party vendor not integrated with Order Desk. That rule might look like this:

**Event:** When Order is Imported\
**Filter:** If Item Metadata Location equals Vendor X\
**Action:** Send Vendor X Dropship Email to Vendor

You can add more than one filter or action to a rule as well. For instance with the last example, you could also add an Action to move the order after the dropship email is sent.

**Event:** When Order is Imported\
**Filter:** If Item Metadata Location equals Vendor X\
**Action:** Send Vendor X Dropship Email to Vendor\
**Action:** Move Order to “At Vendor X Folder”

Or how about:

**Event:** When Order is Imported\
**Filter:** If Order Source equals Etsy\
*AND* **Filter:** If Shipping Country equals FR\
**Action:** Tag Order Red\
**Action:** Submit Order to ABC Integration\
**Action:** Move Order to At ABC Folder

There are many actions that can be taken on orders with a rule. Some of these are Change Folder, Delete Order, Split Order, and Create a PDF. There are also specific actions available that show up depending on which integrations you have enabled.

For a complete list of events and actions available in your Rule Builder, navigate to the **Rule Builder** page from the left sidebar:

![](https://251457507-files.gitbook.io/~/files/v0/b/gitbook-x-prod.appspot.com/o/spaces%2FAQOLMUJWMYtrpQ7Oxxca%2Fuploads%2FYVCOYVlFt96kEBQE6VXZ%2Flegacy-d740452447b23c39c352.png?alt=media)

Choose the Rule Type—if you want the rule to take action on an entire order or on certain items within an order—and in the Event tab, you can see what events are available:

![](https://251457507-files.gitbook.io/~/files/v0/b/gitbook-x-prod.appspot.com/o/spaces%2FAQOLMUJWMYtrpQ7Oxxca%2Fuploads%2F6UQqHNfzq4qusT54yDUs%2Flegacy-68f8701ace479e2c27f6.png?alt=media)

In the Filters & Actions tab, you will see what actions are available:

![](https://251457507-files.gitbook.io/~/files/v0/b/gitbook-x-prod.appspot.com/o/spaces%2FAQOLMUJWMYtrpQ7Oxxca%2Fuploads%2FBIEadEgRCRHsylO8UZSM%2Flegacy-045b28107ccbc4a3faba.png?alt=media)

For a detailed walkthrough of creating and using rules, read the [How to Work with Rules](/guided-walkthroughs/rules-and-automations/how-to-work-with-rules) guide.

**For more information on working with the Rule Builder, see these guides:**

[How to Work with Rules](/guided-walkthroughs/rules-and-automations/how-to-work-with-rules) – Everything you need to know about creating and working with rules.

[Rules Reference: Events, Filters and Actions](/resources/rules-reference-events-filters-and-actions) – References and explains all of the events, filters and actions in the Rule Builder.

[How to Split and Dropship Orders for Separate Vendors](/guided-walkthroughs/shipping-fulfillment-and-returns/how-to-split-and-dropship-orders-for-separate-vendors) – Create a rule that sends a dropship email to a third party vendor.

[How to Send Shipment/Tracking Info to Customers](/guided-walkthroughs/shipping-fulfillment-and-returns/how-to-print-thermal-labels/how-to-send-shipment-tracking-info-to-customers) – Create a rule that sends a shipment notification email to customers when tracking info is added to an order.

[How to Work with Timestamps](/guided-walkthroughs/orders-and-folders/how-to-work-with-timestamps) – Create rules that run based on a timestamp on the order.

[How to Use Custom Events](/guided-walkthroughs/rules-and-automations/how-to-use-custom-events) – Use the Rule Builder to create custom events that will scan the orders in a specific folder on a schedule.

[How to Use Custom Buttons](/guided-walkthroughs/rules-and-automations/how-to-use-custom-buttons) – Run rules on orders at the click of a button.

#### Related Articles

* Quick Start: Overview
* Quick Start: Orders and Inventory


# Getting Started Video Series


# How Order Desk Helps You Video

Order Desk is a robust and versatile order management app that will help you organize and optimize your ecommerce business. This series of demo videos explains what Order Desk does and shows how you can begin to use and customize it to fit your business workflow.

If what you’re looking to do with Order Desk isn’t covered in this demo video series, chances are good that it’s still possible—the customized nature of the app makes the possibilities absolutely infinite.

As you watch these videos, keep notes about any questions you have that may not be answered here. Email your questions to our support team and we can help you decide if Order Desk is right for your business.

{% embed url="<https://player.vimeo.com/video/601795734?dnt=1&amp;app_id=122963>" %}

<a href="/start-here/getting-started-video-series/integrations-video" class="button secondary" data-icon="arrow-right">Next video</a>


# Integrations Video

Order Desk connects to hundreds of outside services, called integrations. When you use Order Desk to connect to the other services you use, Order Desk can communicate with them and act as the central hub where your orders can be managed. Watch this video for a brief introduction to connecting to an integration and using it within Order Desk.

{% embed url="<https://player.vimeo.com/video/604143848?dnt=1&amp;app_id=122963>" %}

<a href="/start-here/getting-started-video-series/how-order-desk-helps-you-video" class="button secondary" data-icon="arrow-left-long">Previous video</a><a href="/start-here/getting-started-video-series/how-to-use-folders-video" class="button secondary" data-icon="arrow-right">Next video</a>

### FAQ

**Can you help me figure out why my credentials don’t work?**

Unfortunately this is not something Order Desk can help with as your integration credentials or login details are secure information created in or provided by another service.

The Order Desk team does not have access to your third party accounts and won’t have a way to know what your credentials should be. If you’re having trouble connecting to a service inside Order Desk, please contact that service for help with the credentials they have provided to you.

**I don’t understand the settings in the integration I’m using. Do you have a video to cover those?**

With so many integrations, and more being added all the time, we can’t make a video for each specific integration and the settings within it, however, look for our on your specific integration to learn more about what the settings do.

If the integration you use does not have a help guide or any settings are not covered in that guide, please contact Order Desk support for more information.

**Will you make an integration to a new service for me?**

To request a new integration, please fill out [this form](https://www.orderdesk.com/requests/), and someone from our integrations team will follow up with you about it soon.

**How do you decide what integrations to make?**

We keep track of every integration request we receive. However, we receive far more requests than we could ever build, so we have to take certain considerations into mind when deciding which integrations will be built.

* Is this integration technically feasible for our development team to build and support it?
* Will this integration benefit many Order Desk merchants or only a few?
* Is this an integration that is frequently requested?

**The service I want an integration for doesn’t have an API. What options do I have?**

You can still communicate with third parties from Order Desk using import and export templates. For more information, see the [How to Import a Spreadsheet](/guided-walkthroughs/templates-emails-and-order-documents/how-to-import-a-spreadsheet) and the [How to Build Export Templates](/guided-walkthroughs/templates-emails-and-order-documents/how-to-build-export-templates) guides.

**I need a private integration. Can you help?**

All integrations built by Order Desk are intended for everyone who uses Order Desk. While private integrations can work with the Order Desk app, it isn’t work our development team can take on since their priorities are to ensure that new features and integrations are benefiting all of our customers.

If you need a private integration, we invite you to build one of your own using [our API](broken://pages/acRxeXiEEk56fGX7v4W9).


# How to Use Folders Video

Order Desk uses a folder system that lets you name the custom status for each step in the fulfillment process that your orders need to take. This video explains how to create, edit and use folders.

{% embed url="<https://player.vimeo.com/video/604144133?dnt=1&amp;app_id=122963>" %}

<a href="/start-here/getting-started-video-series/integrations-video" class="button secondary" data-icon="arrow-left-long">Previous video</a><a href="/start-here/getting-started-video-series/inventory-templates-and-users-video" class="button secondary" data-icon="arrow-right">Next video</a>

### FAQ

**How many folders can a store have?**

You can create as many folders as you need in a single store.

**Can folders be nested?**

At this time, folders cannot be nested. For a creative workaround, you can make empty folders that use symbols in the names to visually convey nested folders.

**Can I put an order in more than one folder?**

No. Orders can only be in one folder at a time.

**Why can’t I edit or remove the All Orders folder?**

The All Orders folder contains all the orders in a store, regardless of which folder they are currently in. It looks and functions like a folder, but because it’s actually a collection of the entire store, it cannot be modified or removed.

**Where can I find the Folder ID?**

In some cases, such as an Order Modify import template, you may need to use the Folder ID to tell Order Desk which folder you want to use. To find the folder ID, go into the folder and look at the URL. The number at the end of the URL after the folder= is the ID.

![](https://s3.amazonaws.com/helpscout.net/docs/assets/57b0032590336059d4edf94f/images/5d1bb78c04286369ad8d0ad4/file-7q5qjyCKRm.png)

**When I moved an order into a folder, why didn’t it submit to my fulfillment service?**

Folders by themselves will not take actions on orders. As an example, if you have an FBA folder, moving an order into this folder will not submit the order to FBA *unless* you have created a rule that tells Order Desk to send the order to FBA when it is moved into the FBA folder.

For more information on creating rules for your folders, please refer to the [Working with Folders guide](/start-here/getting-started-series/quick-start-overview#working-with-folders) or watch the Rules video.

**Why can’t I see the options to edit or create folders?**

If you followed along with the video but don’t see the cog icon or the folders page in your Store Settings, then you likely do not have the right permissions to work on folders. Please talk to your store admin to get permissions if this is something you need. Order Desk support cannot enable permissions on your account where the admin has disabled them.

For more information, please see the [How to Add Store Users and Edit Permissions guide](/guided-walkthroughs/using-order-desk/how-to-add-your-team-to-your-store).

**Can I change what info is in the folder view?**

Yes! You can customize the columns in each folder. For instructions, suggestions and limitations for how to do this, please refer to the [How to Customize Folder Columns guide](/guided-walkthroughs/orders-and-folders/how-to-customize-folder-columns).


# Inventory, Templates and Users Video

Manage your inventory, communicate with your customers and vendors, and add your entire team to your Order Desk stores. Watch this video to get started on learning how these features work in Order Desk.

{% embed url="<https://player.vimeo.com/video/604144332?dnt=1&amp;app_id=122963>" %}

<a href="/start-here/getting-started-video-series/how-to-use-folders-video" class="button secondary" data-icon="arrow-left-long">Previous video</a><a href="/start-here/getting-started-video-series/how-to-import-files-video" class="button secondary" data-icon="arrow-right">Next video</a>

#### Inventory FAQ

**Does Order Desk support multi-location inventory?**

At this time, this is not a feature supported by Order Desk. If you have items in multiple warehouses using the same SKUs, Order Desk does not have a way to manage the inventory quantities at each separate location. If your items in different locations are using *different* SKUs, however, then inventory sync will work with Order Desk for those unique SKUs.

**Why isn’t my inventory updating in my shopping cart?**

As long as you have Sync Inventory enabled in your shopping cart integration, any time your inventory counts are updated in Order Desk, they will also be updated in the cart.

If items are not updating, there are a few things to look for:

* The inventory sync to shopping carts is an appointment that runs 7 minutes *after* an item has been updated in Order Desk. You can run this appointment ahead of schedule after items have been updated in Order Desk by visiting your View Appointments page, under the Tools menu in the left sidebar, otherwise it will take 7 minutes from the time the numbers are changed in Order Desk for the numbers to start updating in the shopping cart.
* Do the SKUs match? In almost all integrations, Order Desk uses the SKUs to communicate information about your products between services. Make sure your SKUs match in all locations for inventory sync to work. If you use code replace, there are some limitations and important details that you can read about [here](/guided-walkthroughs/products-and-inventory/how-to-work-with-inventory-quantities#inventory-quantities-for-replaced-skus).
* Have you added any safety levels to the items? For more information, see [this guide](/guided-walkthroughs/products-and-inventory/how-to-work-with-inventory-quantities#safety-levels).

**Why is Order Desk changing the number my warehouse has in stock when communicating stock levels to my shopping cart?**

Order Desk will never change the information it has been given, however there may be settings on certain items that tell Order Desk to alter the numbers it communicates to a shopping cart. Make sure your items do not have [safety levels](/guided-walkthroughs/products-and-inventory/how-to-work-with-inventory-quantities#safety-levels) added to them if the numbers are wrong.

Additionally, many warehouses have different stock counts for a single item depending on where in the warehouse the item currently is. Some warehouses will provide a more precise inventory file to merchants accounting for all pieces of inventory in stock, but what they provide to Order Desk is a simplified overview of just the inventory that is currently on the shelf and ready to be shipped.

If you see a discrepancy between what your warehouse tells you is in stock and what Order Desk is telling your shopping cart, please check with your warehouse to find out how they break their numbers down and what they are communicating to Order Desk.

**I still don’t understand how to set up bundles with Order Desk.**

For more information on how code replace and bundles work in Order Desk, please review [this guide](/guided-walkthroughs/products-and-inventory/how-to-use-code-replace#code-replace-bundles).

To summarize, add your inventory to Order Desk using the same SKUs used in your shopping cart. To communicate to Order Desk when a SKU needs to be changed into another SKU or into a group of SKUs, use an item metadata field to add code\_replace and the SKU(s) the original item should be changed to.

For a single item, where SKU\_A needs to be changed to SKU\_B:

![](https://s3.amazonaws.com/helpscout.net/docs/assets/57b0032590336059d4edf94f/images/5e307b0f2c7d3a7e9ae6ddce/file-qjcTl6qVQq.png)

For a bundle, where SKU\_A needs to be changed to SKU\_B,SKU\_C,SKU\_D:

![](https://s3.amazonaws.com/helpscout.net/docs/assets/57b0032590336059d4edf94f/images/5e307b182c7d3a7e9ae6ddcf/file-1bURE5qoNt.png)

**How do I push my products from one cart to another?**

Order Desk doesn’t manage listings and cannot push products into shopping carts.

#### Templates FAQ

**I’m not familiar with code. Will you design my email and receipt templates for me?**

We get it; code can be difficult, which is precisely why we tell you to hire a skilled developer or designer. The templates we provide work for most scenarios, but if you aren’t able to customize them yourself, we do ask that you hire a skilled professional to take the time necessary to write your code.

We appreciate your understanding that the Order Desk team is not your personal designer or developer.

**Can I copy the code from my email or receipt templates in another platform into Order Desk?**

The field names used in the code in Order Desk are unique to Order Desk. Because of this, copying code from another platform into Order Desk will not work.

**Where can I find more info about email templates?**

If you’d like to learn more about creating and using email templates in Order Desk, please refer to the [How to Work with Email Templates guide](/guided-walkthroughs/templates-emails-and-order-documents/how-to-work-with-email-templates).

The shipment notification email template is the default template created in your Order Desk store whenever you add a new template.

If you’d like to use the dropship email template instead, you can find and copy the code from [here](/technical-documentation/templates-and-documents/sample-dropship-email-template).

If you want to send a customer receipt as an email, use [this code](/technical-documentation/templates-and-documents/customer-receipt-email-template) in your email template. Please note that this code is slightly different from the syntax required in actual receipt templates, and those cannot be copied and pasted into email templates.

The most basic rule you can create for sending an email template is to send shipment information when it’s added to an order in Order Desk. For instructions on setting this up, refer to the [How to Send Shipment/Tracking Info to Customers guide](/guided-walkthroughs/shipping-fulfillment-and-returns/how-to-print-thermal-labels/how-to-send-shipment-tracking-info-to-customers).

For instructions on splitting your orders and sending dropship emails to separate vendors, please follow the instructions in the [How to Split and Dropship Orders for Separate Vendors guide](/guided-walkthroughs/shipping-fulfillment-and-returns/how-to-split-and-dropship-orders-for-separate-vendors).

**Where can I find more info about receipt templates?**

If you’d like to learn more information about creating and using receipt templates in Order Desk, please refer to the [How to Work with Receipt Templates guide](/guided-walkthroughs/templates-emails-and-order-documents/how-to-work-with-order-documents).

When creating a receipt in Order Desk, the default template will be supplied. If you need to factor VAT taxes into your receipts, use this [sample template](/technical-documentation/templates-and-documents/vat-receipt-template) instead.

To turn your receipt templates into PDFs, please follow the instructions in [this guide](/guided-walkthroughs/templates-emails-and-order-documents/how-to-create-pdf-files-for-order-documents).

**How do I attach a packing slip to my orders for my fulfillment provider?**

Whether you create the packing slip directly in Order Desk or have a packing slip from some other source, you can add it to your orders in Order Desk by setting the link to the packing slip in a checkout data or order metadata field called PackingSlip. Details on how this works can be found [here](/guided-walkthroughs/templates-emails-and-order-documents/how-to-create-pdf-files-for-order-documents).

Many of the fulfillment integrations in Order Desk will receive the packing slip when formatted this way on orders. If you are not sending the packing slip to an integration, but rather sending the order info and packing slip via a file or email, you can add the field name to your templates to have the packing slip included with the order details.

#### Store Users and Permissions FAQ

**Where can I find more info about user permissions?**

For more information on user permissions, please refer to [this guide](/guided-walkthroughs/using-order-desk/how-to-add-your-team-to-your-store).

**How do I give a user access to only parts of my store?**

In general, if you don’t want your users to access certain parts of your store or certain information about your orders, it’s recommended that they not have access at all.

However, if you are comfortable writing CSS, you have some ability to hide certain pages or features from certain users. For more information, please refer to [this guide](/guided-walkthroughs/using-order-desk/manage-store-settings#custom-css).

**How many users can I add to my store?**

There currently isn’t a hard limit on the number of users a store can have, however if you’re planning on adding more than a couple dozen, please contact Order Desk support to determine if Order Desk is the right app to meet your needs.


# How to Import Files Video

Learn how to create import templates so you can upload your own files directly into Order Desk. Topics covered include what types of information can be imported, how to understand the import template, how to import your files manually, from email or via FTP, how to test your file before importing it, how to read the results of your import and how to understand and fix errors.

There are five videos covering these topics on importing files into Order Desk:

1. Overview
2. How to Create an Import Template
3. How to Import a File
4. Understanding Imports
5. How to Reload Sample Data and Why

#### Imports Overview

{% embed url="<https://player.vimeo.com/video/604144848?dnt=1&amp;app_id=122963>" %}

#### How to Create an Import Template

{% embed url="<https://player.vimeo.com/video/604144997?dnt=1&amp;app_id=122963>" %}

#### How to Import a File

{% embed url="<https://player.vimeo.com/video/604145481?dnt=1&amp;app_id=122963>" %}

#### Understanding Imports

{% embed url="<https://player.vimeo.com/video/604145600?dnt=1&amp;app_id=122963>" %}

#### How to Reload Sample Data and Why

{% embed url="<https://player.vimeo.com/video/604145659?dnt=1&amp;app_id=122963>" %}

<a href="/start-here/getting-started-video-series/inventory-templates-and-users-video" class="button secondary" data-icon="arrow-left-long">Previous video</a><a href="/start-here/getting-started-video-series/how-to-export-files-video" class="button secondary" data-icon="arrow-right">Next video</a>

#### FAQ

**What types of files can I import?**

* CSV
* TXT
* XLS
* XLSX
* TSV

When using a format that allows multiple sheets, the data to be imported must be on the first tab/sheet.

**What info is necessary in the file for it to import?**

Certain information is required for a file to import. The requirements for each type of template are listed below.

| Import Type  | Required Data        |
| ------------ | -------------------- |
| Orders       | Name or Company Name |
| Shipments    | Order Number         |
| Inventory    | SKU                  |
| Order Modify | Order Number         |

**What is a delimiter?**

A delimiter is the character that separates values in a data file.

Most spreadsheets use a comma as the delimiter, which is where CSV comes from: Comma Separated Values. While you may not see the comma when looking at your spreadsheet, the data in the spreadsheet is separated by a comma.

If you don’t know what your file delimiter is, it is probably a comma.

Other delimiter types are typically tab, pipe and semicolon.

**Can I test my file before I import it?**

Yes! You can do a test import to see what the results will be. To do this, click on the **Preview Only** option and then upload your file normally:

![](https://251457507-files.gitbook.io/~/files/v0/b/gitbook-x-prod.appspot.com/o/spaces%2FAQOLMUJWMYtrpQ7Oxxca%2Fuploads%2FpqHgcJch4eyXepG3wsJr%2Flegacy-20db1c8ab9fef2989270.png?alt=media)

Instead of importing the file, Order Desk will show you what the results would be.

If your file has too many or too few columns:

![](https://s3.amazonaws.com/helpscout.net/docs/assets/57b0032590336059d4edf94f/images/5cffc2712c7d3a493e798a22/file-poSoyeQHLf.png)

If the order numbers aren’t found in your store:

![](https://s3.amazonaws.com/helpscout.net/docs/assets/57b0032590336059d4edf94f/images/5cffc2900428632218e3f862/file-hTDtEzT7us.png)

If the information needed to import the file is missing or the template isn’t mapped yet:

![](https://s3.amazonaws.com/helpscout.net/docs/assets/57b0032590336059d4edf94f/images/5cffc2a92c7d3a493e798a26/file-9w1yddMNYR.png)

Or if the file would be successfully imported:

![](https://s3.amazonaws.com/helpscout.net/docs/assets/57b0032590336059d4edf94f/images/5cffc2bb2c7d3a493e798a28/file-bOBhYt7i1R.png)

**What does invalid length error mean?**

If you do a test import and get an invalid length error, this means the number of columns in your file aren’t the same as the number of columns the import template was told to expect.

Ensure that your file and your import template having matching columns to avoid this error.

**Can someone email the file to my store?**

Yes, this can be done using the unique email address at the top of the page within the template:

![](https://s3.amazonaws.com/helpscout.net/docs/assets/57b0032590336059d4edf94f/images/5cffcd540428632218e3f92c/file-IQFxTjo26k.png)

Give this address to the third party who will be emailing files into your store. Files should be attached to the email. The body of the email can be left blank as nobody will be receiving or reading it.

**Can I copy fields between import templates?**

Copying fields between templates is not recommended. Use the dropdown in the template you are working on to find the right field.

If the template types are different, what looks like the same field may actually have a different structure for the app to be able to read it, and the import won’t be successful.

**How often do files import through FTP?**

FTP import appointments run automatically every 12 hours. It is not possible for these appointments to happen more frequently than this, however, you can run the appointment at any time from your View Appointments page.

To do this, click on **View Appointments** under the **Tools** menu in the left sidebar.

Find the Import Files from FTP appointment and click **Run** to tell Order Desk to look for and import files:

![](https://s3.amazonaws.com/helpscout.net/docs/assets/57b0032590336059d4edf94f/images/5cfec2510428632218e3ee82/file-BBviJ6zZAM.png)

**How do I change the time the FTP import appointment runs?**

Click on **View Appointments** under the **Tools** menu in the left sidebar.

Find the FTP import appointment and click **Edit** to adjust what time you want the appointment to run:

![](https://s3.amazonaws.com/helpscout.net/docs/assets/57b0032590336059d4edf94f/images/5cfec3270428632218e3ee91/file-BNQoH8fW1p.png)

**My FTP appointments are failing. Is something wrong with Order Desk?**

There probably isn’t anything wrong with Order Desk. When FTP appointments are failing, please work out the issue with your FTP service or the party you are communicating with through FTP.

When FTP appointments fail it is typically because the credentials are incorrect or the FTP server being used is outdated. Since we don’t know what your credentials should be and have no control over the server being used, our ability to help resolve this is limited.

**I need to whitelist your IP address for my FTP to work.**

You can whitelist [this list of IP addresses](/technical-documentation/api-and-integration-reference/application-ip-address).

If you whitelist our IP addresses, you will not be able to run FTP appointments manually due to a rotating IP address that changes each time the appointment runs. Please let your FTP appointments run on their automatic schedule to avoid errors.

**What is Manual Mapping?**

Manual Mapping allows you to add or remove custom information when importing a file.

For details about how to use this field, please refer to the [How to Import Spreadsheets guide](/guided-walkthroughs/templates-emails-and-order-documents/how-to-import-a-spreadsheet#edit-your-template-manual-mapping).


# How to Export Files Video

Create export templates to send order information to third parties via email or FTP, automatically on a schedule or manually when you need to. You can also create custom reports using the export template feature. Watch this video to learn how to create and export your own custom templates in Order Desk.

{% embed url="<https://player.vimeo.com/video/604145991?dnt=1&amp;app_id=122963>" %}

<a href="/start-here/getting-started-video-series/how-to-import-files-video" class="button secondary" data-icon="arrow-left-long">Previous video</a><a href="/start-here/getting-started-video-series/how-to-use-rules-video" class="button secondary" data-icon="arrow-right">Next video</a>

#### FAQ

**What are the different types of file name options?**

For a list of all the options for naming the export template file, see the [How to Build Export Templates guide](/guided-walkthroughs/templates-emails-and-order-documents/how-to-build-export-templates).

**What are the custom parameters?**

For a list of all custom parameters, see the [How to Build Export Templates guide](/guided-walkthroughs/templates-emails-and-order-documents/how-to-build-export-templates).

**How do Filters work?**

For an overview of how Filters work in export templates, please see the Filters section of the [How to Build Export Templates guide](/guided-walkthroughs/templates-emails-and-order-documents/how-to-build-export-templates-filters-and-custom-fields#filters).

**Why is the file empty when I export it?**

There are three reasons why a file might have empty fields when exported.

1. Check that the fields in the template match the One Line Per setting. If you are exporting product fields, for example, but have it set to One Line Per Order, this would explain why the fields are empty. It will need to be set to One Line Per Item instead.
2. Check that any custom fields where the? is replaced with your own field name match the field names in your items and orders. These are case sensitive and should be an exact match for the fields otherwise they will be left blank in the export. If your field names vary from item to item or order to order, fix this for consistency. For example, if the variation is “color” on some items but “Color” on others, it should be changed to one or the other for all items and the export template should match.
3. Make sure the field exists in the order or item. If it isn’t there, it can’t be exported.

**What happens to my data when it’s exported?**

Order Desk won’t change or delete your data when it’s exported.

Within each export template, there is an option to move the orders to a different folder after the export runs. This is the most Order Desk will do to “change” the orders when exported.

**Is there a limit to how many exports I can run?**

Nope! However, there is a limit on how many lines can be exported in one file.

**The schedule options don’t give me what I need. Can you add more?**

If you need to run the export automatically more often or at a different interval than the schedule allows for, you can duplicate your export template as many times as needed and set each template up on alternating schedules that come out to the right timing for your store.

**How do I export my inventory?**

Export templates are for orders only, however if you want to export your inventory, you can do so directly from the Inventory Items page.

![](https://s3.amazonaws.com/helpscout.net/docs/assets/57b0032590336059d4edf94f/images/5d31f8322c7d3a2ec4bf1fe7/file-htJBeox84c.png)


# How to use Rules Video

The Order Desk Rule builder is the mechanism which makes automating your workflow possible. Watch this video to learn more about how the Rule Builder works and how you can start creating your own rules that teach Order Desk how you want it to work.

{% embed url="<https://player.vimeo.com/video/604146814?dnt=1&amp;app_id=122963>" %}

<a href="/start-here/getting-started-video-series/how-to-export-files-video" class="button secondary" data-icon="arrow-left-long">Previous video</a><a href="/start-here/getting-started-video-series/billing-video" class="button secondary" data-icon="arrow-right">Next video</a>

**FAQ**

**What is a rule?**

Rules are how you tell Order Desk how to automate workflows based on the specific needs of your store.

Think of rules as an If/Then statement. You tell Order Desk *if* something specific happens, *then* you want Order Desk to take action on certain orders or items within orders.

**How can I tell when a rule runs?**

When in doubt, look at your Order History to see what has happened to the order. When a rule runs, it will show up in the history as Auto.

Order History can be found near the bottom of every order details page:

![](https://s3.amazonaws.com/helpscout.net/docs/assets/57b0032590336059d4edf94f/images/5d3722402c7d3a2ec4bf4b52/file-SujXQGLNBE.png)

**Why didn’t my rule run?**

If a rule didn’t run on an order or item where it was expected to run, make sure the filters in the rule match the order or item. In most cases, the issue is a small, easy to miss difference, such as case sensitive error.

If you are certain the rule filters should have applied but didn’t, contact Order Desk support for help.

**Why doesn’t my rule work on older orders?**

In most cases, this is because the rule is made for the Order is Imported event, which has already happened for older orders. If the rule is created *after* the order imports, the rule won’t run on the order.

If this is the case, you can run the Order is Imported event on your orders to force the rule to work on them. For instructions on how to do this, see the [How to Work with Rules guide](/guided-walkthroughs/rules-and-automations/how-to-work-with-rules#how-to-run-an-event).

**Why does my rule creating a PDF sometimes mess up the rest of the actions after the PDF is created?**

Actions don’t always complete as expected when in the same rule as the PDF creation action. This is because some PDFs take longer to create than others. If the PDF is delayed even a fraction of a second when being created (to account for a large order or large thumbnails, for instance), any actions that take place in the same rule may run with an incomplete or nonexistent PDF.

However, if those actions are set up to run on the event for when PDF is Created, the PDF will be fully created before this next rule runs and all actions should complete without issue.


# Billing Video

If you’re ready to upgrade your Order Desk store, watch this video to answer any questions you may have about how the billing plans work, especially with multiple stores on a single account.

{% embed url="<https://player.vimeo.com/video/604146955?dnt=1&amp;app_id=122963>" %}

<a href="/start-here/getting-started-video-series/how-to-use-rules-video" class="button secondary" data-icon="arrow-left-long">Previous video</a>

> **IMPORTANT**
>
> The pricing in this video is not up to date. For more information on our current prices, please refer to our [Pricing](https://www.orderdesk.com/pricing/) outline.

### FAQ

**Can I try Order Desk for free before paying?**

Yes! When you first sign up for Order Desk, you will have a 30 day free demo period to trial the app and all of its features. At the end of the 30 day period, you can choose a plan and upgrade if you want to continue using the app, or you can let your store lock itself.

**I already set up my store but I need to wait awhile before I can upgrade. Will I lose all of my work?**

If your store locks, everything will be saved and available again when you are ready to upgrade.

**Why did I get charged for all of these orders?**

Every order in Order Desk, whether it splits, is duplicated, is copied into another store or is unfulfilled, counts towards the per-order fee. The pricing plans are set up so that each Order Desk store is accountable for its usage of the app, including the amount of orders that are being stored and processed in the app.

**Why did my bill this month include orders from last month?**

Billing plans for Order Desk cover two fees: one for the monthly subscription and one for the number of orders in your store. Since the number of orders that are added to Order Desk cannot be determined in advance, your bill will include the monthly fee for the upcoming month and the per-order fee from the previous month.

**Do I have to pay extra for each integration?**

With the exception of the Starter plan, which only allows 3 integrations, you can enable and use as many integrations as you need on an Order Desk store at no additional cost.

**How do I delete my Order Desk store?**

If you would like to delete your store, follow the steps [in this guide](/guided-walkthroughs/using-order-desk/how-to-delete-a-store) to schedule deletion.


# Print on Demand Video Series


# Introduction to Order Desk

This video series will provide you with an overview on how to set up Print on Demand fulfillment with Order Desk. Through this video series you’ll learn how Order Desk facilitates the Print on Demand process for merchants, how to connect your integrations to your Order Desk store, the importance of inventory, and more.

{% embed url="<https://player.vimeo.com/video/602175278?dnt=1&amp;app_id=122963>" %}

<a href="/start-here/print-on-demand-video-series/why-your-inventory-matters-and-how-to-set-it-up" class="button secondary" data-icon="arrow-right">Next video</a>

### FAQ

**I’m an artist who wants to print and sell my designs. How do I get started?**

First, start with our [Getting Started for Artists](/start-here/learn-the-basics) guide. This guide will give you a simple walkthrough of how you can use Order Desk to automate the print on demand process, including setting up your inventory, connecting integrations and shipping options. Next, use the [Print on Demand Providers](/integration-setup-guides/print-on-demand/print-on-demand-providers) list to find your perfect printer.

**How do I connect to the ecommerce services I use?**

Order Desk provides integrations with over 200 Print on Demand services. Find your provider and it’s associated integration guide to get your printers connected to Order Desk and ready to process orders.

**I don’t see the printer I use in your list of integrations. What should I do?**

If you use a print on demand provider that is not integrated, [visit this page](https://www.orderdesk.com/requests/) to submit it as an integration request. Our team will look it over and follow up to let you know if that’s a service we’ll be able to support.

**I don’t know the credentials I need to connect my integration. Can you help me?**

We typically can’t help with integration credentials, because their source is the application you’re connecting to as opposed to Order Desk itself. If you’re missing credentials or they aren’t being authorized, check in with the company you’re trying to connect to and either reset the credentials or find out where they are located in their respective applications.

**Can someone at Order Desk set up my store for me?**

Since Order Desk is a “do it yourself” platform, there isn’t anyone on our team would be able to to set up your store on your behalf. Additionally, since everyone’s needs are different, we wouldn’t be able to know what you would need in your set up that someone else might not. But while setting up your Order Desk store is something you’ll need to do, you aren’t alone! Our support team is here to answer any questions you have along the way!


# Why Your Inventory Matters (And How to Set It Up)

In this video, we’ll look at why setting up your SKUs with their print details in Order Desk is so important and how to go about getting them added. We’ll also talk through which print details you need to add and some important things to keep in mind when adding each print detail.

{% embed url="<https://player.vimeo.com/video/604960944?dnt=1&amp;app_id=122963>" %}

<a href="/start-here/print-on-demand-video-series/introduction-to-order-desk" class="button secondary" data-icon="arrow-left-long">Previous video</a><a href="/start-here/print-on-demand-video-series/dont-lose-money-by-skipping-the-shipping-settings" class="button secondary" data-icon="arrow-right">Next Video</a>

### FAQ

**Why do I need a SKU for each item?**

SKUs are unique combinations of numbers and letters that help identify an inventory item. By giving an item and individual SKU, you’re allowing for your printer to know exactly which item needs to be printed with which dimensions.

**Why do I need to add all of my inventory to Order Desk? Couldn’t I just use rules to add the print details?**

By investing time initially into setting up your inventory correctly in Order Desk, you’ll be setting yourself up for a fully automated experience down the line. Each inventory item needs to have all the correct print details set up for each individual product, so using rules would not be an option. A rule would not be able to accommodate for each individual item’s unique SKU and print details.

**What if my items are personalized and the print details change for each order?**

Personalized items will have their personalization added as item metadata. The print details for an item will still need to be set up, with additional item information added for each specific order. [This guide has more information on that specific process](/guided-walkthroughs/print-on-demand-walkthrough/print-on-demand-custom-artwork).

**Should I use the value provided to me by the printer as my item’s SKU?**

No. Instead, each combination of print\_sku and print\_url should be its own separate SKU. Since you might have multiple designs that you want to print on the same blank, giving them each their own SKU avoids limiting your products to just one design per printer blank. It can get a bit confusing, so it’s best to just remember that each item you sell should have its own unique SKU that is not the printer’s item code/blank.

**How can I know whether my printer needs me to include additional fields when I send them my orders?**

The best way to know which fields a printer needs is to check the Order Desk guide for that print on demand integration. Not only will this guide tell you want fields can be sent, it will also indicate which ones are mandatory and which ones are not. With a few exceptions, a print\_url and print\_sku field will be mandatory for orders intended for all printers, but additional fields may be necessary as well.

**Do I need to add all of my items one by one?**

While we recommend setting up a few items manually to get a sense for how to edit the fields, you can definitely add items in bulk using an import template. [This video series is a great resource for how to do so](/start-here/getting-started-video-series/how-to-import-files-video).

**I added the print details to my store, but they didn’t sync into any of my orders. How do I get those details onto my existing orders?**

An important thing to keep in mind about Order Desk is that it doesn’t take action retroactively without being told to do so. As a result, if you add details to your inventory *after* orders have been imported, those changes won’t sync in automatically. To tell our app to bring those details into the order, open the order, scroll to the bottom, and click the Sync Item Details With Inventory button. This will tell us to bring in those inventory details so the order can be sent to the printer.


# Don’t Lose Money by Skipping the Shipping Settings

Let’s talk about shipping! When you offer multiple options at checkout, you’ll need to be sure to let Order Desk know which options offered by your printer they match to. This video will walk through both what a shipping class match is and how to use it in your Order Desk store.

{% embed url="<https://player.vimeo.com/video/604129910?dnt=1&amp;app_id=122963>" %}

<a href="/start-here/print-on-demand-video-series/why-your-inventory-matters-and-how-to-set-it-up" class="button secondary" data-icon="arrow-left-long">Previous video</a><a href="/start-here/print-on-demand-video-series/sending-orders-to-the-printer" class="button secondary" data-icon="arrow-right">Next video</a>

## FAQ

#### Can I use Order Desk to offer living shipping rates at checkout?

Since Order Desk focuses on what happens with the order *after* they are placed, we don’t have a way to send a shopping cart shipping costs. If this is something you want to do on your checkout page at your shopping cart, you’ll need to contact your shopping cart directly to see if this is service they can provide.

#### How do I know which options my fulfillment service offers?

If your printer has a shipping class match section, you can see all of the shipping options they offer in the dropdown. If not, you’ll want to reach out to them directly to determine what shipping methods they support.

#### Does my shipping class match need be exactly the same as the shipping method sent from my cart?

Yes. The name you use in the shipping class match section must match exactly (including capitalization and spacing) as what we get from the shopping cart. If not, the method set as the default will be sent to your printer. The best way to make sure they match is to copy the shipping method from an existing order and paste it into the shipping class match field.

#### Which shipping method at my cart best matches the methods offered by printer?

This isn’t something Order Desk would be able to clarify for you. Since the shipping method at the cart could be anything, it will be up to you to determine which one offered there best matches the options made available to you by your printer.


# Sending Orders to the Printer

{% embed url="<https://player.vimeo.com/video/604141584?dnt=1&amp;app_id=122963>" %}

<a href="/start-here/print-on-demand-video-series/dont-lose-money-by-skipping-the-shipping-settings" class="button secondary" data-icon="arrow-left-long">Previous video</a>

### FAQ

**Once I submit the order, how will I know the printer has received it?**

Every successful order submission will be recorded in the Order History. You can know that an order has been received by the printer when you see the message “Order Submitted to *Your Printer*.”

**I don’t understand the error message indicating why the order didn’t submit. What does it mean?**

Different error messages can mean different things, but it’s important to know that some error messages are coming directly from the printer themselves. If the error is not related to the order missing print details, you will usually be best served asking your *printer* what the error message means, as it’s likely the Order Desk support team won’t be able to say for certain.

**I needed to make a change to the order after it was submitted. How do I send my printer the update?**

Once an order has been submitted, we don’t have a way to make additional updates to it at your printer. As a result, if you need to make changes to a submitted order, you’ll need to reach out to your printer directly to have them make that update on their end.

**What do I do if an order contains some items that don’t need to be sent to the printer?**

If you only need to send the printer some of the items, you would need to look into either [splitting your orders](/guided-walkthroughs/orders-and-folders/how-to-split-orders) (to remove the items the printer won’t be fulfilling), or using [a product code skip](/integration-setup-guides/fulfillment-services/fulfillment-integration-product-settings#product-code-skip) to tell us to exclude those items when sending the order to the printer.


# Using Order Desk

Use these guides when you are setting up a store or getting comfortable with the basics. They cover store settings, team access, importing orders, and what to do after the initial setup.


# Logging in to Order Desk

If you’re having some trouble logging in to Order Desk, you may want to check the following in order to help you access your account.If you are a customer who purchased an item online and are looking to access an order you placed, you will not be able to do so through Order Desk. This app is only intended to be used by stores and vendors to help them process their orders. If you need any help accessing an order, please contact the store directly as our team would not be able to assist you.

### Do You Have an Account?

Before progressing any further, the first thing you’ll want to confirm is whether or not you’ve already signed up for Order Desk. If you don’t know how to make one or if you don’t recall ever making one, you can go through our sign up process [here](https://app.orderdesk.me/account-setup). This is where you’ll provide some info like your contact info, your store, and what type of store you’ll be setting up with us.

If you’re not sure, one thing you may want to do is search your inbox for any reference to an Order Desk account. Depending on whether or not you find any emails, this would likely indicate that you either do have an account (if you’ve received an email from us) or you do not (if you haven’t received any emails from us).

In the event that you’re working with multiple people on the same store and you don’t have your own login for it, you’ll want to request access from the store owner or manager so you can log in with your own personal credentials. Refer to our guide on [How to Add Store Users and Permissions](/guided-walkthroughs/using-order-desk/how-to-add-your-team-to-your-store) for more details on this process.

### Login Methods

You can always log in through the [Order Desk website](https://www.orderdesk.com/) via the link in the header.

![](https://251457507-files.gitbook.io/~/files/v0/b/gitbook-x-prod.appspot.com/o/spaces%2FAQOLMUJWMYtrpQ7Oxxca%2Fuploads%2FpwSxWHyUglIH7GFpED2u%2Flegacy-4b10f962d14f59e71368.jpg?alt=media)

Alternatively, you can log in directly to your Order Desk store by accessing the dashboard through [this link](https://app.orderdesk.me/dashboard).

### Are You in the Right Store?

If you’ve logged in and you’re not seeing any of your orders or integration details, or if you’re seeing a trial/expired message even though you have an active paid plan, you may have either created a new store by mistake or the account was created under a different email address.

A quick way to determine if you’re in the correct store would be to check the dropdown menu in the upper left corner.

![](https://251457507-files.gitbook.io/~/files/v0/b/gitbook-x-prod.appspot.com/o/spaces%2FAQOLMUJWMYtrpQ7Oxxca%2Fuploads%2Fb6EiYqZPzraEp8nGqRPB%2Flegacy-21d608553eba6c531279.png?alt=media)

This will allow you to switch over to any Order Desk store associated with your email address, so if you’re not in the store that you intended to view then you’ll be able to easily change over to the correct one. And if it turns out that you have multiple stores with the same name and this was not intentional, go ahead and [contact our support team](https://www.orderdesk.com/contact/) so we can remove the duplicate for you.

Otherwise if you’re unable to switch over to the store you had been working with, then this may indicate that the store is under a different email address. You can refer to the section [at the beginning](#do-you-have-an-account) of this guide for some guidance on determining which email address the account may be under.

### Resetting Your Password

In the event that you need to change your password, there are two ways you can go about doing this depending on whether or not you have access to your account.

If you’re unable to log in, you can click **Forgot Password?** to begin the password rest process.

![](https://251457507-files.gitbook.io/~/files/v0/b/gitbook-x-prod.appspot.com/o/spaces%2FAQOLMUJWMYtrpQ7Oxxca%2Fuploads%2FF11p9Q9wKs2RJrVrIVdL%2Flegacy-7b30dbee9da3e2e0b984.png?alt=media)

Note that if you don’t receive the reset email, you may want to check your spam filter to see if our emails are being directed away from your inbox. If you’ve verified that the email did not go to your spam folder and it’s been a while since you requested a password reset, then this may indicate that the store is under a different email address. Refer to the guidance we provided [at the beginning](#do-you-have-an-account) of this guide for help with verifying which email address your store is under.

If you’re logged in to your Order Desk store, you’ll want to refer to the sidebar on the left side of the screen and click **Edit My Account**.

![](https://251457507-files.gitbook.io/~/files/v0/b/gitbook-x-prod.appspot.com/o/spaces%2FAQOLMUJWMYtrpQ7Oxxca%2Fuploads%2F1T7pkhPwQfEiX2R7KPEJ%2Flegacy-bb9d71a5bd3641f9c5bc.png?alt=media)

This will bring up your account details where you can then update your password information.

![](https://251457507-files.gitbook.io/~/files/v0/b/gitbook-x-prod.appspot.com/o/spaces%2FAQOLMUJWMYtrpQ7Oxxca%2Fuploads%2F94hRXLElVZfrFfCquctv%2Flegacy-bf322e97ab5973afdf98.jpg?alt=media)


# Managing Your Account

The User Account Information page is where you can go to manage your Order Desk login details, and can be accessed by clicking the **Edit My Account** link near the bottom of the left sidebar.

![](https://251457507-files.gitbook.io/~/files/v0/b/gitbook-x-prod.appspot.com/o/spaces%2FAQOLMUJWMYtrpQ7Oxxca%2Fuploads%2FKhCrf7oppbosYT99Wrg1%2Flegacy-bd8d1e1342a60c6d0379.jpg?alt=media)

### Details

![](https://251457507-files.gitbook.io/~/files/v0/b/gitbook-x-prod.appspot.com/o/spaces%2FAQOLMUJWMYtrpQ7Oxxca%2Fuploads%2FSAftyeOk8tUNLnuCDsdF%2Flegacy-38224f41462f80857df8.png?alt=media)

This is where you can update your account name and email address. Note that any changes you make here will be reflected in all stores associated with your login, so if you update your email address here then you will be using that address everywhere.

### Password Reset

![](https://251457507-files.gitbook.io/~/files/v0/b/gitbook-x-prod.appspot.com/o/spaces%2FAQOLMUJWMYtrpQ7Oxxca%2Fuploads%2FOPPRPyNFQ1lkJSTt8EcH%2Flegacy-ef7be1c23173a885cb53.png?alt=media)

The Password Reset section is where you can change your password quickly without having to go through the reset process [while logged out](/guided-walkthroughs/using-order-desk/logging-in-to-order-desk#resetting-your-password).

### Store Access

![](https://251457507-files.gitbook.io/~/files/v0/b/gitbook-x-prod.appspot.com/o/spaces%2FAQOLMUJWMYtrpQ7Oxxca%2Fuploads%2FsRcz0N6iDZ6y1GOu9A4C%2Flegacy-0eaaf6197f1541ba46d1.png?alt=media)

All stores associated with your email address will be visible here, displaying a list of each store, how many new orders each one currently has, and an option to select which store you want to open by default when you access [your dashboard](https://app.orderdesk.me/dashboard).

### Delete Store

If you need to delete your store instead of locking and canceling it, you can do so from within your Store Settings page. For a step by step look at the deletion process, please see our [How to Delete a Store](/guided-walkthroughs/using-order-desk/how-to-delete-a-store) guide.

### Two-Factor Authentication

Two-factor authentication (also abbreviated as 2FA) is an additional layer of account security that will prompt you to enter a security code whenever you log in through a new computer or device for the first time, or if the previous session has expired. Order Desk supports this feature via [Google Authenticator](https://support.google.com/accounts/answer/1066447), which is available on both Android and iOS devices. **It is strongly recommended** that you enable this feature to prevent any unauthorized use of your account.

When you initially click the button to begin the setup process, you will be presented with a QR code along with a code that you can enter manually, depending on which method you prefer.

![](https://251457507-files.gitbook.io/~/files/v0/b/gitbook-x-prod.appspot.com/o/spaces%2FAQOLMUJWMYtrpQ7Oxxca%2Fuploads%2Fcfp7KaYdp9aWI4QhQBSg%2Flegacy-3ba7d092a1f9d5a57948.png?alt=media)

In the Google Authenticator app, you’ll see an option in the lower right hand corner of the screen where you can choose to either scan the QR code on your computer screen with your mobile device’s camera, or input the unique code that is generated for you in the setup window.

![](https://251457507-files.gitbook.io/~/files/v0/b/gitbook-x-prod.appspot.com/o/spaces%2FAQOLMUJWMYtrpQ7Oxxca%2Fuploads%2FJpZYKOdqlwGYi5lRu7nN%2Flegacy-8ee95d418d2a2bf256d6.jpg?alt=media)

After scanning or entering your unique code, the app will now display a six digit security code you can use to finalize the setup process in Order Desk. Moving forward, every time you need to enter your login credentials into Order Desk you will also be required to retrieve the current security code from Google Authenticator. For security purposes, this code will change every 30 seconds, and the account will not be accessible unless you have the current code.

If you need to disable two-factor authentication for any reason, you can return to this section of your account settings to remove it.

### Log Out of All Devices

This button will make sure you’re completely logged out of every computer and device that you’ve signed into Order Desk through, which is helpful in situations where you believe you may have accidentally left yourself logged in on a public computer, if you were logged in to a device or computer you no longer have access to, or if you believe someone may have logged in to your account without your permission.

If you have any concerns about any potential unauthorized use, we highly recommend using this feature to log out of all devices, then update your password and enable two-factor authentication.


# How to Configure Your Store Settings

Since Order Desk is often used to process orders across multiple locations, time zones, and currencies, a little bit of configuration will be necessary on the Store Settings page to ensure that accurate data is sent to any receiving vendors. Here, we’ll walk through the basic settings that are most critical to the setup process, however you’ll find a walkthrough of more advanced settings [here](/guided-walkthroughs/using-order-desk/manage-store-settings).

![](https://251457507-files.gitbook.io/~/files/v0/b/gitbook-x-prod.appspot.com/o/spaces%2FAQOLMUJWMYtrpQ7Oxxca%2Fuploads%2F79L8IYEyL03cWbLrowrc%2Flegacy-a3e2c6a54a519ae73353.png?alt=media)

### Store Details

**Store Name**

The store name is the name used in email communication with your customers and in templates throughout the app.

**Country**

When the store country is properly set, orders that are domestic will not display their country code, but any international orders will. This also helps the EasyPost integration determine what is domestic and what is international for a specific store.

**Currency**

Use this setting to choose the preferred currency for your orders in your Order Desk store.

**Timezone**

Set your timezone so that your orders will be displayed with your local time offset.

**Country Name Format**

Choose how the country name should be formatted in the shipping and billing address field on orders.

**IOSS Number**

Enter the default IOSS Number that you want to be used for your EU imports, if applicable.

### Order Settings

**Phone Number Format**

Choose how phone numbers are stored with orders.

**Split Method**

There are two options for Split Method: *Keep Extra Order Details* or *Remove Extra Order Details*.

When splitting an order, if you want to keep the extra details of the order (that is, if you want to keep the connection with the source of the order), select *Keep Extra Order Details*. This way, when split, the new order will be linked to the original order and can still communicate with the source (your shopping cart) where the order came from. The new order will share the original order ID and have **-S1** appended to it, for example, **#1234** and **#1234-S1**.

If you want your split orders to be completely separate from their source order, select *Remove Extra Order Details*, and they will become completely new orders with no connection to the source.

**Capitalize the first character of each word in the address**

If enabled, this will normalize the capitalization on addresses on orders.

**Prepend Original Store ID When Transferring Orders Into This Store**

Every Order Desk store has a unique store ID. If *Prepend Original Store ID When Transferring Orders Into This Store* is enabled, any time orders are copied or moved from another Order Desk store into this store, they will have the original store ID prepended to the order number.

This is especially useful for accounts that move a lot of orders between stores and need to know where they came from at a glance. It will also keep similar order numbers from colliding. For example **2154-1000** and **6548-1000** both had an order number of **1000**, but because they came from different Order Desk stores, both can be added into the same store without an order number conflict.

The new order number will look something like this:

![](https://251457507-files.gitbook.io/~/files/v0/b/gitbook-x-prod.appspot.com/o/spaces%2FAQOLMUJWMYtrpQ7Oxxca%2Fuploads%2FCjRB0TZ83OXeDJ9w7qxv%2Flegacy-64badc7a4362e41142db.png?alt=media)

### Display Options

**Date Format**

The date format uses PHP date code. For more information and the date code reference, refer to [this article](http://php.net/manual/en/function.date.php).

**Short Date Format**

The short date format is used in certain integrations to display the date, specifically *Authnet*, *EasyPost Shipment Manager*, *Stripe Account Details*, and *MCF Estimated Shipment* details.

When using nonstandard combinations of PHP date format codes, dates on orders can be changed to **January 1, 1970** unintentionally. If you see this date, try a different date format or return it to the default: Y-m-d H:i:s.

**Orders Per Page**

The orders per page setting allows you to change how many orders you would like displayed on a single page. The default is set to 50, which is the optimum setting for speed and performance of the app.

**Inventory Items Per Page**

As with the *Orders Per Page* setting, the *Inventory Items Per Page* setting allows you to change how many items you would like displayed on a single page, with the default set to 50 for optimal performance.

### Inventory Settings

**Add Inventory Details to Order Items**

If you want the items in your orders to sync in any extra inventory details saved in Order Desk, enable this setting. This is mandatory for print on demand stores, but may also be useful for other merchants who need to store extra item details that don’t come in from the shopping cart.

For general information about syncing inventory with orders, please [see this guide](/guided-walkthroughs/products-and-inventory/how-to-sync-item-details-into-orders). For print on demand order syncing, [read this guide](/guided-walkthroughs/print-on-demand-walkthrough/print-on-demand-order-syncing).

**Update Stock Level as Orders are Added**

To automatically update your inventory stock levels as orders are added to Order Desk, enable this setting. This works for all orders added, whether manually created, downloaded from an integration or imported from a file.

**Create Inventory Items as Orders are Added**

If you would like Order Desk to automatically create new inventory items out of the items on your orders, select this option. If any SKUs that aren’t already saved to Order Desk come through in new orders, they will be added to your Order Desk inventory. For this to work, you must also enable the *Update Stock Level as Orders are Added* setting.

For more general information on working with inventory in Order Desk, please read our [Inventory Items guide](/guided-walkthroughs/products-and-inventory/how-to-work-with-inventory-details).

**Keep Inventory Synced with Other Stores**

If you have more than one Order Desk store and want to keep your inventory synced across your stores, select this option and choose which stores should be synced from the options. For more information on how this setting works, please see the [How to Sync Inventory Between Order Desk Stores guide](/guided-walkthroughs/products-and-inventory/how-to-sync-inventory-between-order-desk-stores).


# My Store Is Set Up, Now What?

When you’re finished setting up your store, there’s still work that can be done to make the most of Order Desk’s features. Here are just a few of the things you can do to enhance your store even further.

### Two-Factor Authentication

Also known as *2FA*, this is a common feature across many services where you must provide a unique login code in order to log in to your account. This helps prevent unauthorized access to your account, as even if someone has somehow stolen your password, they will not be able to log in without providing the unique code.

To learn more about setting this up, please refer to our [Managing Your Account](/guided-walkthroughs/using-order-desk/managing-your-account) guide.

### Adding Store Users

If you’re operating a business that requires people other than yourself to access your Order Desk store, you can invite them as a contributor so they can have their own unique login. The amount of users you can add to your store can vary depending on which plan you’re on.

To learn more about adding additional users to your store, check out [How to Add Store Users & Permissions](/integration-setup-guides/tools-and-productivity/how-to-add-store-users-and-permissions) guide.

### Managing Multiple Stores

You can manage multiple businesses under one Order Desk account and freely toggle between them on your dashboard, but it requires some additional setup to make sure they’re all connected to the same login and pricing plan.

To learn more about setting this up, please refer to our [How to Manage Multiple Stores on One Account](/guided-walkthroughs/using-order-desk/how-to-manage-multiple-stores-on-one-account) guide.

### Keep up with our socials

We here at Order Desk love to stay connected to our community. Here are just a few of the places where you can stay updated, join in on insightful conversations about ecommerce, and so much more.

* [Order Desk Insiders](https://www.facebook.com/groups/orderdesk) on Facebook
* [Order Desk](https://www.threads.com/@orderdeskrules) on Threads
* [Order Desk](https://www.reddit.com/r/orderdesk/) on Reddit

### Reach out to Support

Our support team is there to assist you with any question you may have, whether you just want us to double check your setup or you’re bumping into a particular issue that you can’t quite fix. No question is too small, so don’t hesitate to reach out through the link below.


# How to Add Your Team To Your Store

It can be helpful to give your team access to Order Desk, especially if you have employees or vendors who help you manage your store. You can customize their permissions to control what they can see and what they are able to do. Since user accounts are based on email address, they’ll only need one Order Desk account to log into multiple stores, if applicable to your use case.

### Watch and Learn

Are you more of a visual learner? Check out this video on adding users:

{% embed url="<https://player.vimeo.com/video/604144332?color&amp;autopause=0&amp;loop=0&amp;muted=0&amp;title=1&amp;portrait=1&amp;byline=1#t=>" %}

### Add Store Users

To add a new store user, click on **Store Users** under **Settings** in the sidebar.

![](https://251457507-files.gitbook.io/~/files/v0/b/gitbook-x-prod.appspot.com/o/spaces%2FAQOLMUJWMYtrpQ7Oxxca%2Fuploads%2F1RzAPZzl29nzTTXAW7hc%2Flegacy-646a22ba77a5c941b998.png?alt=media)

Under **Add Store User**, enter the email address for the person you want to give access to your store. Click **Continue**.

![](https://251457507-files.gitbook.io/~/files/v0/b/gitbook-x-prod.appspot.com/o/spaces%2FAQOLMUJWMYtrpQ7Oxxca%2Fuploads%2FvxtKTQtxTCZXBJKcYped%2Flegacy-5ed2d3f20313714c743f.png?alt=media)

### Users Who Don’t Already Have an Order Desk Account

If the email address you invite is not already associated with an Order Desk account, you will be taken to the **Add User to Store** page where you can enter their details and adjust their permissions:

![](https://251457507-files.gitbook.io/~/files/v0/b/gitbook-x-prod.appspot.com/o/spaces%2FAQOLMUJWMYtrpQ7Oxxca%2Fuploads%2FISRyMMAZPgz30P8FZaw8%2Flegacy-06d299a39d92c5d6889b.png?alt=media)

Add the user’s name and make sure their email address is accurate, as this will be their login.

A temporary password will be generated, and you’ll see an option called **Send Email With Temporary Password**. Keep this option selected if you want Order Desk to send the temporary password to the new user on your behalf, or uncheck it if you want to provide the password to them another way.

When they first login, they will be prompted to change their password. They can also update their user details, see what stores they have access to, and set up Two-Factor Authentication (2FA).

![](https://251457507-files.gitbook.io/~/files/v0/b/gitbook-x-prod.appspot.com/o/spaces%2FAQOLMUJWMYtrpQ7Oxxca%2Fuploads%2Fgpy6zI6nuqeDUaWAqu8k%2Flegacy-85a0fee248af484e7085.png?alt=media)

If for any reason they don’t receive or remember their temporary password, they can request a new password by clicking the **Forgot Password?** link on the login page and enter the email address associated with their account:

![](https://251457507-files.gitbook.io/~/files/v0/b/gitbook-x-prod.appspot.com/o/spaces%2FAQOLMUJWMYtrpQ7Oxxca%2Fuploads%2FCMF59TcONFD1Q99UU1Cz%2Flegacy-bba24353fff9b2edf347.png?alt=media)

If the email address wasn’t correct, you can [remove the user](#remove-store-users) from your store and add the correct email address as a new user instead.

### Add Users to Multiple Stores

If you need to add a user to multiple stores that you manage, find the yellow banner at the bottom of the **Add User to Store** page and click the link that says “these other stores too?”

![](https://251457507-files.gitbook.io/~/files/v0/b/gitbook-x-prod.appspot.com/o/spaces%2FAQOLMUJWMYtrpQ7Oxxca%2Fuploads%2Fq7VIXzCkWplzIWNSlQxS%2Flegacy-17df35d06b34fae15419.png?alt=media)

When you click the link, you’ll see an section called **Create User On Other Stores**. Here, a list of stores associated with your account will be displayed, and you can select which stores you’d like to give them access to, then click **Add User** once you’re done.

![](https://251457507-files.gitbook.io/~/files/v0/b/gitbook-x-prod.appspot.com/o/spaces%2FAQOLMUJWMYtrpQ7Oxxca%2Fuploads%2FOzwKdIulMrkBWymSPHRx%2Flegacy-ee5c2bb3a49c10ebb0b2.png?alt=media)

### Users Who Already Have an Order Desk Account

If the email address you add has already been used to create a user account for another store, you will be taken directly to the User Details and Permissions page:

![](https://251457507-files.gitbook.io/~/files/v0/b/gitbook-x-prod.appspot.com/o/spaces%2FAQOLMUJWMYtrpQ7Oxxca%2Fuploads%2FRDaBizoisBBLP1xSQ1uR%2Flegacy-5ae10ef0e02629103118.png?alt=media)

### Edit User Permissions

You can edit a user’s permissions from the **Add User To Store** page in the previous step, or you can adjust them afterward by clicking on **Edit Permissions** to the right the user on your **Store Users** page.

![](https://251457507-files.gitbook.io/~/files/v0/b/gitbook-x-prod.appspot.com/o/spaces%2FAQOLMUJWMYtrpQ7Oxxca%2Fuploads%2FxJIjnUZIHEDup7R9PrNL%2Flegacy-62a116ca48efca41ae1a.png?alt=media)

All permissions are set to **ON** by default.

![](https://251457507-files.gitbook.io/~/files/v0/b/gitbook-x-prod.appspot.com/o/spaces%2FAQOLMUJWMYtrpQ7Oxxca%2Fuploads%2Ffnf4ZgAedSWfxA1XwYE9%2Flegacy-2a1e54b406119e5c91dd.png?alt=media)

If you are giving a vendor access to your account, you may want to set *View Dashboard*, *Delete Orders*, *Manage Users*, *Manage Settings*, and *Manage Integration*s to **OFF**. With these permissions, they will only able to edit orders in your store.

### **Can you give someone access to just one folder?**

In general, if you don’t want your users to access certain parts of your store or certain information about your orders, it’s recommended that they not have access at all. Try other solutions to get them the information in those folders, like [exporting the data to their email](/guided-walkthroughs/templates-emails-and-order-documents/how-to-build-export-templates).

### **More Options with Custom CSS**

If you want even more control over the views and access your store users have, you can use custom CSS.

**IMPORTANT**

This is an advanced setting. If you’re unfamiliar writing CSS, you may want to try a different method.

To do this, name the **Custom User Class** for each store user. In this example, we’ll use “vendor” as the custom user class.

![](https://251457507-files.gitbook.io/~/files/v0/b/gitbook-x-prod.appspot.com/o/spaces%2FAQOLMUJWMYtrpQ7Oxxca%2Fuploads%2FsO8cMhXhmOrFjxTIgorJ%2Flegacy-5f298c829972da66bea6.png?alt=media)

To add your custom CSS, navigate to the **Store Settings** page and click on the **Custom CSS** tab.

![](https://251457507-files.gitbook.io/~/files/v0/b/gitbook-x-prod.appspot.com/o/spaces%2FAQOLMUJWMYtrpQ7Oxxca%2Fuploads%2FWdiDLIutkDn28Nlviyxp%2Flegacy-977f46aae54c592bbb3c.png?alt=media)

This is where you’ll write the code that address which types of store users can see anything associated with the sample “vendor” custom user class.

Continuing this example, let’s say that these users should not be able to see the **Reports** and **Add Shipments** pages in the **Tools** menu, nor do we want them to access the entire Account menu:

![](https://251457507-files.gitbook.io/~/files/v0/b/gitbook-x-prod.appspot.com/o/spaces%2FAQOLMUJWMYtrpQ7Oxxca%2Fuploads%2FIKzNv4NehZMrFRJgFq1n%2Flegacy-95a42c8910aa38f93ea4.png?alt=media)

To block a user’s view of these pages, add the following code to the Custom CSS field in Store Settings:

```
				
					body.userclass-vendor .od-menu-reports {
display: none;
}
body.userclass-vendor .od-menu-add-shipments {
display: none;
}
body.userclass-vendor .od-menu-account {
display: none;
}
				
			
```

![](https://251457507-files.gitbook.io/~/files/v0/b/gitbook-x-prod.appspot.com/o/spaces%2FAQOLMUJWMYtrpQ7Oxxca%2Fuploads%2F4vOVM40UjLOzRBVi7o3M%2Flegacy-9d4cfe714c50489bab96.png?alt=media)

With this code in place, a user with the “vendor” custom user class will have a customized sidebar view when signed into your store.

They will not be able to see **Reports** or **Add Shipments** under Tools, nor will they see the entire Account menu:

![](https://251457507-files.gitbook.io/~/files/v0/b/gitbook-x-prod.appspot.com/o/spaces%2FAQOLMUJWMYtrpQ7Oxxca%2Fuploads%2FOl8RjrgmNy1lg40AyVXS%2Flegacy-48b6658a0e917bccbecb.png?alt=media)

Please be aware that using CSS to hide certain links from view is doing just that—*hiding the link*. Any hidden pages can still be accessible to the user if they are comfortable using developer tools in a web browser to view the page’s code.

The only way to fully remove access to certain areas of the app for specified users is to use our built-in permissions.

#### Remove Store Users

From the **Store Users** page, click on **Remove Access** next to the user name to remove a user from your store.

![](https://251457507-files.gitbook.io/~/files/v0/b/gitbook-x-prod.appspot.com/o/spaces%2FAQOLMUJWMYtrpQ7Oxxca%2Fuploads%2FGH9Ih6pAnJn9zjRYGkOs%2Flegacy-25658e234fee5d4c5212.png?alt=media)

### **How many users can I add to my store?**

There currently isn’t a hard limit on the number of users a store can have, however if you’re planning on adding more than a couple dozen, please contact Order Desk support to determine if Order Desk is the right app to meet your needs.


# Manage Store Settings

Store Settings is where you can manage general settings for your Order Desk account. These settings include emails used for customer facing notifications as well as admin emails for communication with Order Desk, folder management for customizing where your orders are stored in the app, adding CSS to customize views, enabling certain security checks and setting up return addresses, among other settings which will be discussed in more detail in this guide.

To access your store settings, click on **Store Settings** under the **Settings** menu in the left sidebar:

![](https://251457507-files.gitbook.io/~/files/v0/b/gitbook-x-prod.appspot.com/o/spaces%2FAQOLMUJWMYtrpQ7Oxxca%2Fuploads%2F2PNCskUxPMKV04EeJDNU%2Flegacy-299a3c5236439c3da7bf.png?alt=media)

This guide will go over each of the different tabs within the settings:

![](https://251457507-files.gitbook.io/~/files/v0/b/gitbook-x-prod.appspot.com/o/spaces%2FAQOLMUJWMYtrpQ7Oxxca%2Fuploads%2FQ75eY7KcyEWP3QXhbQOC%2Flegacy-dbc53e3b9df368299ba9.png?alt=media)

**IMPORTANT**

Any store user on an account with the “manage settings” permission enabled will be able to access and edit the Store Settings. For more information on store users and permissions, please see the [How to Add Store Users and Permissions](/guided-walkthroughs/using-order-desk/how-to-add-your-team-to-your-store) guide.

![](https://251457507-files.gitbook.io/~/files/v0/b/gitbook-x-prod.appspot.com/o/spaces%2FAQOLMUJWMYtrpQ7Oxxca%2Fuploads%2FpmYWTzgAbwbycosHOwsu%2Flegacy-5adcb2db60fba306c3b1.png?alt=media)

### Store Settings

Store Details | Order Settings | Display Options | Inventory Settings

#### Store Name

The store name is the name used in email communication with your customers and in templates throughout the app.

#### Country

When the store country is properly set, orders that are domestic will not display their country code, but any international orders will. This also helps the EasyPost integration determine what is domestic and what is international for a specific store.

#### Currency

The currency setting allows you to set the currency on your Order Desk store.

#### Timezone

Set your timezone so that your orders will be displayed with your local time offset.

#### Country Name Format

Choose how the country name should be formatted in the shipping and billing address field on orders.

#### IOSS Number

Enter the default IOSS Number that you want to be used for your EU imports, if applicable.

#### Phone Number Format

Choose how phone numbers are stored with orders.

#### Split Method

There are two options for Split Method—Keep Extra Order Details or Remove Extra Order Details.

When splitting an order, if you want to keep the extra details of the order (that is, if you want to keep the connection with the source of the order), select Keep Extra Order Details. This way, when split, the new order will be linked to the original order and can still communicate with the source (your shopping cart) where the order came from. The new order will share the original order ID and have -S1 appended to it, for example, #1234 and #1234-S1.

If you want your split orders to be completely separate from their source order, select Remove Extra Order Details, and they will become completely new orders with no connection to the source.

#### Capitalize the first character of each word in the address

If enabled, this will normalize the capitalization on addresses on orders.

#### Prepend Original Store ID When Transferring Orders Into This Store

Every Order Desk store has a unique store ID. If Prepend Original Store ID When Transferring Orders Into This Store is enabled, any time orders are copied or moved from another Order Desk store into this store, they will have the original store ID prepended to the order number.

This is especially useful for accounts that move a lot of orders between stores and need to know where they came from at a glance. It will also keep similar order numbers from colliding. For example 2154-1000 and 6548-1000 both had an order number of 1000, but because they came from different Order Desk stores, both can be added into the same store without an order number conflict.

The new order number will look something like this:

![](https://251457507-files.gitbook.io/~/files/v0/b/gitbook-x-prod.appspot.com/o/spaces%2FAQOLMUJWMYtrpQ7Oxxca%2Fuploads%2FFin2YVXsBpt8MBSCSJGV%2Flegacy-7295af2a702ad64f47a1.png?alt=media)

### Display Options

#### Date Format

The date format uses PHP date code. For more information and the date code reference, refer to [this article](http://php.net/manual/en/function.date.php).

#### Short Date Format

The short date format is used in certain integrations to display the date, specifically Authnet, EasyPost Shipment Manager, Stripe Account Details and MCF Estimated Shipment details.

When using nonstandard combinations of PHP date format codes, dates on orders can be changed to **January 1, 1970** unintentionally. If you see this date, try a different date format or return it to the default: Y-m-d H:i:s.

#### Orders Per Page

The orders per page setting allows you to change how many orders you would like displayed on a single page. The default is set to 50, which is the optimum setting for speed and performance of the app.

#### Inventory Items Per Page

As with the Orders Per Page setting, the inventory items per page setting allows you to change how many items you would like displayed on a single page, with the default set to 50 for optimal performance.

#### Add Inventory Details to Order Items

If you want the items in your orders to sync in any extra inventory details saved in Order Desk, enable this setting. This is mandatory for print on demand stores, but may also be useful for other merchants who need to store extra item details that don’t come in from the shopping cart.

For more information on syncing inventory with orders, please [see this guide](/guided-walkthroughs/products-and-inventory/how-to-sync-item-details-into-orders).

For information specifically about print on demand order syncing, [read this guide](/guided-walkthroughs/print-on-demand-walkthrough/print-on-demand-order-syncing).

#### Update Stock Level as Orders are Added

To reduce your inventory stock as orders are added to Order Desk, enable this setting. This works for all orders added, whether manually created, downloaded from an integration or imported from a file.

#### Create Inventory Items as Orders are Added

If you would like Order Desk to automatically create new inventory items out of the items on your orders, select this option. If any SKUs that aren’t already saved to Order Desk come through in new orders, they will be added to your Order Desk inventory. For this to work, you must also enable the Update Stock Level as Orders are Added setting.

For more general information on working with inventory in Order Desk, please read our [Inventory Items guide](/guided-walkthroughs/products-and-inventory/how-to-work-with-inventory-details).

#### Keep Inventory Synced with Other Stores

If you have more than one Order Desk store and want to keep your inventory synced across your stores, select this option and choose which stores should be synced from the options. For more information on how this setting works, please see the [How to Sync Inventory Between Order Desk Stores guide](/guided-walkthroughs/products-and-inventory/how-to-sync-inventory-between-order-desk-stores).

### Folders

![](https://251457507-files.gitbook.io/~/files/v0/b/gitbook-x-prod.appspot.com/o/spaces%2FAQOLMUJWMYtrpQ7Oxxca%2Fuploads%2FY4wZCElLSotQjPiegZQY%2Flegacy-3cb5ad788de0ccc811ae.png?alt=media)

Folders in Order Desk act as a filtering and storage system for your orders. Each Order Desk store has four default folders; New, Prepared, Closed and Canceled. Folders can be rearranged, created and deleted to fit the needs of your workflow.

For more information on how folders work in Order Desk, please see the Working with Folders section of our [Quick Start: Overview guide](/start-here/getting-started-series/quick-start-overview#working-with-folders).

### Email

![](https://251457507-files.gitbook.io/~/files/v0/b/gitbook-x-prod.appspot.com/o/spaces%2FAQOLMUJWMYtrpQ7Oxxca%2Fuploads%2FJw67LGrmFAVkBwzlfTv4%2Flegacy-d25e24da753394733b20.png?alt=media)

#### Store Email

The store email will be used as the return email address when any emails are sent to your customers or clients from Order Desk.

The only exception to this is if the email template being sent has had the **From Email Override** setting changed to a different from email address:

![](https://251457507-files.gitbook.io/~/files/v0/b/gitbook-x-prod.appspot.com/o/spaces%2FAQOLMUJWMYtrpQ7Oxxca%2Fuploads%2FEUKvPF4PhkSxDs3nrQTj%2Flegacy-579f3bb0bc154d365f29.png?alt=media)

Please see our [How to Work with Email Templates](/guided-walkthroughs/templates-emails-and-order-documents/how-to-work-with-email-templates) guide for more information.

#### Admin Email

The admin email address is what Order Desk uses to contact you for Order Desk notifications regarding your store. This email address is not used for any communication from you to your customers through Order Desk.

For multiple addresses, separate with a comma.

#### Email Delivery Options

Email Delivery Options allows you to choose between sending email with Order Desk’s server, or your own SMTP Server. For more information, refer to our [How to Send Email From Order Desk](/guided-walkthroughs/templates-emails-and-order-documents/how-to-send-email-from-order-desk) guide.

### Custom CSS

![](https://251457507-files.gitbook.io/~/files/v0/b/gitbook-x-prod.appspot.com/o/spaces%2FAQOLMUJWMYtrpQ7Oxxca%2Fuploads%2FO5mGL8H2HR8suEdEk93D%2Flegacy-969488a5295a45a70d39.png?alt=media)

You can customize certain aspects of the app by applying your own custom CSS to the Custom CSS page. Options are to customize the interface of your account, hide certain elements from your [store users](/guided-walkthroughs/using-order-desk/how-to-add-your-team-to-your-store), or inject CSS for the confirm page that can be sent [as a field in an export template](/guided-walkthroughs/templates-emails-and-order-documents/how-to-build-export-templates) or linked from the [dropship email template](/guided-walkthroughs/shipping-fulfillment-and-returns/how-to-split-and-dropship-orders-for-separate-vendors).

When writing your CSS, target your code to the body class that can be found in the source code for the page.

### Security

![](https://d33v4339jhl8k0.cloudfront.net/docs/assets/57b0032590336059d4edf94f/images/663d18ba5027f87fcc6be702/file-S8TWXOB8xl.png)

Select any of these security warnings if you want Order Desk to watch for orders that may need to be reviewed. If enabled, orders will be marked with a red flag when the selected warning(s) apply:

![](https://251457507-files.gitbook.io/~/files/v0/b/gitbook-x-prod.appspot.com/o/spaces%2FAQOLMUJWMYtrpQ7Oxxca%2Fuploads%2FipGz5vUP491xb9lSyMlV%2Flegacy-70be2c738f996a39c565.png?alt=media)

Hover your cursor over the flag to see the reason for the warning:

![](https://251457507-files.gitbook.io/~/files/v0/b/gitbook-x-prod.appspot.com/o/spaces%2FAQOLMUJWMYtrpQ7Oxxca%2Fuploads%2FiPmysSQ4Isq5u9Ns2W4s%2Flegacy-c4b3f152d640d84115d1.png?alt=media)

### Defaults

![](https://251457507-files.gitbook.io/~/files/v0/b/gitbook-x-prod.appspot.com/o/spaces%2FAQOLMUJWMYtrpQ7Oxxca%2Fuploads%2F9wSkbtYrl5TTVDSnBuEd%2Flegacy-665e2fe8d4774fd180bb.png?alt=media)

#### Default Shipping Fields

When adding information to a new or existing order, any fields you add to the Default Shipping Fields box will populate as you begin typing, allowing you to quickly select the field you need:

![](https://251457507-files.gitbook.io/~/files/v0/b/gitbook-x-prod.appspot.com/o/spaces%2FAQOLMUJWMYtrpQ7Oxxca%2Fuploads%2Ffh8oUSk3cLKuDmvvY9Gi%2Flegacy-5e9cd4ff5d66d0624341.png?alt=media)

#### Default Checkout Data Fields

Additionally, any fields added to the Default Checkout Data Fields box will be added to the page for you to fill out when creating a new manual order or an existing order:

![](https://251457507-files.gitbook.io/~/files/v0/b/gitbook-x-prod.appspot.com/o/spaces%2FAQOLMUJWMYtrpQ7Oxxca%2Fuploads%2FgXjMPtgve0D5ylYx9yIa%2Flegacy-1490473af94a0a0daaeb.png?alt=media)

Please [see this guide](/start-here/getting-started-series/quick-start-orders-and-inventory#working-with-orders) for more information on adding orders manually.

#### Default Variation Data Fields

![](https://251457507-files.gitbook.io/~/files/v0/b/gitbook-x-prod.appspot.com/o/spaces%2FAQOLMUJWMYtrpQ7Oxxca%2Fuploads%2F9IOOE3p7FoAMgdcILp2b%2Flegacy-b17ed24d14cd3147af1f.png?alt=media)

Add variation names, one per line, to have them autofill when adding variations to an item in an order.

### Return Addresses

![](https://251457507-files.gitbook.io/~/files/v0/b/gitbook-x-prod.appspot.com/o/spaces%2FAQOLMUJWMYtrpQ7Oxxca%2Fuploads%2FJosPDidfgbcHqzjgIBvV%2Flegacy-b99e8b0930b61e6bde0c.png?alt=media)

Add the return address you use for your store here. Add as many return addresses as you use, giving each a unique Address Title (Home, Office, Warehouse X, etc.).

When at least one return address is saved, you will see an additional link on your Order Details page, **Set Return Address**:

![](https://251457507-files.gitbook.io/~/files/v0/b/gitbook-x-prod.appspot.com/o/spaces%2FAQOLMUJWMYtrpQ7Oxxca%2Fuploads%2FBP43UXuZAqVzbiRILuQ4%2Flegacy-f9bee0e31e4e1d6f2009.png?alt=media)

Click this **Set Return Address** link if you want to change the return address for the order. You can either add a new one directly in the dialog box that pops up or, if you have more than one return address saved in your Store Settings, you can select from a dropdown of your Available Addresses:

![](https://251457507-files.gitbook.io/~/files/v0/b/gitbook-x-prod.appspot.com/o/spaces%2FAQOLMUJWMYtrpQ7Oxxca%2Fuploads%2FwKIEXu166Vip1hnRrzzo%2Flegacy-ee0b944500de765063cb.png?alt=media)

You can also set the return address automatically with a rule based on any filters you specify:

![](https://251457507-files.gitbook.io/~/files/v0/b/gitbook-x-prod.appspot.com/o/spaces%2FAQOLMUJWMYtrpQ7Oxxca%2Fuploads%2FW3BmByDglNnR2Hlp2xZx%2Flegacy-dc6b26812a40da7d0f48.png?alt=media)

For more information on working with rules, please see the [How Customizable is Order Desk](/start-here/getting-started-series/quick-start-how-customizable-is-order-desk-really#the-order-desk-rule-builder) guide.

### Feature Tags

![](https://251457507-files.gitbook.io/~/files/v0/b/gitbook-x-prod.appspot.com/o/spaces%2FAQOLMUJWMYtrpQ7Oxxca%2Fuploads%2FaBu2JQOegFVdQbdJC4ns%2Flegacy-d15f2de0a216b594e116.png?alt=media)

In some cases, Order Desk support may provide you with special feature tags to implement a custom feature for your specific store. In those cases, we will put the code in the box under this tab or tell you to enter it here.

### API

To access and create your API Key, click on the API tab:

![](https://251457507-files.gitbook.io/~/files/v0/b/gitbook-x-prod.appspot.com/o/spaces%2FAQOLMUJWMYtrpQ7Oxxca%2Fuploads%2FilhOImWM5mRxD0XXp8kU%2Flegacy-6e9ac6eaff970892d9f8.png?alt=media)

Your Store ID and API Key will be displayed on this page.

![](https://251457507-files.gitbook.io/~/files/v0/b/gitbook-x-prod.appspot.com/o/spaces%2FAQOLMUJWMYtrpQ7Oxxca%2Fuploads%2FlZxgCyCUflmWsSPyngtS%2Flegacy-14fedc7e8124a888e803.png?alt=media)

If you plan to use the Order Desk API to send and receive data, please refer to the API Documentation [here](https://apidocs.orderdesk.com/).

### Deletion

![](https://251457507-files.gitbook.io/~/files/v0/b/gitbook-x-prod.appspot.com/o/spaces%2FAQOLMUJWMYtrpQ7Oxxca%2Fuploads%2FHi1rqYIED11BKVmZuhSn%2Flegacy-382553e541aa741f5a03.png?alt=media)

You can schedule your store for deletion using this tool. Once you have opted to delete your store by pressing the **Schedule for Deletion** button, your store will be deleted in 30 days. Please review our [How to Delete a Store](/guided-walkthroughs/using-order-desk/how-to-delete-a-store) guide before the deletion process.

Store deletion is permanent and will remove **all** of the following:

* Orders
* Inventory Items
* Rules
* Email Templates
* Import and Export Templates
* Integrations and Integration Settings
* Store Users and User Access

If you would rather pause your store temporarily, you can choose to deactivate it by canceling your store. For more information on that process, please see our guide on [How to Cancel Your Order Desk Store](/guided-walkthroughs/using-order-desk/how-to-cancel-your-order-desk-store).

### Related Articles

* Quick Start: Overview
* EasyPost Integration
* Quick Start: How Customizable is Order Desk Really?
* How to Send Email From Order Desk


# How to use Order Desk Without an Integration

If you’re interested in using Order Desk but we don’t offer an integration with the service you had in mind, it may still be possible to work with them through our import and export tools. This allows you to enjoy all the features Order Desk has to offer, even when we don’t have a built-in integration for the service you want to connect with.

### Importing Orders

Order Desk can import your orders if they’re saved into a file as one of the following formats:

\*\*.csv\
\*\*\*\*.xlsx\
\*\***.txt**

Using the **Import Data** option in the Order Desk app, you can create a template that will read the files and import all the order details successfully. When you create the template, it’s important to make sure you consistently use the same structure for your imports, such as keeping all the columns the same (always use the same column names, always keep your columns in the same order, etc.).

For more details on importing a spreadsheet, check out our [How to Import a Spreadsheet](/guided-walkthroughs/templates-emails-and-order-documents/how-to-import-a-spreadsheet) guide.

### Exporting Orders

Similar to the process of setting up your imports, you can also create a template to export your order details when you want to send them somewhere that Order Desk isn’t integrated with. You have the option to save the export as a file so you can manually upload your orders elsewhere, automatically send the export via email, or send the exports vis FTP. The following file formats are supported at this time:

**.csv**\
**.xlsx**\
**.txt**

For more information on setting up your exports, check out our [How to Build Export Templates](/guided-walkthroughs/templates-emails-and-order-documents/how-to-build-export-templates) guide.

### Requesting an Integration

If there’s a particular integration that you would like to see added to Order Desk in the future, you can [submit a request](https://www.orderdesk.com/requests/) to our team for review. All we ask is that you collect some info about the service you’d like to see an integration for (such as the API details), and understand that while we do strive to make as many integrations available as possible, due to a variety of factors it’s not possible to fulfill every request we receive.

### Related Articles

* [How to Import a Spreadsheet](/guided-walkthroughs/templates-emails-and-order-documents/how-to-import-a-spreadsheet)


# How to Manage Multiple Stores On One Account

In some scenarios, you may need to create additional Order Desk stores to be able to manage all of your orders in Order Desk.

While you can connect to as many different integrations as needed on a single Order Desk store, a separate Order Desk store will be needed for each additional account you have for a single integration (two Shopify stores, two Etsy shops, etc.).

Similarly, if you are a fulfillment provider, you will need to have a separate Order Desk store for each of your clients.

Even though you may need multiple Order Desk stores, they can all be set up under one account with easy access to each store while you are logged into Order Desk. You can also copy or move orders from one store to another if you want all of your orders to eventually end up in one Order Desk store.

This guide will cover how to create new stores, link the billing for multiple stores and how to move or copy orders between stores.

### Creating a New Store

To create a new store in Order Desk, click on **Create New Store** under the **Account** menu in the left sidebar.

![](https://251457507-files.gitbook.io/~/files/v0/b/gitbook-x-prod.appspot.com/o/spaces%2FAQOLMUJWMYtrpQ7Oxxca%2Fuploads%2F1sxZ9RdTXMDnZ6j5bjDl%2Flegacy-d47f82821889eb4a4e8e.png?alt=media)

#### Store Details

Enter your new store name and select the appropriate store description. If you’re not sure which store description to choose, select **other**.

![](https://251457507-files.gitbook.io/~/files/v0/b/gitbook-x-prod.appspot.com/o/spaces%2FAQOLMUJWMYtrpQ7Oxxca%2Fuploads%2Fm3JRM6TISUVDYXPaiSc9%2Flegacy-9ae721f4e018eda54da2.png?alt=media)

#### Linking Billing to Another Store

The *How Will You Pay For This Store* section offers the option to either link the billing of your new store to an existing Order Desk store (using a drop down to select the store name), or pay for the store separately.

#### Duplicate Store

You can also duplicate an existing store to have all the templates, rules, folders and settings copied into the newly created store.

### Managing Multiple Stores

Create as many stores as you need, giving them names that are easy to identify. Once you have more than one store in Order Desk, you can quickly switch between your stores by choosing the store name from the dropdown at the top of the left sidebar.

![](https://d33v4339jhl8k0.cloudfront.net/docs/assets/57b0032590336059d4edf94f/images/697b7a0ad62ec08a2b3cb1b0/file-qurvASNbHm.png)

If you have lots of stores on your account, you can also search for the specific store name from the dropdown.

![](https://d33v4339jhl8k0.cloudfront.net/docs/assets/57b0032590336059d4edf94f/images/697b7a98063c285e7010e8f4/file-CRJOxKxzcJ.png)

### Copying and Moving Orders Between Stores

**IMPORTANT**\
We recommend copying orders rather than moving them. Moved orders are completely moved from one store into another. Copied orders will stay in the original store and create a copy of the order in the second store. Copied orders will automatically pull fulfillment details from the second store. Moved orders will not.

With more than one store on your Order Desk account, you may need to copy or move orders from one store to another. This allows you to work on or submit orders for fulfillment through one single Order Desk store rather than from each individual store. You may also want to keep all orders in one store for your records or as part of your workflow.

To copy or move orders, create a rule in the initial store where the orders are first imported. If you aren’t familiar with the Rule Builder, see the [How to Work with Rules guide](/guided-walkthroughs/rules-and-automations/how-to-work-with-rules) for more information.

To create your rule, click on **Rule Builder** under the Settings menu in the left sidebar and select **Order Rule** for the rule type.

![](https://251457507-files.gitbook.io/~/files/v0/b/gitbook-x-prod.appspot.com/o/spaces%2FAQOLMUJWMYtrpQ7Oxxca%2Fuploads%2FnazCiqXPE47kCIyTxZKE%2Flegacy-e31d00540f5d735d4e40.png?alt=media)

For the event, select **Order is Imported**.

![](https://251457507-files.gitbook.io/~/files/v0/b/gitbook-x-prod.appspot.com/o/spaces%2FAQOLMUJWMYtrpQ7Oxxca%2Fuploads%2FLXEK3nUNv9vkDZCgBu6O%2Flegacy-94823cda4e787f3fba06.png?alt=media)

For the action, choose either **Copy to Store** or **Move to Store** and select the store where the orders should copy/move to:

![](https://251457507-files.gitbook.io/~/files/v0/b/gitbook-x-prod.appspot.com/o/spaces%2FAQOLMUJWMYtrpQ7Oxxca%2Fuploads%2Fc6n54KsuzsIffnBFI7X4%2Flegacy-66b0695ff21c838201bb.png?alt=media)

You may need to add filters or additional actions, depending on your preferred workflow.

In the second store, if you want to take action on order that have been copied/moved, you will need to use the **Order Copied From Another Store** or **Order Moved From Another Store** events. The Order is Imported event will not work on these orders.

![](https://251457507-files.gitbook.io/~/files/v0/b/gitbook-x-prod.appspot.com/o/spaces%2FAQOLMUJWMYtrpQ7Oxxca%2Fuploads%2FP5LgDdOqDtna6kLF0EOg%2Flegacy-4347ef900ceb42b99cbf.png?alt=media)

#### Fulfillment on Copied/Moved Orders

As copied orders are fulfilled in the second store, the shipment details will automatically pass back into the original store to update the order. If the store and integration settings are in place for it, the fulfillment details will also be sent back to the shopping cart and/or to notify the customer.

Moved orders will no longer exist in the original store. Because of this, the link to the shopping cart will be broken and we will not be able to pass any fulfillment details back into the shopping cart. Moving orders is generally better for creating an archive store and want to move old, fulfilled orders into it.

### Copying Import Templates Between Stores

Any import templates you’ve set up in an Order Desk store can be copied over to another store on your account, saving you some time so you don’t have to manually create the same template in multiple stores. You can read more about this process in our guide [here](/guided-walkthroughs/templates-emails-and-order-documents/how-to-import-a-spreadsheet#copying-a-template-to-another-store).

### Syncing Inventory Between Stores

If you need to keep your inventory synced between two or more of your Order Desk stores, please see the [How to Sync Inventory Between Order Desk Stores guide](/guided-walkthroughs/products-and-inventory/how-to-sync-inventory-between-order-desk-stores) for more information.


# How to Cancel Your Order Desk Store

We understand that sometimes you’ll need to close down your Order Desk account. This is something that you can do right within your own Order Desk store following the instructions in this guide.

Before proceeding, you may want to consider the following:

* Export inventory, orders and any relevant reports first if necessary. Once your store is canceled, you will no longer be able to download or export your data.
* If your business needs a particular integration or feature in order to continue using Order Desk, [contact Order Desk support](https://www.orderdesk.com/contact/) to let us know. All requests are reviewed and saved, and new features are often built based on how many customers have asked for them.

### What Does Canceling Do?

When you cancel your Order Desk store, you are putting your store in a read-only mode where no activity can happen.

All of your content will be saved, but the store will remain locked unless you decide to upgrade again. If your store is already on a paid plan, once you lock your account, you will no longer be billed for service and your store will no longer function.

**Please note that locked accounts may be deleted on future audits.** If you plan to come back to Order Desk and do not want your store to be deleted, let Order Desk support know.

If you need to delete your store instead of locking and canceling it, you can do so from within your Store Settings page. For a step by step look at the deletion process, please see our [How to Delete a Store](/guided-walkthroughs/using-order-desk/how-to-delete-a-store) guide.

### Canceling a Demo Store

If your demo store has never been upgraded to a paid plan, it will lock (cancel) itself 30 days from the day it was created.

You do not need to take further action, though you can follow the steps for [How to Cancel Your Account](#how-to-cancel-your-account) if you would like to lock your store ahead of schedule.

**For Shopify Merchants**

Uninstalling the Order Desk app from within Shopify does not cancel or remove your Order Desk store. You will still need to come into Order Desk to cancel your account following the steps below.

If you have a paid account, please be certain you have locked your Order Desk store, as billing will continue even if Shopify and Order Desk are no longer connected.

### How to Cancel Your Account

In Order Desk, click **Billing** in the left sidebar under the **Account** menu.

![](https://251457507-files.gitbook.io/~/files/v0/b/gitbook-x-prod.appspot.com/o/spaces%2FAQOLMUJWMYtrpQ7Oxxca%2Fuploads%2FUd8o5UsHJDKPQW58qkQL%2Flegacy-a7e261a6ddd1add0b6d4.png?alt=media)

Click **Change Billing Plan**.

![](https://251457507-files.gitbook.io/~/files/v0/b/gitbook-x-prod.appspot.com/o/spaces%2FAQOLMUJWMYtrpQ7Oxxca%2Fuploads%2FlP2WH6WlFFD6RINIuIvW%2Flegacy-88944e8cddeaf87003eb.png?alt=media)

Click **Cancel My Account Now** to deactivate the store.

![](https://251457507-files.gitbook.io/~/files/v0/b/gitbook-x-prod.appspot.com/o/spaces%2FAQOLMUJWMYtrpQ7Oxxca%2Fuploads%2FWjDu0Tb3pAwcDg1gCdf0%2Flegacy-8b529e38b9cd81a452b5.jpg?alt=media)


# How to Delete a Store

This guide outlines the process by which you can permanently delete your Order Desk store. If you would like to temporarily disable your store instead, please do so by following the steps in our [How To Cancel Your Order Desk Store](/guided-walkthroughs/using-order-desk/how-to-cancel-your-order-desk-store) guide.

The store deletion tool can be found in your [Store Settings](/guided-walkthroughs/using-order-desk/manage-store-settings). To access your store settings, click on **Store Settings** under the **Settings** menu in the left sidebar:

![](https://251457507-files.gitbook.io/~/files/v0/b/gitbook-x-prod.appspot.com/o/spaces%2FAQOLMUJWMYtrpQ7Oxxca%2Fuploads%2FTM0zQVd9rpvuWPk9f6ln%2Flegacy-4d36d78592f8aeff1286.png?alt=media)

Once you’ve accessed the Store Settings, click the tab labeled **Deletion**:

![](https://251457507-files.gitbook.io/~/files/v0/b/gitbook-x-prod.appspot.com/o/spaces%2FAQOLMUJWMYtrpQ7Oxxca%2Fuploads%2FCUGFAJeDFU4JP0DNOiAb%2Flegacy-7a86ee948c18f3cef624.png?alt=media)

### Deleting Your Store

The Deletion tab contains all the information you need to begin the process of deleting your Order Desk store. You’ll be able to schedule your store for deletion by clicking the **Schedule for Deletion** button. Once you have opted to delete your store, it will take effect in 30 days.

![](https://251457507-files.gitbook.io/~/files/v0/b/gitbook-x-prod.appspot.com/o/spaces%2FAQOLMUJWMYtrpQ7Oxxca%2Fuploads%2FHBg9g4Qfs5WT5rHQmmpD%2Flegacy-17237bc5b0b577d093ea.png?alt=media)

Store deletion is permanent and will remove **all** of the following:

* Orders
* Inventory Items
* Rules
* Email Templates
* Import and Export Templates
* Integrations and Integration Settings
* Store Users and User Access

### Ineligible Stores

A Child store is any Order Desk store that is linked to another store via billing, where the store processes payment of their Order Desk invoices on their behalf. This store is also known as the Parent store. If you are attempting to delete a Child store, this warning will appear:

![](https://251457507-files.gitbook.io/~/files/v0/b/gitbook-x-prod.appspot.com/o/spaces%2FAQOLMUJWMYtrpQ7Oxxca%2Fuploads%2FgjsgezaZSXZVtHyMLZeq%2Flegacy-aa0ed0f91a6b893788c5.png?alt=media)

If you are attempting to delete a Parent store, this warning will appear instead:

![](https://251457507-files.gitbook.io/~/files/v0/b/gitbook-x-prod.appspot.com/o/spaces%2FAQOLMUJWMYtrpQ7Oxxca%2Fuploads%2FWJal9n4JBVAqtoDyIe72%2Flegacy-fa237a9ca1e23e619dd9.png?alt=media)

In order to delete these stores they must be unlinked from within the Child store by an Admin User.

#### Unlinking Stores

To unlink your stores, click on **Billing** under the **Account** menu in the left sidebar from within one of your Child stores:

![](https://251457507-files.gitbook.io/~/files/v0/b/gitbook-x-prod.appspot.com/o/spaces%2FAQOLMUJWMYtrpQ7Oxxca%2Fuploads%2FQ5GMh5C5TBe5bSVMSCyF%2Flegacy-79d12128db89fd030a27.png?alt=media)

Once the Billing Settings page opens, you’ll be able to see the name of the store that you’re linked to. Click the **Unlink This Billing Account From (Store Name)** button to unlink the accounts.

![](https://251457507-files.gitbook.io/~/files/v0/b/gitbook-x-prod.appspot.com/o/spaces%2FAQOLMUJWMYtrpQ7Oxxca%2Fuploads%2F3Z5REIQ4NDORhHObzVVG%2Flegacy-da973ffd451d7cc33458.png?alt=media)

After the stores have been successfully unlinked, you can return to the Deletion tab in the Store Settings of the store you plan to delete and click the **Schedule for Deletion** button again.

### Confirming Store Deletion

Since store deletion is permanent, we have a few steps to confirm your decision. After clicking the **Schedule for Deletion** button, a pop-up will appear to confirm your choice. Click **I wish to delete this store** to confirm.

![](https://251457507-files.gitbook.io/~/files/v0/b/gitbook-x-prod.appspot.com/o/spaces%2FAQOLMUJWMYtrpQ7Oxxca%2Fuploads%2Fb8D5ZCxPDzzympn6fDma%2Flegacy-b30444ad3a017b05716c.png?alt=media)

A second pop-up will appear. Click **I understand the implications** to move to the next step.

![](https://251457507-files.gitbook.io/~/files/v0/b/gitbook-x-prod.appspot.com/o/spaces%2FAQOLMUJWMYtrpQ7Oxxca%2Fuploads%2FWNu5ER2cn2AnjOS1E6jM%2Flegacy-d713d14206305aabfd7c.png?alt=media)

The final step is to enter the exact name of the current store in the **Store Name** field and click **Delete Store**.

![](https://251457507-files.gitbook.io/~/files/v0/b/gitbook-x-prod.appspot.com/o/spaces%2FAQOLMUJWMYtrpQ7Oxxca%2Fuploads%2FZxFgxw3gjJluHy3anSi6%2Flegacy-048fc6a1c2c3decfcf90.png?alt=media)

You’ll know that you have successfully finished the deletion scheduling process when you are redirected to the **Create New Store** page and prompted to click **OK** on the confirmation pop-up.

![](https://251457507-files.gitbook.io/~/files/v0/b/gitbook-x-prod.appspot.com/o/spaces%2FAQOLMUJWMYtrpQ7Oxxca%2Fuploads%2FPMFvS6wYDw0VWvgAJlmo%2Flegacy-4a451fa1d591b9821772.png?alt=media)

### Canceling Store Deletion

Once 30 days has passed, your store will be permanently deleted. If you’d like to cancel deletion prior to that deadline, you may reach out to our support team [here](mailto:support@orderdesk.com) to do so.

### FAQ

#### Can I pause my store instead of deleting it?

Pausing your store is a great way to shut it down temporarily without losing your orders and settings. In order to do so, you’ll need to cancel your store. You can learn more about that [in this guide](/guided-walkthroughs/using-order-desk/how-to-cancel-your-order-desk-store).

#### What if I change my mind?

No worries! If you opt to delete your store, you have 30 days to stop the pending deletion. If you do so your store will revert to a locked state, at which point you’ll be able to either leave it locked or select a billing plan and restart your subscription. However, once 30 days has passed there is no way for us to recover your store. If you’d like to stop the deletion process, please reach out to our [support team](mailto:support@orderdesk.com).

#### I just want to press one button and be done with it! Why are there so many warnings?

As a company that specializes in automation, we absolutely appreciate when things move instantaneously! That said, deleting your store removes everything *permanently*. We don’t keep an archive of deleted stores and we can’t recreate or rebuild them. These warnings are a way for us to confirm that you’re 100% sure you want to delete your store and for you to make sure you’re deleting the right store (if you have multiple).


# How to Use Order Desk on Mobile Devices

Order Desk is not intended to be used on mobile devices, as it was built with desktop browsers in mind. However, it is possible to use a limited range of features via mobile browser on most newer Android and iOS devices. For best results we recommend using the most recent version of either Chrome or Safari.

### Is there an Order Desk mobile app?

Order Desk does not offer a mobile app at this time.

### What features are supported on mobile?

Many of our features can be difficult or impractical to work with on a mobile device due to the limitations of mobile browsers, which is why we generally advise against using Order Desk on mobile.

Should you need to check your orders on the go and you don’t have access to a desktop computer, you can log into Order Desk on your mobile device and perform a limited amount of actions if need be.

![](https://251457507-files.gitbook.io/~/files/v0/b/gitbook-x-prod.appspot.com/o/spaces%2FAQOLMUJWMYtrpQ7Oxxca%2Fuploads%2FRYkdK5YXOEo7kcfCqS1S%2Flegacy-1d410204908697bf2765.jpg?alt=media)

Order Desk is built with a responsive design that adapts to the size and scale of a browser, so when viewed on a mobile device you’ll see a layout that’s different, but familiar. Both the sidebar and the search field become collapsable menus, complete with all the same options you would see on desktop.

![](https://251457507-files.gitbook.io/~/files/v0/b/gitbook-x-prod.appspot.com/o/spaces%2FAQOLMUJWMYtrpQ7Oxxca%2Fuploads%2FxT5Ad5uf7MV64W3TY8Fj%2Flegacy-316ae136df11b88bf802.jpg?alt=media)

You’ll also have access to many of the same features when viewing a folder, allowing you to select orders to move them, tag them, and so on.

![](https://251457507-files.gitbook.io/~/files/v0/b/gitbook-x-prod.appspot.com/o/spaces%2FAQOLMUJWMYtrpQ7Oxxca%2Fuploads%2FzPqf0HNtE6mzDJsdQrZ0%2Flegacy-85f3e57b77d49f50a764.jpg?alt=media)

The orders themselves will display all of the order details, including the item metadata, customer information, and order history. You can even edit item details, update customer info, and add internal order notes.

This basic experience should give you a good idea of what the rest of Order Desk would be like on mobile. You wouldn’t want to perform any advanced actions like building templates or importing/exporting files, but simple tasks involving orders or account management can still be done when you don’t have immediate access to a computer.


# Is Order Desk Down?

In the event that you’re unable to reach Order Desk or the Order Desk app, there are a couple of steps you can take to verify what the cause may be. Here are some common culprits that can be easy to identify.

## Is There an Outage?

This would be the simplest thing to check for. In the event of an outage we will update our [status page](http://status.orderdesk.com/) accordingly, with information on the current issue along with a log of our most recent uptime history.

Additionally we may also give our customers a heads up on social media through our Twitter handle, [@OrderDeskRules](https://twitter.com/orderdeskrules). If our team has identified an outage or we have any scheduled maintenance coming up, we’ll tweet out this information along with any updates once everything is back up and running.

## Check Your Browser

Sometimes there will be a problem with a specific web browser, either because of something occurring within the browser itself or due to a third-party extension or add-on being used. Check the following:

* Does this persist after clearing your browser’s cache? Occasionally a browser’s cache can come into conflict with a website and can cause some unexpected behavior, so clearing it out will completely reload the Order Desk app the next time you access it. If you’re not sure how to do this, here are some quick links that may help:
  * [Chrome](https://support.google.com/accounts/answer/32050)
  * [Firefox](https://support.mozilla.org/en-US/kb/how-clear-firefox-cache)
  * [Safari](https://support.apple.com/guide/safari/manage-cookies-and-website-data-sfri11471/mac)
  * [Edge](https://support.microsoft.com/en-us/help/10607/microsoft-edge-view-delete-browser-history)
  * [Internet Explorer](https://support.microsoft.com/en-us/help/17438/windows-internet-explorer-view-delete-browsing-history)
* Do you have any browser extensions/add-ons enabled? Any third-party customizations added to your browser (ad blockers, rewards programs, etc.) can potentially come into conflict with websites you use on a daily basis, even if the add-on isn’t intended to be used with the website you’re viewing. Those extensions are still running on the page even if it doesn’t look like it, so you may want to try disabling them temporarily to see if this resolves the issue.
* Are you able to load Order Desk in a different browser program? If you’re not having any success with the browser you’re currently using, try using an alternate program like [Chrome](https://www.google.com/chrome/) or [Firefox](https://www.mozilla.org/en-US/firefox/browsers/). You shouldn’t have to switch to them permanently, but for testing purposes this will either tell you whether it’s happening with any web browser on your computer or if it’s an isolated problem.

## Check Your Local Network

If you’ve ruled out your browser software as the culprit, the next step would be to look into any issues that may be affecting your network connection.

* If you’re able to do so, try restarting your router and/or modem to see if that does the trick. If your network is being hindered by some type of connection problem, it may be resolved through a complete restart.
* Another quick way to verify whether or not the issue is being caused by your network would be to try accessing Order Desk through your phone’s mobile browser. Make sure the phone is disconnected from your wifi before doing this, so that you’re using your cellular network instead. If Order Desk is inaccessible through both networks, then this likely indicates an issue on our end.
* You can also use a third-party website like [Down.com](https://down.com/) to determine whether Order Desk may be down for everyone else as well, as it will check to see if a particular site is down on your behalf.

## Still Need Help?

If you’ve exhausted all of the above and you’re still unable to access Order Desk, go ahead and [contact us](https://www.orderdesk.com/contact/) directly so we can assist you further.


# Orders and Folders

These guides cover the day to day work of managing orders, adding extra data, splitting, merging, and organizing them into folders.


# How to Begin Importing Orders

Orders can be added to Order Desk in a variety of different ways. This guide will serve as an overview that covers the basic concepts of importing orders into Order Desk. Links to more in-depth tutorials will be included in each section.

### Manually Create Orders

If you haven’t made your first sale yet, or you’re not ready to enable any integrations, you can manually create real or test orders to begin exploring how Order Desk works.

To manually create an order, click on **Add New Order** under the **Tools** menu in the sidebar:

![](https://d33v4339jhl8k0.cloudfront.net/docs/assets/57b0032590336059d4edf94f/images/5ac3c428042863794fbedcbc/file-FIoo8egasf.png)

Next, fill out as many of the order details as you know. You can always edit or add information to an order later, especially if you’re unsure what a field means while you’re creating an order.

You will need to add a Code/SKU for any item added, as well as a shipping name or company name to create the order.

**IMPORTANT**

💡 Every order item in Order Desk needs to have a unique Code/SKU. If duplicate codes are used, it will affect your order data.

Click the **Save New Order** button when you’ve added the necessary data.

### Via Integrations

Orders can be imported directly into Order Desk via Shopify, Amazon, or through the many other sales channel integrations built into Order Desk.

Open your preferred sales channel integration and look for a setting called **Check For New Orders**. This is used to set how often Order Desk should check that service for new orders, then import them on a schedule.

Automatic imports can be modified by using filters or rules. Not all integrations support import filters, but for those that do, each integration’s guide includes instructions on how to use them.

### Via an Import Template

For fully custom imports, you can upload a CSV file into Order Desk via an **import template**. Through this feature, you can also email orders directly into the app! For a more in-depth walkthrough on how to create and use import templates, [**click here**](/guided-walkthroughs/templates-emails-and-order-documents/how-to-import-a-spreadsheet).

### Watch and Learn

Importing a spreadsheet is a more advanced topic. Here, you’ll find an overview video of how it works. Follow the link to this guide for a more in-depth tutorial.

{% embed url="<https://player.vimeo.com/video/604144997?color&amp;autopause=0&amp;loop=0&amp;muted=0&amp;title=1&amp;portrait=1&amp;byline=1#t=>" %}


# How to Cancel an Order

Being the middle point between the shopping cart and the fulfillment service, it’s common for merchants to want to know how to cancel an order directly in Order Desk so that it will also update as canceled in the shopping cart *and* at the fulfillment service.

Because every integration has different settings, requirements and API data, it isn’t actually possible to “just” cancel an order in Order Desk. This is especially true if the intention is to have it also automatically cancel the order everywhere else as well.

There are, however, a few exceptions and tips for handling canceled orders in Order Desk, which will be covered in this guide.

### Can I Cancel an Order in Order Desk?

Strictly speaking, there is no automatic way to cancel an order in Order Desk. Just moving the order to the canceled folder **will not trigger any actions on the order** unless a rule has been set up to do something specific with an order that is moved into the canceled folder.

In Order Desk, folders are places to store and organize orders. Folders can be deleted, edited, renamed, moved around and used for your own customized purposes. A canceled folder is merely a label for a certain folder and not an event or action that happens to the orders in that folder.

When an order is moved into the canceled folder, either manually or automatically by some other means, this movement does not, by default, indicate that a cancel notification has been sent back to the shopping cart or to the fulfillment service that has the order.

For more information on how folders and rules work in Order Desk, please read these guides on [working with folders](/start-here/getting-started-series/quick-start-overview#working-with-folders) and the [Order Desk Rule Builder](/start-here/getting-started-series/quick-start-how-customizable-is-order-desk-really#the-order-desk-rule-builder).

### Integration Specific Details

Each integration has its own requirements and specifications for how to cancel an order. Most fulfillment or shipping services will require canceling from their own app or by contacting them directly by phone or email.

Some shopping carts will accept a cancelation notification from Order Desk if a rule is set up for it, such as *If Order Moved to Canceled Folder, Change Order Status at Shopify to Canceled.*

Check the Order Desk help guides for more information about specific integrations, explore the actions available in the Rule Builder for your integrations, or contact Order Desk support to find out if this is possible with the integrations you are using.

For some fulfillment integrations, a **Cancel Order** button will appear on the order page after it has been submitted to the integration. With a few exceptions (listed below), these cancel buttons are meant to be used immediately after an order is submitted, within seconds, in case the submission was a mistake.

Once the order has successfully transferred through to the receiving service, it will start moving through their system and will need to be stopped from their side. If you pressed the cancel order button here in Order Desk, please follow up with the service to make sure it has been canceled, unless the integration specific instructions say otherwise.

It’s recommended that any order that has already been submitted for fulfillment be checked on directly with that service to ensure it has been canceled in time.

**Integration specific instructions**

**Amazon Marketplace**: [press cancel button](/integration-setup-guides/sales-channels/amazon-marketplace-integration#canceling-orders)\
**Amazon MCF**: press cancel button, but follow up with MCF to confirm\
**Bay Photo**: press cancel button\
**BDLinx**: press cancel button or use Cancel Order at BDLinx rule action\
**Rithum**: press cancel button and select reason from the dropdown\
**MWW**: if within the first minute or two after the order is submitted, [press cancel button; otherwise send email](/integration-setup-guides/print-on-demand/mww-on-demand-integration#canceling-orders)\
**OIA Global**: [send email](/integration-setup-guides/fulfillment-services/oia-global-integration#resubmitting-or-canceling-an-order)\
**HP Site Flow**: [press cancel button](/integration-setup-guides/print-on-demand/hp-site-flow-integration#canceling-orders)\
**Progressive Solutions**: [press cancel button](/integration-setup-guides/print-on-demand/progressive-solutions-integration#canceling-orders)

### Resubmit an Order for Fulfillment

Unless the integration specific instructions say otherwise, to resubmit an order, you will first need to change the order number, which can easily be done by duplicating the order. This must be done so the fulfillment or shipping service sees a new order number and does not reject the order submission as one they have already received and/or canceled.

To do this, [follow these instructions](/guided-walkthroughs/shipping-fulfillment-and-returns/how-to-handle-returns#full-order-duplicate-the-order-first).

### Related Articles

* How to Handle Returns


# How to Customize Folder Columns

In Order Desk, your folders have columns that provide an overview of the information in each order. These columns can be rearranged, changed or customized to display specific information in the orders.

If you aren’t yet familiar with how to create, rearrange and use folders, please refer to the [Working with Folders guide](/start-here/getting-started-series/quick-start-overview#working-with-folders) first.

### How to Customize Columns

The default columns available in each folder are **Order ID**, **First Name**, **Last Name**, **Total**, **Qty**, and **Order Date**:

![](https://251457507-files.gitbook.io/~/files/v0/b/gitbook-x-prod.appspot.com/o/spaces%2FAQOLMUJWMYtrpQ7Oxxca%2Fuploads%2FEJP89TEi0KM68eh3RODo%2Flegacy-b68eda9d1ad9f00e08fa.png?alt=media)

To get started, select the folder you want to customize from the left sidebar and click the **Customize** button in the top right corner.

![](https://251457507-files.gitbook.io/~/files/v0/b/gitbook-x-prod.appspot.com/o/spaces%2FAQOLMUJWMYtrpQ7Oxxca%2Fuploads%2FSmkjMXHhW33PyyaYOGbK%2Flegacy-b86358c57b1814b3edae.png?alt=media)

On the next page, you will see two columns:

![](https://251457507-files.gitbook.io/~/files/v0/b/gitbook-x-prod.appspot.com/o/spaces%2FAQOLMUJWMYtrpQ7Oxxca%2Fuploads%2Ft7gBdp0S9Hj1OFymtdMN%2Flegacy-524101220dca8a5f7ca0.png?alt=media)

The left column shows what is currently being used in the folder view. The right column shows what else is available to add to the folder.

These options can be dragged back and forth between the two columns to add or remove them from the folder view, or they can be dragged up and down in the left column to arrange them in in the order you want.

**Custom Defined Columns**

At the bottom of the right column, there are two buttons for adding checkout data and order metadata columns:

![](https://251457507-files.gitbook.io/~/files/v0/b/gitbook-x-prod.appspot.com/o/spaces%2FAQOLMUJWMYtrpQ7Oxxca%2Fuploads%2F0b5aQKy5flRCcKGh6KKN%2Flegacy-d3d9a4c57122aa76c9c8.png?alt=media)

If you need to add any of your checkout data or order metadata fields as a column, add the field name to the appropriate box and click the button. This must be an exact match to the field name for it to display the information. For example, if your field name is DeliveryDate, then you must use DeliveryDate, not Delivery Date or deliverydate, etc.

![](https://251457507-files.gitbook.io/~/files/v0/b/gitbook-x-prod.appspot.com/o/spaces%2FAQOLMUJWMYtrpQ7Oxxca%2Fuploads%2FSbfTVmJT4OjcMuIBt0Si%2Flegacy-43eb1249111a21592d36.png?alt=media)

Order metadata is found at the bottom of the order details page.

![](https://251457507-files.gitbook.io/~/files/v0/b/gitbook-x-prod.appspot.com/o/spaces%2FAQOLMUJWMYtrpQ7Oxxca%2Fuploads%2FhRs1LjvdxtbwI8FrVYxY%2Flegacy-7f0fae767ab9e87f5212.png?alt=media)

Checkout data is found at the top right corner of the order details page:

![](https://251457507-files.gitbook.io/~/files/v0/b/gitbook-x-prod.appspot.com/o/spaces%2FAQOLMUJWMYtrpQ7Oxxca%2Fuploads%2Fh9ununLCytogjcn00bix%2Flegacy-ab6340b1e75272291bfb.png?alt=media)

If you are unfamiliar with checkout data, see the [How to Work with Checkout Data](/guided-walkthroughs/orders-and-folders/how-to-work-with-checkout-data) guide.

### Special Features

The column name can also be customized if you want to change the field names from what’s on the orders. This can be done by adding **=** after the field name, followed by the name you’d like to give the column.

Continuing with the DeliveryDate example from above, if you want to list the DeliveryDate data under a column named “Delivery On” instead of “DeliveryDate”, then you put **DeliveryDate=Delivery On** in the field:

![](https://251457507-files.gitbook.io/~/files/v0/b/gitbook-x-prod.appspot.com/o/spaces%2FAQOLMUJWMYtrpQ7Oxxca%2Fuploads%2FxqnIXzf8MDKdWAdUKYg1%2Flegacy-c5bbfc6008556eb201fb.png?alt=media)

Once this is done, the column in the folder view will show the new custom name:

![](https://251457507-files.gitbook.io/~/files/v0/b/gitbook-x-prod.appspot.com/o/spaces%2FAQOLMUJWMYtrpQ7Oxxca%2Fuploads%2FjH6n1jWq3meVqEGce6bk%2Flegacy-7acc4efcb1cc8d169eb7.png?alt=media)

This feature is useful if you have long or technically complex field names and want to rename them in the column display to something shorter, more efficient or more easy to understand.

### Suggestions

Keep the order number at the front of the row of columns so you can still easily click into an order:

![](https://251457507-files.gitbook.io/~/files/v0/b/gitbook-x-prod.appspot.com/o/spaces%2FAQOLMUJWMYtrpQ7Oxxca%2Fuploads%2FQ4VEUqH4zJJ8j6Mjy1ig%2Flegacy-4c0f6771c21101f1494d.gif?alt=media)

Without the Order ID, you can only see the quickview, which isn’t all of the order details:

![](https://251457507-files.gitbook.io/~/files/v0/b/gitbook-x-prod.appspot.com/o/spaces%2FAQOLMUJWMYtrpQ7Oxxca%2Fuploads%2FWUizOWfmXpwDIkWwjia3%2Flegacy-31df3406c0159ef30f6f.gif?alt=media)

Each folder has to be set up individually, even if several of them will have the same custom column layout. this does, however, mean that each folder can be customized separately if necessary.

### Limitations

The columns in a folder are not intended to show *any* detail about the order, but rather certain order level details where there won’t be more than one piece of information for each field. For example, an order could have multiple items or multiple tracking numbers, so these fields are not available to avoid the page view being skewed by an order with multiples of a single field.

To see more information about the orders in a folder, click the i button to view the quickview for each order in the folder:

![](https://251457507-files.gitbook.io/~/files/v0/b/gitbook-x-prod.appspot.com/o/spaces%2FAQOLMUJWMYtrpQ7Oxxca%2Fuploads%2FGdXCdR0XAWDgPgiUUxa2%2Flegacy-1c6989e734764421cee0.png?alt=media)


# How to Merge Orders

Order Desk can merge two or more orders together to make shipping an easier and more affordable process for you or your fulfillment service.

This guide explains how to merge orders, how and why it’s important to archive the originals, and other necessary info if you plan to merge your orders together in Order Desk.

### Manually Merging Orders

Two or more orders can be merged together manually by selecting the orders and clicking on the **Merge Checked Orders** button at the bottom of each folder page.

![](https://251457507-files.gitbook.io/~/files/v0/b/gitbook-x-prod.appspot.com/o/spaces%2FAQOLMUJWMYtrpQ7Oxxca%2Fuploads%2Ftoy4T52lRG224g6AQgNm%2Flegacy-dc95694b8dcc117e3fa7.png?alt=media)

A new order will be created with the item and checkout data details from the original orders, and the newly created order will have the same order number as the most recent of the merged orders with a -M added as the suffix:

![](https://251457507-files.gitbook.io/~/files/v0/b/gitbook-x-prod.appspot.com/o/spaces%2FAQOLMUJWMYtrpQ7Oxxca%2Fuploads%2F73bGRMCSkmCFzHWb6laj%2Flegacy-3985d26a65b530132265.png?alt=media)

If the merged orders *do not have* the same shipping name and address, the name and address on the most recent order will be used for the newly created merged order.

Please be careful when manually merging orders so as not to accidentally merge two or more orders for separate customers together.

If you mistakenly merge orders together, the original orders will still exist and the newly created merged order can be deleted. If you have your store set up to [automatically archive the original orders](#archiving-the-original-orders) after they’ve been merged into a new order, you will have to go pull those orders out of the folder they’ve been sent to and make sure they are processed according to your normal workflow.

### Merging Orders with Rules

If you prefer to automate this process, Order Desk can be set up to merge orders with a rule. **When merging with a rule, orders will only be combined if the shipping name, company and address line 1 are the same in each of the orders**.

To merge orders with a rule, this should be done by setting up a custom event to run every 30 to 60 minutes *or longer*, depending on how often you want Order Desk to poll your orders and look for any that could be merged. Keep in mind that enough time needs to be given for new orders from the same person to be placed, hence needing a longer time between appointments for this custom event.

To set up a custom event, follow the instructions [in this guide](/guided-walkthroughs/rules-and-automations/how-to-use-custom-events).

Once the custom event has been created, create a rule for the **Order Rule** type for the event **Merge Orders**:

![](https://251457507-files.gitbook.io/~/files/v0/b/gitbook-x-prod.appspot.com/o/spaces%2FAQOLMUJWMYtrpQ7Oxxca%2Fuploads%2FoAQRRYcOFQiFhGfOqXJ4%2Flegacy-65f9e074f0a72b7572ca.png?alt=media)

### Archiving the Original Orders

The original orders will still exist after being merged into a new order so it’s best to archive the originals to prevent them from being fulfilled more than once.

To archive the original orders, you can either manually move them into a different folder, such as Canceled or Archived, by selecting the orders and clicking on the folder name where you want them moved:

![](https://251457507-files.gitbook.io/~/files/v0/b/gitbook-x-prod.appspot.com/o/spaces%2FAQOLMUJWMYtrpQ7Oxxca%2Fuploads%2FER4OOtfZe4QII8Xd75l9%2Flegacy-3c9671758d3e63729d8b.png?alt=media)

Or, to automate this process, create a rule that uses the **Order Merged Into Another Order** event and **Change Folder** as the action:

![](https://251457507-files.gitbook.io/~/files/v0/b/gitbook-x-prod.appspot.com/o/spaces%2FAQOLMUJWMYtrpQ7Oxxca%2Fuploads%2FqWy8SDK0ayowdDIvOgdy%2Flegacy-6bea68cdb7f4e601eaf7.png?alt=media)

Choose the folder where you want your archived orders to go, such as Canceled. For more information on folders, see the [Working with Folders guide](/start-here/getting-started-series/quick-start-overview#working-with-folders).

Do not delete the original orders if you need to maintain the link back to the shopping cart they came from. They must exist for Order Desk to pass the shipment and tracking information back to the original cart.

### Shipment Details

When shipment and tracking details are added to a merged order, they will be copied back to the original orders and sent back to the shopping cart they came from as long as your store and cart integrations are set up for this.


# How to Split Orders

Rules can tell Order Desk how to split your orders and where to send them once they’re split. When orders are split, the tax, shipping, handling and discounts are split proportionally between the new and original order.

This guide covers splitting options and how to create rules for after orders split to tell split orders where to go.

If you aren’t familiar with the Rule Builder, take a few moments to read through the [How to Work with Rules guide](/guided-walkthroughs/rules-and-automations/how-to-work-with-rules).

### Shopify and BigCommerce Instructions

Splitting orders that come from Shopify or BigCommerce will be a slightly different process than what is explained in this guide. For instructions, read the guides on how to split by vendor for [Shopify](/guided-walkthroughs/integration-specific-walkthroughs/how-to-split-by-vendor-with-shopify) or for [BigCommerce](/guided-walkthroughs/integration-specific-walkthroughs/how-to-split-by-vendor-with-bigcommerce).

If your Shopify or BigCommerce orders need to be split using another method, continue reading this guide for options.

### Manually Split Orders

To manually split an order, open the order page and select the item(s) that need to be split into a new order. Click **Split Order**.

![](https://251457507-files.gitbook.io/~/files/v0/b/gitbook-x-prod.appspot.com/o/spaces%2FAQOLMUJWMYtrpQ7Oxxca%2Fuploads%2FOWARKW1WrBpQMUfFWQVj%2Flegacy-c45c9e162847a3983bef.gif?alt=media)

The order will be split into two separate orders based on the items selected. After the split takes place, you will be redirected to the new order.

### Automatically Split Orders with Rules

Orders can be split automatically with rules using these different methods:

* **CODE/SKU:** split specific SKUs out of orders.
* **ITEM NAME:** split specific items out of orders based on their names.
* **CATEGORY CODE:** Category Code is a unique field used for the Foxy integration allowing you to categorize your items. If you are using Foxy, you can use it to split your items into separate orders. Shopify vendors will also be placed in this field.
* **DELIVERY TYPE:** Delivery Type is a unique field for FoxyCart shops. If you set the Delivery Type on your items in FoxyCart, you can split using this method.
* **VARIATION:** split items with specific variations out of orders.
* **ITEM METADATA**\*\*:\*\* split items with specific metadata tags out of orders. This is the most versatile, fully customizable method for splitting orders.
* **ALL**: split every item into a new order.

#### Creating a Split Rule

From the Rule Builder, choose the **Order Rule** type:

![](https://251457507-files.gitbook.io/~/files/v0/b/gitbook-x-prod.appspot.com/o/spaces%2FAQOLMUJWMYtrpQ7Oxxca%2Fuploads%2FqTzXELyLb642uVRsp9B4%2Flegacy-552206f0e5e89608647c.gif?alt=media)

Select the event that you want to split orders on. This is typically going to be **Order is Imported**, but any event can be used.

![](https://251457507-files.gitbook.io/~/files/v0/b/gitbook-x-prod.appspot.com/o/spaces%2FAQOLMUJWMYtrpQ7Oxxca%2Fuploads%2FSiGz9NVyiwLghvMyLBNT%2Flegacy-d55ba246b31f8dc393c2.png?alt=media)

Under the Filters & Actions tab, select the **Split Order** action:

![](https://251457507-files.gitbook.io/~/files/v0/b/gitbook-x-prod.appspot.com/o/spaces%2FAQOLMUJWMYtrpQ7Oxxca%2Fuploads%2F1wCzOLlYBnZ6MiDQ02zE%2Flegacy-0c7292de030ef34983ef.png?alt=media)

While setting up your rules, be mindful of capitalization, spacing and punctuation. In most cases, names and values will need to be an exact match to what is on your items for the split rules to work.

Do not add any additional actions to a rule that splits orders. Use a second rule for when [Order is Split](#take-action-after-split-happens) to tell Order Desk what actions to take on a split order. This way the split action has a chance to complete before any additional actions start running.

#### Instructions for Each Method

Split By\
Code/SKU | Item Name | Category Code | Delivery Type | Variation | Item Metadata | Split All Items

Special Features\
[Split Method Wildcard](#special-feature-split-method-wildcard) | [Split All Items of Specific Type](#special-feature-split-all-items-of-specific-type)

#### Split by Code/SKU

Choose **Code/SKU** as the **Split Type**. This method works if you have a small number of product SKUs to split out of orders. If you have more than a dozen or so SKUs you want to split out, another split method will be more efficient.

![](https://251457507-files.gitbook.io/~/files/v0/b/gitbook-x-prod.appspot.com/o/spaces%2FAQOLMUJWMYtrpQ7Oxxca%2Fuploads%2F8uALgRMBC02d4hiNlBog%2Flegacy-68b88083db4cd07d4cd9.png?alt=media)

You can also add multiple SKUs by separating them with a comma: SKU1,SKU2,SKU3 and so on. This will split these SKUs, if they come in with an order, into a single order. This will *not* create separate orders for each SKU.

#### Split by Item Name

To split orders by the item name, choose **Name** as the **Split Type**.

Under **Names to Split** add the actual item name to be split out. For example, split the Apple Treats item into their own orders with:

![](https://251457507-files.gitbook.io/~/files/v0/b/gitbook-x-prod.appspot.com/o/spaces%2FAQOLMUJWMYtrpQ7Oxxca%2Fuploads%2F8yveGRUc55itoo9SoOx5%2Flegacy-b15a921da76398eed26c.png?alt=media)

You can add more than one name to a split rule, separating the name values by a comma:

![](https://251457507-files.gitbook.io/~/files/v0/b/gitbook-x-prod.appspot.com/o/spaces%2FAQOLMUJWMYtrpQ7Oxxca%2Fuploads%2FwG83SWm07izXDnkvNiwN%2Flegacy-b5c1c9e9c20807ce2014.png?alt=media)

This will split the targeted items into a single order rather than separate individual orders. If you need to separate the treat items into individual orders, set up two separate rules. Also give your split a **Reference Name**.

#### Split by Category Code

The category code comes in on items from certain shopping carts. If your shopping cart supports this field, you will see it in the item details directly in an order:

![](https://251457507-files.gitbook.io/~/files/v0/b/gitbook-x-prod.appspot.com/o/spaces%2FAQOLMUJWMYtrpQ7Oxxca%2Fuploads%2Fj5NwVrrNLJJBSnE6E1eF%2Flegacy-06bb3ca5188e41715371.png?alt=media)

To split by the category code, choose **Category Code** as the **Split Type.** In **Values to Split** add the actual category code you are using, and separate multiple values by commas. Also make sure to give your split a **Reference Name**.

![](https://251457507-files.gitbook.io/~/files/v0/b/gitbook-x-prod.appspot.com/o/spaces%2FAQOLMUJWMYtrpQ7Oxxca%2Fuploads%2FH3ilhNNvCIbCoRGPNHsq%2Flegacy-a6696bd0b83918c5014e.png?alt=media)

#### Split by Delivery Type

The delivery type field only works with FoxyCart shops. If you have set the delivery type on your items in FoxyCart, you will see it come through in the item details directly in the order:

![](https://251457507-files.gitbook.io/~/files/v0/b/gitbook-x-prod.appspot.com/o/spaces%2FAQOLMUJWMYtrpQ7Oxxca%2Fuploads%2F4bNXb79yXMYbVQOvVkfm%2Flegacy-1dbd1b474f7bd8eb6b79.png?alt=media)

Delivery type values are: Ship, No Ship, Download and Future.

To set up your rule, under the **Split Type** menu choose **Delivery Type**, then add the type of delivery to the **Values to Split** line, and give this split a **Reference Name**.

![](https://251457507-files.gitbook.io/~/files/v0/b/gitbook-x-prod.appspot.com/o/spaces%2FAQOLMUJWMYtrpQ7Oxxca%2Fuploads%2F4thsGt7BM9PKLkl8Q0qN%2Flegacy-3e6f705d28d432f07b05.png?alt=media)

#### Split by Variation

You can use the variation field set on your items to split orders. Under the **Split Type** menu choose **Variation**:

![](https://251457507-files.gitbook.io/~/files/v0/b/gitbook-x-prod.appspot.com/o/spaces%2FAQOLMUJWMYtrpQ7Oxxca%2Fuploads%2Frbl16G6hg1gfvDpcwz9v%2Flegacy-8e4a9aedb88877ffa372.png?alt=media)

In **Field Name** enter the exact name of your variation (size, color, pattern, etc.) being mindful of capitalization, spaces and punctuation. Under **Values to Split** add what the variation is (8oz, small, red, argyle, etc.)

You can also combine variations *of the same type* into the same split orders, such as:

![](https://251457507-files.gitbook.io/~/files/v0/b/gitbook-x-prod.appspot.com/o/spaces%2FAQOLMUJWMYtrpQ7Oxxca%2Fuploads%2F8ykG6na42WbkxwJNhNPz%2Flegacy-8b3c8b224e9834cb8e96.png?alt=media)

This would split items with “Red” and “Blue” values into their own order together.

Splitting by an item’s metadata is the most versatile and easily customizable option for splitting your orders. In many cases, metadata will come in from your shopping cart with your items, such as these metadata fields that came in from Shopify:

![](https://251457507-files.gitbook.io/~/files/v0/b/gitbook-x-prod.appspot.com/o/spaces%2FAQOLMUJWMYtrpQ7Oxxca%2Fuploads%2FBaNEkeFbgJZTv1BCaseZ%2Flegacy-640d6b30dd21eeca3a27.png?alt=media)

If the data you need doesn’t come in from your shopping cart, [add it directly to your saved inventory items](/start-here/getting-started-series/quick-start-orders-and-inventory#working-with-inventory) here in Order Desk:

![](https://251457507-files.gitbook.io/~/files/v0/b/gitbook-x-prod.appspot.com/o/spaces%2FAQOLMUJWMYtrpQ7Oxxca%2Fuploads%2FHc8odGww5Hy68sqf9rS9%2Flegacy-707acdbe2cd5406d4d3e.png?alt=media)

When an order comes in from the shopping cart, metadata fields will be synced into the item in the order ([Add Inventory Details to Order Items](/guided-walkthroughs/using-order-desk/manage-store-settings#add-inventory-details-to-order-items) must be enabled on your store for this to work):

![](https://251457507-files.gitbook.io/~/files/v0/b/gitbook-x-prod.appspot.com/o/spaces%2FAQOLMUJWMYtrpQ7Oxxca%2Fuploads%2Faf5vvljiuWwX9acTApRT%2Flegacy-06d32358ad61b484fe4b.png?alt=media)

You can use any metadata field on your items or that come in from the shopping cart to split orders. Using the above screenshots as an example, we could use the metadata field we’ve set called pattern to split out all snowflakes items like this:

![](https://251457507-files.gitbook.io/~/files/v0/b/gitbook-x-prod.appspot.com/o/spaces%2FAQOLMUJWMYtrpQ7Oxxca%2Fuploads%2FgGASZTokADqvT1HNylth%2Flegacy-997cabbea07602c74657.png?alt=media)

The most commonly used split rules are set up to look at the inventory location on an item, specifically called inventory\_location:

![](https://251457507-files.gitbook.io/~/files/v0/b/gitbook-x-prod.appspot.com/o/spaces%2FAQOLMUJWMYtrpQ7Oxxca%2Fuploads%2Fkm5egFjU9pfO0tNClLMV%2Flegacy-49bad4b2bce54ea169c2.png?alt=media)

When you have different vendors or fulfillment services, you can set their names in this location field and use that to split your orders by vendor:

![](https://251457507-files.gitbook.io/~/files/v0/b/gitbook-x-prod.appspot.com/o/spaces%2FAQOLMUJWMYtrpQ7Oxxca%2Fuploads%2Fwqftvy6rV8KWzMFutv5J%2Flegacy-5fdd44be99a5cfcdd529.png?alt=media)

Once split, you can set up rules to send the newly separated orders to each separate vendor, integration or fulfillment service, which we’ll go over [in the next section](#take-action-after-split-happens).

If you need to split all vendor/location names into their own orders, skip down to the [Special Features: Split All Items of Specific Type section](#special-feature-split-all-items-of-specific-type) below for instructions on setting up one rule to split all orders rather than one rule per vendor/location.

#### Split All Items out of Orders

If you need to split every item into its own order, choose **All Items** as your **Split Type**.

![](https://251457507-files.gitbook.io/~/files/v0/b/gitbook-x-prod.appspot.com/o/spaces%2FAQOLMUJWMYtrpQ7Oxxca%2Fuploads%2Fw0itJC8cJjWljvGYQnr9%2Flegacy-857ebb376b6d23f4f1c2.png?alt=media)

Split orders cannot be merged back together, so be certain this is what you intend to do before creating a rule to split *all* items into separate orders.

If you also want to split multiple quantities of a single product into separate orders you will first need to use a rule with the action **Convert Item Quantities to Separate Items**. Once converted, you can run an ALL split rule on your orders.

#### Special Feature: Split Method Wildcard

If you add the \* symbol to your split rule, it will act as a wildcard, that is, it will look for anything *like* what is in the rule. For instance:

![](https://251457507-files.gitbook.io/~/files/v0/b/gitbook-x-prod.appspot.com/o/spaces%2FAQOLMUJWMYtrpQ7Oxxca%2Fuploads%2F40j9Iw5Ldys5FfQh7x4D%2Flegacy-e061b5a96aca8fb51012.png?alt=media)

This will split any items with mug *in* the name. Capitalization does not matter when using the wildcard.

Another wildcard example is to look for a specific piece of information, such as the middle part of a set of SKUs, and only splitting those items out. For example, if you need to split out any SKU with -A- in the middle of it, use:

![](https://251457507-files.gitbook.io/~/files/v0/b/gitbook-x-prod.appspot.com/o/spaces%2FAQOLMUJWMYtrpQ7Oxxca%2Fuploads%2FHEFyKGuC05EXtUweqcq9%2Flegacy-8ecee008c4a052dbc7e9.png?alt=media)

#### Special Feature: Split All Items of Specific Type

If you want to split all items of a specific type, under the **Split Type** choose **All Items**, then give your split a **Reference Name**.

![](https://251457507-files.gitbook.io/~/files/v0/b/gitbook-x-prod.appspot.com/o/spaces%2FAQOLMUJWMYtrpQ7Oxxca%2Fuploads%2F0TsokCwdTga03CFJqmjl%2Flegacy-538b5286e442d73629d0.png?alt=media)

This works for every method type.

If you work with multiple vendors, instead of setting up a split rule for each vendor/location name, choose **Metadata** as your **Split Type**, then add *inventory\_location* as the **Field Name**.

![](https://251457507-files.gitbook.io/~/files/v0/b/gitbook-x-prod.appspot.com/o/spaces%2FAQOLMUJWMYtrpQ7Oxxca%2Fuploads%2FzQ50Vcce04XU8e18Bp1N%2Flegacy-5e00fd20ac7a7c372421.png?alt=media)

### Take Action After Split Happens

After orders have been split, you can tell Order Desk what you want to happen to them, such as submitting them for fulfillment, moving them to a specific folder, emailing someone about the order, tagging the order a certain color, etc.

To do this, you will need to create a new rule.

#### Add New Rule

Create a new rule using the **Order Rule** type, this time selecting **Order is Split** as the event:

![](https://251457507-files.gitbook.io/~/files/v0/b/gitbook-x-prod.appspot.com/o/spaces%2FAQOLMUJWMYtrpQ7Oxxca%2Fuploads%2Fr84lONCeTsHOmRim5Jxi%2Flegacy-a47bce6a78c3a76be8ea.png?alt=media)

#### Set Filters

Use the filter that matches your split method:

* If Item Code
* If Item Name
* If Item Category Code
* If Item Delivery Type
* If Item Variation
* If Item Metadata

Choose your operator:

![](https://251457507-files.gitbook.io/~/files/v0/b/gitbook-x-prod.appspot.com/o/spaces%2FAQOLMUJWMYtrpQ7Oxxca%2Fuploads%2FydxeCOeycqnoWIQ8zVPG%2Flegacy-90b20e95c4a01931b1f2.png?alt=media)

You will most likely want to use Equals, In List or Contains:

| **Equals**   | Must be an exact match for a single value. Case and space sensitive. “If it *equals* this value.”       |
| ------------ | ------------------------------------------------------------------------------------------------------- |
| **In List**  | The exact match must be *in* a list of values, separated by commas. “If it’s *in* this list of values.” |
| **Contains** | Does not need to be an exact match and is not case sensitive. “If it’s *like* this value.”              |

Set your value(s). For instance:

**If Item Code&#x20;*****Equals*****&#x20;SKU1**\
**If Item Code&#x20;*****In List*****&#x20;SKU1,SKU2,SKU3**\
**If Item Name&#x20;*****Contains*****&#x20;mug**

Variations and item metadata need to include the name of the field as well as the value like in the split rule itself. For instance:

**If Item Variation color Equals red**

![](https://251457507-files.gitbook.io/~/files/v0/b/gitbook-x-prod.appspot.com/o/spaces%2FAQOLMUJWMYtrpQ7Oxxca%2Fuploads%2FueCQueg8vUBZ6qW7guw1%2Flegacy-cc60df563beff368b57e.png?alt=media)

or

**If&#x20;*****Item Metadata*****&#x20;inventory\_location&#x20;*****Contains*****&#x20;BuckLtd**

![](https://251457507-files.gitbook.io/~/files/v0/b/gitbook-x-prod.appspot.com/o/spaces%2FAQOLMUJWMYtrpQ7Oxxca%2Fuploads%2F8KUqchK9jW5n3YkwSxzf%2Flegacy-54c446b2378f599b48d7.png?alt=media)

#### Add Actions

To finish your rule, add the actions you want applied to a split order. Actions include Submit to Integration, Send Email to Customer and Change Folder, among others.

![](https://251457507-files.gitbook.io/~/files/v0/b/gitbook-x-prod.appspot.com/o/spaces%2FAQOLMUJWMYtrpQ7Oxxca%2Fuploads%2F2mr2f2Q29Ku2gXEM6mIz%2Flegacy-6a38994780c3af978930.png?alt=media)


# How to Work with Checkout Data

Checkout data is a versatile field in each Order Desk order that can be used to store information from the shopping cart, send information to a shipping or fulfillment service, and add custom information directly to the order in the app to aid in processing, filtering and organizing orders.

### Manually Add Checkout Data

Checkout data fields can be found in the top right corner of an order page:

![](https://251457507-files.gitbook.io/~/files/v0/b/gitbook-x-prod.appspot.com/o/spaces%2FAQOLMUJWMYtrpQ7Oxxca%2Fuploads%2Fy9YjPw8eoMy8cnxX8Q6W%2Flegacy-9c05539bf0da885cc906.png?alt=media)

You can add, edit or remove checkout data at any time by clicking the **Add/Edit Checkout Data Fields** button.

### Automatically add Checkout Data

You can add specific checkout data with a rule to orders that meet your filters. To do this, in the Rule Builder, use the **Order Rule** rule type:

![](https://251457507-files.gitbook.io/~/files/v0/b/gitbook-x-prod.appspot.com/o/spaces%2FAQOLMUJWMYtrpQ7Oxxca%2Fuploads%2Ff35EozZXwiDF0Fmgjsw2%2Flegacy-50d78304f3a0394b4d59.png?alt=media)

Select the event that needs to happen for checkout data to be added to an order. This will most likely be Order is Imported but will be your preference:

![](https://251457507-files.gitbook.io/~/files/v0/b/gitbook-x-prod.appspot.com/o/spaces%2FAQOLMUJWMYtrpQ7Oxxca%2Fuploads%2FYTarIqox8IBFiyfddPjF%2Flegacy-b62bca20be51603010c4.png?alt=media)

Under the Filters & Actions tab, select the **Set** **Checkout Data Value** action and add the field name and field values you want to use.

![](https://251457507-files.gitbook.io/~/files/v0/b/gitbook-x-prod.appspot.com/o/spaces%2FAQOLMUJWMYtrpQ7Oxxca%2Fuploads%2Fbfg98J9RRzFuJFS6LNbz%2Flegacy-14558617c2ede95534a1.png?alt=media)

If you leave the value empty, it will apply just the field name so the value can be filled in later.

For more information on how to use the Rule Builder, see the [How to Work with Rules guide](/guided-walkthroughs/rules-and-automations/how-to-work-with-rules).

### Default Checkout Data Fields

In your Store Settings under the Defaults tab, you can add default checkout data fields.

![](https://251457507-files.gitbook.io/~/files/v0/b/gitbook-x-prod.appspot.com/o/spaces%2FAQOLMUJWMYtrpQ7Oxxca%2Fuploads%2FbkV89IAWuGyfqlApDYxr%2Flegacy-fba9bf4d93df20646c0d.png?alt=media)

And fields added here will show up when adding a new order manually:

![](https://251457507-files.gitbook.io/~/files/v0/b/gitbook-x-prod.appspot.com/o/spaces%2FAQOLMUJWMYtrpQ7Oxxca%2Fuploads%2FEfGYXljpYBlQmTwmVItv%2Flegacy-3f6462c133448630d9e5.png?alt=media)

For more information on adding orders manually, please read this [Getting Started guide](/start-here/getting-started-series/quick-start-orders-and-inventory#working-with-orders).

### Checkout Data from Shopping Carts

Some shopping cart integrations will apply certain fields sent through in an order as checkout data on the order.

The most common example of this is the gift message, which comes in under a different name from different shopping carts, such as message\_from\_buyer, gift\_message, or Note. If your shopping cart sends this field through, check your orders to see what the field is called.

If you have this field on your orders, you can use it when exporting orders or sending them to different shipping or fulfillment integrations. Keep reading for instructions.

### Send Checkout Data to Fulfillment Services

Many shipping and fulfillment integrations have a setting or special options to send checkout data to them.

**Gift Message Field | Picklist Message Field**

If your shipping or fulfillment integration has a **Gift Message Field** or a **Picklist Message Field** option, you’ll find it in the integration settings:

![](https://251457507-files.gitbook.io/~/files/v0/b/gitbook-x-prod.appspot.com/o/spaces%2FAQOLMUJWMYtrpQ7Oxxca%2Fuploads%2FWovuqKpsF6ZXd6aqiF3t%2Flegacy-9ccaacc3fb015e5b866a.png?alt=media)

You can add a checkout data name to either of these. If the field name entered is on an order, it will be sent through to the shipping or fulfillment service with the order.

**Customized Instructions**

Many shipping and fulfillment integrations can accept customized instructions for an order. These instructions should be set as checkout data.

For instance, with [Extensiv 3PL Warehouse Manager](/integration-setup-guides/fulfillment-services/extensiv-3pl-warehouse-manager-integration#custom-order-details), you can apply custom shipping instructions such as 3PL\_BILLING\_CODE and 3PL\_SHIPPING\_ACCOUNT. For [Artsy Couture](/integration-setup-guides/print-on-demand/artsy-couture-integration#customize-order-details), you can send a PDF through as PackingSlip. There are many other options for both of these integrations and many other integrations that also have this feature.

Check the help guides for your integrations to find out if they support this feature, and, if so, which checkout data field names you can pass through to each service.

### Custom Folder View

If you have a specific checkout data field on your orders that you want to view from the folder view, you can add it by clicking on the **Customize** button in the folder.

![](https://251457507-files.gitbook.io/~/files/v0/b/gitbook-x-prod.appspot.com/o/spaces%2FAQOLMUJWMYtrpQ7Oxxca%2Fuploads%2FoqNUtGuLebhwhrMfxr6D%2Flegacy-55e1a7e65da0b1158115.png?alt=media)

Scroll to the bottom of the page under Available Columns and on the right side where it says **Add Checkout Data Field**, type in the specific checkout data field name that is on your orders that you want displayed as a column in the folder view, for instance “Gift Message”.

![](https://251457507-files.gitbook.io/~/files/v0/b/gitbook-x-prod.appspot.com/o/spaces%2FAQOLMUJWMYtrpQ7Oxxca%2Fuploads%2FS9qepkiyKL8GXK5hf9nG%2Flegacy-79f30fae28d23a3c9fca.png?alt=media)

Click the **Add Checkout Data Field** button and scroll up to see the field in your list of columns for the folder you are in.

![](https://251457507-files.gitbook.io/~/files/v0/b/gitbook-x-prod.appspot.com/o/spaces%2FAQOLMUJWMYtrpQ7Oxxca%2Fuploads%2FF4Aom0IFfYm8SKbyjN7a%2Flegacy-6cafdcb1a86afe4cc2e7.png?alt=media)

Drag the columns up or down to place them in the order you want them displayed.

![](https://251457507-files.gitbook.io/~/files/v0/b/gitbook-x-prod.appspot.com/o/spaces%2FAQOLMUJWMYtrpQ7Oxxca%2Fuploads%2FhmguPBNsK5T2zNb64lZ0%2Flegacy-096671b586cfe2e02fdb.gif?alt=media)

Now when viewing the folder, any orders with the same checkout data field in them will display that information in the column.

![](https://251457507-files.gitbook.io/~/files/v0/b/gitbook-x-prod.appspot.com/o/spaces%2FAQOLMUJWMYtrpQ7Oxxca%2Fuploads%2F2Pl2xTnGyTwcEzqiWIke%2Flegacy-cb73c50dbd06cda177c7.png?alt=media)

### Map Checkout Data in Import and Export Templates

**Import Checkout Data**

When setting up an import template for orders, if you want to add a column from your file as a specific checkout data field, select **Checkout Data Field** from the Field Setup dropdown and replace the ? in **checkout\_data|?** with the name you want to apply to your checkout data:

![](https://251457507-files.gitbook.io/~/files/v0/b/gitbook-x-prod.appspot.com/o/spaces%2FAQOLMUJWMYtrpQ7Oxxca%2Fuploads%2F9pj0ZNMaMFXdUNRDeAcv%2Flegacy-d3739410d2cfc35f7744.gif?alt=media)

For more information on building import templates, see the [How to Import a Spreadsheet guide](/guided-walkthroughs/templates-emails-and-order-documents/how-to-import-a-spreadsheet).

**Export Checkout Data**

When setting up an export template, if you want to add checkout data to the file, select **Single Checkout Data Field** from the Order Fields section and replace the ? in **{checkout\_data|?}** with the name of the field in your orders that you want to export. This must be an exact match to the field in your orders and is case-sensitive.

![](https://251457507-files.gitbook.io/~/files/v0/b/gitbook-x-prod.appspot.com/o/spaces%2FAQOLMUJWMYtrpQ7Oxxca%2Fuploads%2FljV7iefpWoasGw7I32ah%2Flegacy-cff6afad86ec6f3d52f5.png?alt=media)

You can also rename the column header to whatever you need to call it.

![](https://251457507-files.gitbook.io/~/files/v0/b/gitbook-x-prod.appspot.com/o/spaces%2FAQOLMUJWMYtrpQ7Oxxca%2Fuploads%2FeNuJ0MzVaLMlLKT6RDtQ%2Flegacy-1e7483f899b016b41a61.png?alt=media)

For more information on building export templates, see the [How to Build Export Templates guide](/guided-walkthroughs/templates-emails-and-order-documents/how-to-build-export-templates).

### Special Features

If you are familiar with [Twig](/technical-documentation/templates-and-documents/how-to-build-custom-templates), you can customize checkout data even further. The following are a few common examples of what can be done with a little creativity and some code.

**Fraud Risk**

Flag orders where the shipping and billing countries don’t match by creating a rule with this as the checkout data:

**risk|** `{% if shipping.country != customer.country %}{{ "check for fraud" }}{% else %}{{ "none" }}{%endif %}`

**Cost Total**

If you want to add up the total cost of items in an order, make sure you have cost set in the inventory, that your inventory [syncs into your orders](/guided-walkthroughs/products-and-inventory/how-to-sync-item-details-into-orders), and then create a rule with this code:

**Cost Total|** `{% set cost = 0%}{% for item in order_items %}{% set cost = cost + item.metadata.inventory_cost * item.quantity %}{% endfor %}{{ cost }}`

**Timestamp**

Apply a date or time stamp on an event by naming your checkout data field and adding this code to apply the current date (and/or time) when the rule runs:

**Fulfilled On|** `{{ "now"|date("Y-m-d") }}`

Click [here](http://php.net/manual/en/function.date.php) for a PHP reference on date and time formats.

### FAQ

**What’s the difference between checkout data and order metadata?**

Checkout data and order metadata are virtually the same thing, but checkout data is a little bit easier to work with if you’ll need to make changes or updates on the spot. Checkout data is stored at the top right of an order page. You can add, edit or delete checkout data manually, or you can add it with a rule.

![](https://251457507-files.gitbook.io/~/files/v0/b/gitbook-x-prod.appspot.com/o/spaces%2FAQOLMUJWMYtrpQ7Oxxca%2Fuploads%2F8a6k6gF7iEERAYRGsazQ%2Flegacy-8af84d3993c01af09cc1.png?alt=media)

Order metadata is stored at the bottom of the order page, typically comes in with an order from a shopping cart, and it can’t be edited. It can only be added with a rule or an import template otherwise.

![](https://251457507-files.gitbook.io/~/files/v0/b/gitbook-x-prod.appspot.com/o/spaces%2FAQOLMUJWMYtrpQ7Oxxca%2Fuploads%2FMHY5Iucp0hWWk1rBrnXQ%2Flegacy-69cf376214bf1bc98e21.png?alt=media)

**I’m trying to export checkout data in a file, but it’s blank. What’s going wrong?**

When working with checkout data, keep in mind that it is case sensitive and must be an exact match. If the checkout data field on your orders is “Note”, but in the file, you’re exporting **{checkout\_data|note}**, the field will be empty. It should be **{checkout\_data|Note}**.

This also applies to spelling and spaces. Make sure the checkout data field you add to your orders is exactly the same on every order and exactly the same in any templates you add it to.

**How can I add checkout data to an email and receipt template?**

Email templates and receipt templates require the code to be formatted a little differently.

**Email Templates**

For email templates, if you want to add all of your checkout data fields to the template, use this code:

`{% if checkout_data|length > 0 %}` `{% for key, val in checkout_data %}` `<b>{{ key }}:</b> {{ val }}` `{% endfor %}` `{% endif %}`

But if you want to only single out a specific checkout data field, use this code, replacing xxx with the name of the field:

`{% if checkout_data['xxx'] is defined %}` `{{ checkout_data['xxx'] }}` `{% endif %}`

Be mindful of spaces, capitalization and punctuation. For instance, if you want to include the checkout data field “Order Note”, use this:

`{% if checkout_data['Order Note'] is defined %}` `<b>Order Note</b>: {{ checkout_data['Order Note'] }}` `{% endif %}`

**Receipt Templates**

For receipt templates, if you want to add all of your checkout data fields to the template, use this code:

`{% if order.checkout_data|length > 0 %}` `{% for key, val in order.checkout_data %}` `<li><b>{{ key }}:</b> {{ val }}</li>` `{% endfor %}` `{% endif %}`

But if you want to only single out a specific checkout data field, use this code, replacing xxx with the name of the field:

`{% if order.checkout_data['xxx'] is defined %}` `{{ order.checkout_data['xxx'] }}` `{% endif %}`


# How to Work with Timestamps

If you want to take action on orders based on a time, you can apply timestamps to your orders and then set up custom events and rules to watch the timestamp and apply the actions when you want.

This guide covers how to set a timestamp on an order with a rule, how to create a custom event to regularly check the orders in a specific folder, and how to use a rule to apply actions at the appropriate time.

### Add Timestamp to Orders

**IMPORTANT**\
If you only need to know when a certain amount of time has passed since the order was created, use the **If Order Date Created** filter instead of setting a timestamp. Follow the instructions in the rest of this guide for how to search against the date created time.

To add a timestamp to your orders, click **Rule Builder** under the **Settings** menu in the left sidebar and select the **Order Rule** rule type.

![](https://251457507-files.gitbook.io/~/files/v0/b/gitbook-x-prod.appspot.com/o/spaces%2FAQOLMUJWMYtrpQ7Oxxca%2Fuploads%2FjalvhSLXHlkV3UqsIKaI%2Flegacy-26243dd8aeac6d420770.png?alt=media)

Choose the event you want your rule to run on. This event is when the timestamp will be applied, such as when the order is imported, when it moves into a certain folder or when the shipment is added.

![](https://251457507-files.gitbook.io/~/files/v0/b/gitbook-x-prod.appspot.com/o/spaces%2FAQOLMUJWMYtrpQ7Oxxca%2Fuploads%2FTDvPIcKOgSBl9V0HCUVe%2Flegacy-7c5d07d7dcc57b3f7163.png?alt=media)

Add any filters to the rule if you need to only apply the timestamp to certain orders.

Select one of the two timestamp actions as the action:

![](https://251457507-files.gitbook.io/~/files/v0/b/gitbook-x-prod.appspot.com/o/spaces%2FAQOLMUJWMYtrpQ7Oxxca%2Fuploads%2FZn3QmSSQcprmumEbyNcJ%2Flegacy-8dccd3467cb656d8e30f.png?alt=media)

**Set Order Metadata Local Timestamp** will apply the timestamp in your store’s local time, which is determined by your [Store Settings](https://app.orderdesk.com/settings/details).

**Set Order Metadata UTC Timestamp** will apply the timestamp in UTC time. If you are going to create a custom event to regularly check for timestamps, use UTC time. When custom events run, they look at UTC time and will apply to that time if different from the store’s timezone. If you notice that your custom events aren’t acting on orders at the right time, check that your rule is applying UTC timestamps rather than local timestamps.

After choosing your timestamp action, name your timestamp any custom name you want to call it:

![](https://251457507-files.gitbook.io/~/files/v0/b/gitbook-x-prod.appspot.com/o/spaces%2FAQOLMUJWMYtrpQ7Oxxca%2Fuploads%2FCX6bggkQxGOvBoWR6XmU%2Flegacy-6dc08743923b8362bd0c.png?alt=media)

When your rule runs, a timestamp will be added to the order metadata of any order the rule applies to:

![](https://251457507-files.gitbook.io/~/files/v0/b/gitbook-x-prod.appspot.com/o/spaces%2FAQOLMUJWMYtrpQ7Oxxca%2Fuploads%2Fcyng1RBwn3DtdchbrH5j%2Flegacy-6e9964bcc39832a2b52f.png?alt=media)

### Create Custom Event

A custom event is an event that you create in your store to run on one specific folder. You can choose how often the event runs and which folder you want it to run on.

If you haven’t already created the folder you want your event to run on, do that [now](/start-here/getting-started-series/quick-start-overview#working-with-folders).

To create a custom event, follow the steps [in this guide](/guided-walkthroughs/rules-and-automations/how-to-use-custom-events), then come back to finish these steps.

A custom event by itself will not do anything to your orders, but the next step will be to create a rule that runs when the custom event looks at your folder, if all the filters in the rule apply.

### Apply Action to Orders

When creating a rule, the first step is to select the event you want the rule to run on. You’ll now find your custom event as one of the available events:

![](https://251457507-files.gitbook.io/~/files/v0/b/gitbook-x-prod.appspot.com/o/spaces%2FAQOLMUJWMYtrpQ7Oxxca%2Fuploads%2F3zw3bUC3RSUx3UTiZ7Qi%2Flegacy-78c590e9c109a5b7e929.png?alt=media)

This rule requires a filter to check against the timestamp in the order, which will be found in the order metadata, so select **Order Metadata Field** as the filter type:

![](https://251457507-files.gitbook.io/~/files/v0/b/gitbook-x-prod.appspot.com/o/spaces%2FAQOLMUJWMYtrpQ7Oxxca%2Fuploads%2FKgf3qXF46HIQAxG33hKr%2Flegacy-bf2a52f804d548d57c9f.png?alt=media)

In the Field Name, add the name you gave to the timestamp. This must be an exact match:

![](https://251457507-files.gitbook.io/~/files/v0/b/gitbook-x-prod.appspot.com/o/spaces%2FAQOLMUJWMYtrpQ7Oxxca%2Fuploads%2FObEhDsEdCqxRuFnuzSnz%2Flegacy-df169ee10596da3aa128.png?alt=media)

Choose the *before time* operator and then add the amount of time you want to have passed, followed by a – sign:

![](https://251457507-files.gitbook.io/~/files/v0/b/gitbook-x-prod.appspot.com/o/spaces%2FAQOLMUJWMYtrpQ7Oxxca%2Fuploads%2FIghBkMtwA2Z9ZkgGSAQ5%2Flegacy-1b8d364d3df4f7f1897b.png?alt=media)

Examples:

**wait\_period** ***before time*****&#x20;-5days** means to wait until 5 days or more *after* the time of the wait\_period timestamp.

**wait\_period** ***before time*****&#x20;-10minutes** means to wait 10 minutes or more *after* the timestamp time for the filter to be true.

If the timestamp on an order is set right at 12:00:00, *before time -10minutes* will be true at 12:10:00, and the next time your custom event scans the folder, the rule will apply to the order.

To finish the rule, select any actions you want to have happen when the filter becomes true against the timestamp:

![](https://251457507-files.gitbook.io/~/files/v0/b/gitbook-x-prod.appspot.com/o/spaces%2FAQOLMUJWMYtrpQ7Oxxca%2Fuploads%2FlRB4Lh3VQa13dZwhmtya%2Flegacy-befd5b3cdc478a8453ba.png?alt=media)


# Organizing Orders With Folders

Every Order Desk store starts with a few default folders:

* New
* Prepared
* Closed
* Canceled
* All Orders

When a new order is imported, it will be added to the *New* folder by default, however this can be changed with rules or certain integration settings.

To grasp the concept of folders, try thinking of them in the physical sense: if you received a paper order, you’d put it into the *New* folder. When that order is packed but not yet shipped, you’d remove the paper from the *New* folder and place it into the *Prepared* folder and so on.

It’s worth mentioning that when an order moves between folders, its status won’t automatically update across any integrations by default, but this is an option that you can configure. You’ll need to check the settings pages in your installed integrations or use the Rule Builder to tell Order Desk to update an order’s status when it’s moved between folders.

### How to Use Folders

For a visual walkthrough of how folders work in Order Desk, check out the following video:

{% embed url="<https://player.vimeo.com/video/604144133?dnt=1&amp;app_id=122963>" %}

### Create Folder

If you’d like to create a new folder, look under the **Settings** menu in the left sidebar and click on **Store Settings**:

![](https://251457507-files.gitbook.io/~/files/v0/b/gitbook-x-prod.appspot.com/o/spaces%2FAQOLMUJWMYtrpQ7Oxxca%2Fuploads%2F79U62lCbv9xYW8XZr7hW%2Flegacy-ebc48334ea3f4d95636c.png?alt=media)

On the Store Settings page, click on the Folders tab, then on Add Folder:

![](https://251457507-files.gitbook.io/~/files/v0/b/gitbook-x-prod.appspot.com/o/spaces%2FAQOLMUJWMYtrpQ7Oxxca%2Fuploads%2FIfTzeltMaqo1e9xVAhX4%2Flegacy-06e6d169a2e77b24a7c6.png?alt=media)

A good method for setting up your folders is to think of where an order physically exists during the fulfillment process. For example, if you send orders to more than one vendor, or a different fulfillment or shipping integration, you can move orders into folders that say they’ve been sent but have not yet been fulfilled, such as “At Vendor X” or “At MWW” or “At ShipStation”.

![](https://251457507-files.gitbook.io/~/files/v0/b/gitbook-x-prod.appspot.com/o/spaces%2FAQOLMUJWMYtrpQ7Oxxca%2Fuploads%2FDZ9QMxO3uELqdwPQ9Gnw%2Flegacy-8ab2f3ed3c99ef7f1082.png?alt=media)

### Moving Orders Through Folders

Remember, orders won’t move on their own unless your settings tell them to move somewhere.

Many integration include a setting that tells where to put an order after it’s imported or submitted for fulfillment. Here’s an example of what that might look like:

![](https://251457507-files.gitbook.io/~/files/v0/b/gitbook-x-prod.appspot.com/o/spaces%2FAQOLMUJWMYtrpQ7Oxxca%2Fuploads%2FJNtrnIUTcDhEbVplGIKZ%2Flegacy-df436f75df7c016ae5cd.png?alt=media)

If sending to a third party vendor through an [export template](/guided-walkthroughs/templates-emails-and-order-documents/how-to-build-export-templates), you can tell the export template to place the order into a specific folder after it’s exported:

![](https://251457507-files.gitbook.io/~/files/v0/b/gitbook-x-prod.appspot.com/o/spaces%2FAQOLMUJWMYtrpQ7Oxxca%2Fuploads%2F7Z9lcPB0GauhnBQaa7Gg%2Flegacy-0b8b119386012e5940e2.png?alt=media)

If your business sends dropshipping emails to a third party vendor, you can even add an action in your rules to move the order into a specific folder after the email is sent:

![](https://251457507-files.gitbook.io/~/files/v0/b/gitbook-x-prod.appspot.com/o/spaces%2FAQOLMUJWMYtrpQ7Oxxca%2Fuploads%2F3kwrbGl5CGUyPckodY7N%2Flegacy-af79a19d95d7c0bd2638.png?alt=media)

If using an integration, check to see if you can change the folder when a shipment is added. If that isn’t an option, or if you aren’t using an integration for some orders, you can set up a rule to move orders to the closed folder when a shipment is added to an order:

![](https://251457507-files.gitbook.io/~/files/v0/b/gitbook-x-prod.appspot.com/o/spaces%2FAQOLMUJWMYtrpQ7Oxxca%2Fuploads%2Ft7zGpc3I1D4YjRSjOeB6%2Flegacy-3b28217d59c3754e58b2.png?alt=media)

Another option with custom folders is filtering orders, whether to flag them for review, assign them to a specific person on your team, or send them to a hold folder that sets them aside before they are ready to move to the next stage in the fulfillment process.

Once you create the folders you need, you can adjust them as you become more familiar with Order Desk and decide how you want to use the app to best process and fulfill each of your orders.


# Products and Inventory

Start here for information on how to manage your products and inventory details in Order Desk.


# Add Your Inventory

Adding inventory items to Order Desk may be necessary if you have a print on demand store or need to split your orders for different fulfillment providers. It can also be beneficial for record keeping purposes.

There are a few ways to add inventory to Order Desk.

### Manually Add Items

You can manually add products by going to **Inventory Items** under the Tools menu in the left sidebar. To add an item, click on the **Add New Item** button in the top right corner.

![](https://251457507-files.gitbook.io/~/files/v0/b/gitbook-x-prod.appspot.com/o/spaces%2FAQOLMUJWMYtrpQ7Oxxca%2Fuploads%2F09ooXU6G93Vs66yI7W20%2Flegacy-23a97390f5547720bd3e.png?alt=media)

When adding your items, you must include a code/SKU.

You can also add print on demand items manually by clicking on the **Add Print on Demand** button. Print on demand products need extra information included, specifically a link to the print file and the printer’s product code. This option prompts you to fill in all the necessary details, but you can use the Add New Item option if you prefer. For more information on manually adding print details to your items, read through [this section](/guided-walkthroughs/print-on-demand-walkthrough/print-on-demand-fulfillment#add-inventory-to-order-desk) of the print on demand fulfillment guide.

### Import File

If you need to import multiple products at once, you can use a spreadsheet. This will require creating an import template in Order Desk so you can match the field names from your file to the field names used in Order Desk.

For detailed instructions on how to import your inventory from a file, read the [How to Import a Spreadsheet](/guided-walkthroughs/templates-emails-and-order-documents/how-to-import-a-spreadsheet) guide.

### Import with Orders

Products can also be imported with your orders. When an order is added to Order Desk, if any items in the order are not yet stored here, they can be automatically added to the inventory.

To set up your Order Desk store to do this, go into your [store settings](/guided-walkthroughs/using-order-desk/manage-store-settings) page and look under the Inventory Settings section. Enable the **Update Stock Level as Orders are Added** and **Create Inventory Items as Orders are Added** settings:

![](https://251457507-files.gitbook.io/~/files/v0/b/gitbook-x-prod.appspot.com/o/spaces%2FAQOLMUJWMYtrpQ7Oxxca%2Fuploads%2FRVhjJeP5YpduMKD2GMVJ%2Flegacy-991904657b88c3e1fef0.png?alt=media)

Both settings need to be enabled for this to work. When you import, download or create a new order, any product in the order will automatically be added to your inventory in Order Desk if it doesn’t already exist.

### Import from Integration

Items can be added from integrations. Not all integrations have this feature, so check the settings page of any integrations you have enabled for an inventory import button like this:

![](https://251457507-files.gitbook.io/~/files/v0/b/gitbook-x-prod.appspot.com/o/spaces%2FAQOLMUJWMYtrpQ7Oxxca%2Fuploads%2FnoZtrfaNQsrWL3prTs5F%2Flegacy-ea4a051ad834e0fd363e.png?alt=media)

If the integration you use supports this, you can manually import your inventory items by clicking this button.

Integrations have limitations on what can be imported. For instance, Amazon MCF only sends the SKU and quantity, so your products will all be called “No Name”. We can only bring in the information supplied by the integrated service, so you may see differences from integration to integration.

### Export Inventory Per Page

![](https://251457507-files.gitbook.io/~/files/v0/b/gitbook-x-prod.appspot.com/o/spaces%2FAQOLMUJWMYtrpQ7Oxxca%2Fuploads%2F9qe7pZIONF8GLYle0LVs%2Flegacy-1e058ff78141ca210089.png?alt=media)

Items can be exported by page using the **Export All Inventory Items** at the bottom of each page in your Inventory Items.

### Export Specific Inventory

![](https://251457507-files.gitbook.io/~/files/v0/b/gitbook-x-prod.appspot.com/o/spaces%2FAQOLMUJWMYtrpQ7Oxxca%2Fuploads%2Fs1tM3COuYMDDjScVfQcn%2Flegacy-daaa7db82bfab2366c89.png?alt=media)

Specific inventory items can be exported using the search function in your Inventory Items page. By adding search terms to the fields and clicking **Export**, only items in your inventory that meet the criteria will be exported.

For a more thorough overview of the Inventory Items page and working with your inventory once it has already been added to Order Desk, please refer to the [How to Work with Inventory Details guide](/guided-walkthroughs/products-and-inventory/how-to-work-with-inventory-details).


# How to Work with Inventory Details

Order Desk can store all of your products and any additional details that may be necessary to help automate your workflow or that need to be sent to your fulfillment providers.

We can also manage and sync inventory counts between most integrated services to make sure your shopping cart(s) show the most recent inventory reported from your fulfillment service.

This guide covers how to work with inventory stored in Order Desk, including adding, storing and removing item details, creating bundles and syncing item details into your orders.

For more information on how to manage inventory stock counts and how to work with quantities using Order Desk, click to see our [How to Work with Inventory Quantities](/guided-walkthroughs/products-and-inventory/how-to-work-with-inventory-quantities) guide.

To see our most frequently asked questions, including what Order Desk *doesn’t* do with inventory, please scroll down to the [FAQ section](#faq) of this guide.

### Add Inventory to Order Desk

For more information on the different ways you can add your inventory to Order Desk, please refer to the [Adding Inventory section](/start-here/getting-started-series/quick-start-orders-and-inventory#working-with-inventory) of the Getting Started guide.

To access your inventory in Order Desk, click on **Inventory Items** under the **Tools** menu in the left sidebar.

![](https://d33v4339jhl8k0.cloudfront.net/docs/assets/57b0032590336059d4edf94f/images/696909118ccf056233f5b53e/file-N6MndrJgKz.png)

Any existing inventory items that have already been added will appear here. You can also add new items manually from this page.

To quickly add all of your items from a spreadsheet, see the instructions in the [Importing Spreadsheet Data](/guided-walkthroughs/templates-emails-and-order-documents/how-to-import-a-spreadsheet) guide.

### Delete Inventory from Order Desk

There are a few different ways to delete inventory items, depending on whether you want to remove just a few items, delete many items at once, or clear everything from your store.

#### Deleting one or few specific items

If you only need to delete one or a few specific items, go to your Inventory Items page and find the item you want to remove. On the far right of the item row, click the Trash icon. This will delete that item from your inventory.

![](https://d33v4339jhl8k0.cloudfront.net/docs/assets/57b0032590336059d4edf94f/images/69690968077bc803cd591b08/file-ZkNDpjj17o.png)

#### Deleting items in bulk

If you need to delete a large number of items at once, you can do this by importing a spreadsheet. First, create a file that contains the SKUs of the items you want to delete in one column. Order Desk uses the SKU to find the matching inventory items. Then create another column for the item name and set its value to **REMOVE** for each row. The word **REMOVE** must be **in all caps**.

![](https://d33v4339jhl8k0.cloudfront.net/docs/assets/57b0032590336059d4edf94f/images/69690b10c587567e963fa366/file-J10d1YUMDo.png)

Once your file is ready, [**import it by following the steps here**](/guided-walkthroughs/templates-emails-and-order-documents/how-to-import-a-spreadsheet). When the file is imported, any item with a SKU in the file and an item name set to **REMOVE** will be deleted from your Order Desk store.

#### Deleting all inventory items

If you want to delete all inventory items from your store, scroll to the bottom of the Inventory Items page and click the **Clear All Inventory Items** button.

![](https://d33v4339jhl8k0.cloudfront.net/docs/assets/57b0032590336059d4edf94f/images/69690c06c587567e963fa374/file-GSth7It8Pe.png)

This will remove every inventory item currently stored in Order Desk.

### Auto-Select Items

If your inventory is stored in Order Desk, you can use auto-select to easily add items to an order.

For orders that already exist in Order Desk, click on the Add Item button.

![](https://d33v4339jhl8k0.cloudfront.net/docs/assets/57b0032590336059d4edf94f/images/5adf64f504286328a414834f/file-dhMc8dIYmo.png)

For orders being manually created in Order Desk, use the Name field in the product section.

![](https://d33v4339jhl8k0.cloudfront.net/docs/assets/57b0032590336059d4edf94f/images/5ce55c972c7d3a6d82bdd472/file-VTm2N3PPd4.png)

Enter part of the product name or SKU for the item. Any matching items already stored in Order Desk will populate and you can select the item from the list:

![](https://d33v4339jhl8k0.cloudfront.net/docs/assets/57b0032590336059d4edf94f/images/587e4f7ec697915403a0f8c9/file-1R9dSXv4uz.gif)

The Name and Code fields will automatically be populated with the item information.

### Store Extra Item Details in Order Desk

Inventory items can be used to store extra details about a product that can’t always come in from the cart with orders. Often used for [print on demand products](/guided-walkthroughs/print-on-demand-walkthrough/print-on-demand-fulfillment), which require extra details to be synced into orders before being sent to a printer, this can also be useful for many different reasons, including splitting orders and saving information necessary for specific fulfillment situations.

These details can include anything that needs to be added to an item such as the UPC, a link to the product image, or the name of the company or organization associated with the product.These details can be pulled into your [emails](/guided-walkthroughs/templates-emails-and-order-documents/how-to-work-with-email-templates#common-code-examples), [receipts or packing slips](/start-here/getting-started-series/quick-start-how-customizable-is-order-desk-really#using-custom-code-in-order-desk) and [export](/guided-walkthroughs/templates-emails-and-order-documents/how-to-build-export-templates) files.

The location is for the vendor name for the product. Metadata and variations can be used to store custom details.

![](https://d33v4339jhl8k0.cloudfront.net/docs/assets/57b0032590336059d4edf94f/images/5ae0a38a04286328a4148cbd/file-UsZpwrcI9f.png)

### Remove Item Details

To manually remove specific details about items, delete the info from the item and save your changes.

For variations and metadata fields, click on the X next to the info to be deleted and then save.

![](https://d33v4339jhl8k0.cloudfront.net/docs/assets/57b0032590336059d4edf94f/images/5ae0a5002c7d3a5063b4df05/file-AatKSlEPwB.png)

To remove item details in bulk, see the [**Removing Data from Inventory Items**](/guided-walkthroughs/templates-emails-and-order-documents/how-to-import-a-spreadsheet#remove-variations-and-metadata-from-inventory-items) section in the Importing Spreadsheet Data guide.

### Sync Details into Orders

If you have extra item details saved to your inventory items here in Order Desk, you will probably want these details synced into your orders.

This can be set up to [automatically](#add-inventory-details-to-order-items) happen when orders import, but if you have any orders that are already in Order Desk and need to be synced, follow the instructions for how to do this [manually](#manually-sync-details-with-inventory-items) for those orders.

#### Add Inventory Details to Order Items

To enable Order Desk to automatically sync your extra item details into your orders as they download or import into Order Desk, head into your Store Settings page and enable the **Add Inventory Details to Order Items** setting.

![](https://d33v4339jhl8k0.cloudfront.net/docs/assets/57b0032590336059d4edf94f/images/5dfa8e812c7d3a7e9ae54b17/file-HmmBfEb2lB.png)

#### Manually Sync Details With Inventory Items

For any orders that are already in Order Desk and need to have the items synced with your inventory, scroll to the bottom of the order details page and click on the **Sync Item Details With Inventory** button:

![](https://d33v4339jhl8k0.cloudfront.net/docs/assets/57b0032590336059d4edf94f/images/5e9898d404286364bc987af0/file-wPvEAEtm0s.gif)

### Create Bundles

Create inventory items in Order Desk for your multi-pack/bundled items using the item metadata.

To do this, add code\_replace as metadata to your bundle item and set the value as the individual SKUs that make up the bundle, separated by a comma:

![](https://d33v4339jhl8k0.cloudfront.net/docs/assets/57b0032590336059d4edf94f/images/5ae0b04d04286328a4148d46/file-MSLQptEYEU.png)

When an order comes into Order Desk, the bundle SKU will be replaced by the individual SKUs. If all of the individual product SKUs are also saved in Order Desk with any additional item details, these will also be synced into the order.

![](https://d33v4339jhl8k0.cloudfront.net/docs/assets/57b0032590336059d4edf94f/images/5ae0b4e504286328a4148d69/file-kCZScueWa6.gif)

[store settings](https://app.orderdesk.com/settings/details) will need to have the Add Inventory Details to Order Items setting enabled for this to work.

For more information on working with code replace, please refer to the [code replace](/guided-walkthroughs/products-and-inventory/how-to-use-code-replace#code-replace) and [code replace bundles](/guided-walkthroughs/products-and-inventory/how-to-use-code-replace#code-replace-bundles) section of the Product Code Match, Skip and Replace guide. There is also a section in that guide for how to set up [print on demand bundles](/guided-walkthroughs/products-and-inventory/how-to-use-code-replace#print-on-demand-bundles).

#### Multiply a Quantity (Bundles of the Same Item)

If you sell a bundle made of multiple quantities of the same item, you can use an item metadata field called `quantity_multiplier` to break your bundle out into individual items.

Set the quantity multiplier to the number of items that make up the bundle.

![](https://d33v4339jhl8k0.cloudfront.net/docs/assets/57b0032590336059d4edf94f/images/5ae20ba504286328a4149856/file-q3AFbfPHsZ.png)

When an order is added to Order Desk for this item, the bundle will be replaced by the individual items and the price of the bundle will be divided by the quantity multiplier number in an attempt to keep the price per item consistent. Please note that rounding can cause slight inaccuracies in the price per item—for instance, an $8 bundle of 3 items will come out to $2.66 each.

#### Combine Code Replace with Quantity Multiplier

You can combine code replace and quantity multiplier to first replace a SKU and then multiply it by the number of items that make up the original bundle.

Set code replace to the SKU of the individual item and then set the quantity multiplier to tell Order Desk how many of the individual item make up the bundle.

![](https://d33v4339jhl8k0.cloudfront.net/docs/assets/57b0032590336059d4edf94f/images/5ae210ac04286328a4149883/file-puj2SQDWd5.png)

In this example, the single item Mini Tennis Ball Bundle (MTBB4) is swapped out with 4 individual Mini Tennis Ball (MTBB1) items in the order.

#### Converting Single Items to Cases

Single items can be converted to cases on import by using the **Convert Single Items to Cases** action in the Rule Builder.

![](https://d33v4339jhl8k0.cloudfront.net/docs/assets/57b0032590336059d4edf94f/images/65400253cad61e125d225fb2/file-EYygFiERiN.png)

In order for this process to work, your inventory items must have both a **case\_size** and **case\_sku** value on each item metadata field.

![](https://d33v4339jhl8k0.cloudfront.net/docs/assets/57b0032590336059d4edf94f/images/6540038e3ebd1a7f3b556881/file-lgLeioUH6S.png)

The **case\_size** metadata tells Order Desk the number of items which make up the case while the **case\_sku** tells Order Desk what SKU to use for the case.

### Duplicating Inventory Items

Inventory items can be duplicated by clicking the **More Actions** button and selecting **Duplicate:**

![](https://d33v4339jhl8k0.cloudfront.net/docs/assets/57b0032590336059d4edf94f/images/665397905940934e140f3e70/file-Lz88gzRRC3.gif)

This will create a new inventory item with blank Name and SKU fields. If the duplicated item has metadata or variation fields, the fields will remain with a blank value. Click **Add New Item** to save the duplicated inventory item. Selecting **Add Another Item After Saving** will create another inventory item immediately. This additional item will *not* be a duplicate:

![](https://d33v4339jhl8k0.cloudfront.net/docs/assets/57b0032590336059d4edf94f/images/66539949e1989867dcefd1f0/file-8TDLYvPSMO.png)

### Printer Specific print\_sku Fields

If you’re sending the same items to multiple printers for print on demand fulfillment, you may need to send each of your printers a different print\_sku.

To do this, you’ll need to use printer specific print\_sku fields as metadata and set the value as the print\_sku for the corresponding printer. Using this system, each of your inventory items can have multiple print\_skus with the name of the printer in the field:

![](https://d33v4339jhl8k0.cloudfront.net/docs/assets/57b0032590336059d4edf94f/images/647fc349969cec658daaf29b/file-q00BFavvyF.png)

### FAQ

#### Is Order Desk an inventory management app?

Technically, no. Order Desk was designed to be an order management app, and that is where the strength and value of the app can be found. Because inventory goes hand in hand with orders, we have included inventory management features to the app over time to help with your order management.

We will continue to add inventory features to the app and may in the future build out more robust inventory management capabilities, but for the time being, you might find limitations with our app if inventory management is ultimately what you need.

#### Can you sync inventory between Order Desk stores?

Yes. For information, please see the [How to Sync Inventory Between Order Desk Stores guide](/guided-walkthroughs/products-and-inventory/how-to-sync-inventory-between-order-desk-stores).

#### Can you sync inventory from multiple warehouses?

If you use different SKUs in different warehouses, yes, we will sync in their numbers and pass those back to your shopping cart(s).

If you use the same SKUs at multiple warehouses, this does not work with Order Desk. Each warehouse can send in inventory reports, and it will update the items here, however if they’re all sending reports for the exact same item SKUs, there won’t be an honest representation of the inventory in stock, nor what the stock is at each separate warehouse. Each warehouse update would overwrite the last update from a different warehouse for the same SKUs.

#### Does Order Desk create and/or push listings to shopping cart(s)?

No. Order Desk can pull in products and orders from shopping carts, and it can pull in shipments and inventory updates from fulfillment services then send those details back to shopping carts. It cannot push listings *to* shopping carts.

#### How often do you check for inventory updates through FTP and can this be increased?

Import appointments for FTP run twice a day, every 12 hours. You can set the appointment time from your [View Appointments](https://app.orderdesk.com/tools/appointments) page. This cannot be increased to more than twice a day, although you can manually run the appointment any time from your View Appointments page.

#### Why isn’t my inventory being updated in my shopping cart?

Most shopping cart integrations have a Sync Inventory setting that needs to be enabled for Order Desk to send your inventory counts to your shopping cart. Check your integration settings for this setting and make sure it is enabled. Inventory is not typically updated immediately but can take up to 7 minutes after a change is made to any stock counts in Order Desk.

If inventory sync is enabled for your shopping cart, inventory has been updated in Order Desk, and you’ve waited 7 minutes and it still isn’t updating, contact Order Desk support.


# How to Use Code Replace

Code replace is a feature in Order Desk that lets you swap one product SKU for another or turn one product into multiple products if you have bundles. It also works for print on demand bundles.

### Code Replace

Code replace swaps one product SKU for another in your orders here in Order Desk.

To set this up, first make sure your store is automatically syncing orders with your inventory items. Click on **Store Settings** (under the **Settings** menu in the left sidebar) and under the Inventory Settings section, enable the **Add Inventory Details to Order Items** setting:

![](https://251457507-files.gitbook.io/~/files/v0/b/gitbook-x-prod.appspot.com/o/spaces%2FAQOLMUJWMYtrpQ7Oxxca%2Fuploads%2FuN7ALPsvWiuDxfD95nki%2Flegacy-a64c8de473c3a04191df.png?alt=media)

Your inventory items need to be stored in Order Desk. If you haven’t done this yet, read [this getting started guide](/start-here/getting-started-series/quick-start-orders-and-inventory#working-with-inventory) for information on the ways you can add your inventory.

To access your current inventory items in Order Desk, click **Inventory Items** in the left sidebar under the **Tools** menu:

![](https://251457507-files.gitbook.io/~/files/v0/b/gitbook-x-prod.appspot.com/o/spaces%2FAQOLMUJWMYtrpQ7Oxxca%2Fuploads%2FqMpehlBCTUI3p2m9H88w%2Flegacy-d4f24995067df65e2266.png?alt=media)

Add a metadata field called `code_replace` to any item that needs to have the SKU changed when the order gets to Order Desk. Set the value of that metadata field to the new SKU.

![](https://251457507-files.gitbook.io/~/files/v0/b/gitbook-x-prod.appspot.com/o/spaces%2FAQOLMUJWMYtrpQ7Oxxca%2Fuploads%2FCJUPSMGLZKBAkPUFIF6s%2Flegacy-ee20325016c900814f8d.png?alt=media)

In this example, when the item 1200AT comes into Order Desk, it will be replaced with PD-999.

Set up an item in Order Desk for PD-999 as well:

![](https://251457507-files.gitbook.io/~/files/v0/b/gitbook-x-prod.appspot.com/o/spaces%2FAQOLMUJWMYtrpQ7Oxxca%2Fuploads%2FtZ911Ihx7TMw24bWuYvB%2Flegacy-b0cebb2154b3ad18e099.png?alt=media)

When an order with this item comes in, the SKU will automatically be replaced, and the details from the new SKU will be applied to the order:

![](https://251457507-files.gitbook.io/~/files/v0/b/gitbook-x-prod.appspot.com/o/spaces%2FAQOLMUJWMYtrpQ7Oxxca%2Fuploads%2FFrnJiPTtkTfUXHzcJayP%2Flegacy-885065f192c7da804586.gif?alt=media)

If using code replace, some integrations inventory counts can be synced back into the shopping carts for the original SKUs. For details on how to set this up and which integrations it works with, please refer to the [How to Work with Inventory Quantities guide](/guided-walkthroughs/products-and-inventory/how-to-work-with-inventory-quantities#inventory-quantities-for-replaced-skus).

### Code Replace Bundles

Code replace can also be used with bundles.

To do this, apply `code_replace` to the metadata of an inventory item and add the individual SKUs that make up the bundle, separated by a comma:

![](https://251457507-files.gitbook.io/~/files/v0/b/gitbook-x-prod.appspot.com/o/spaces%2FAQOLMUJWMYtrpQ7Oxxca%2Fuploads%2FsI6xyKQXb2DFH2KouMBB%2Flegacy-439ca6143e012d91fe7b.png?alt=media)

When an order comes in for the bundle item, it will be replaced by the individual items:

![](https://251457507-files.gitbook.io/~/files/v0/b/gitbook-x-prod.appspot.com/o/spaces%2FAQOLMUJWMYtrpQ7Oxxca%2Fuploads%2FKMXowZWOJwJJsmob5on1%2Flegacy-c943a1e7975817fa1588.gif?alt=media)

### Print on Demand Bundles

For general information on adding print on demand products to your inventory, please refer to the [print on demand fulfillment guide](/guided-walkthroughs/print-on-demand-walkthrough/print-on-demand-fulfillment)

Set print on demand bundles up using the code replace bundles instructions above. Each of your individual items will need to be added to Order Desk, with the print details included.

To access your current inventory items in Order Desk, click **Inventory Items** in the left sidebar under the **Tools** menu:

![](https://251457507-files.gitbook.io/~/files/v0/b/gitbook-x-prod.appspot.com/o/spaces%2FAQOLMUJWMYtrpQ7Oxxca%2Fuploads%2FkohBOobFjzR9kCm5MtKi%2Flegacy-94caab06366679710f56.png?alt=media)

As an example, if you sell a bundle of two separate mugs, set up your bundled item in Order Desk with the code replace pointing to the two individual mug SKUs:

![](https://251457507-files.gitbook.io/~/files/v0/b/gitbook-x-prod.appspot.com/o/spaces%2FAQOLMUJWMYtrpQ7Oxxca%2Fuploads%2FTsM78ILRCzroysIcbb2W%2Flegacy-c4f5e05742bb55077c45.png?alt=media)

In each of the individual items, add the print details. For instance:

![](https://251457507-files.gitbook.io/~/files/v0/b/gitbook-x-prod.appspot.com/o/spaces%2FAQOLMUJWMYtrpQ7Oxxca%2Fuploads%2F1p1aTuOScBXLXlBaQN47%2Flegacy-e4d04ad4b8bda3aea809.png?alt=media)

When an order for the bundled item comes in, Order Desk will split it out into the individual products and sync their print details into the order:

![](https://251457507-files.gitbook.io/~/files/v0/b/gitbook-x-prod.appspot.com/o/spaces%2FAQOLMUJWMYtrpQ7Oxxca%2Fuploads%2Fs7geuDlqJ0YJmNiYP8hm%2Flegacy-e89ec3e6d2946fb63a4d.gif?alt=media)

### Related Articles

* How to Work with Inventory Details
* Quick Start: Orders and Inventory
* How to Match Shopify to Amazon MCF SKUs


# How to Work with Inventory Quantities

This guide covers how to manage your stock counts with Order Desk and provides information about some special features, such as setting minimum and maximum quantity safety levels and skipping the inventory sync on certain items.

If you are looking for information on how to work with your inventory item details, please refer to the [Working with Inventory Details](/guided-walkthroughs/products-and-inventory/how-to-work-with-inventory-details) guide.

### Send Counts to/from Order Desk

**With Integrations**

Most fulfillment service and shopping cart integrations have an inventory sync feature that can be found on the integration settings page. If you want your fulfillment service to send inventory counts to Order Desk, check the integration for this setting, and if you see it, click to enable it:

![](https://251457507-files.gitbook.io/~/files/v0/b/gitbook-x-prod.appspot.com/o/spaces%2FAQOLMUJWMYtrpQ7Oxxca%2Fuploads%2FwMMScfCL8U7vGZjkMAKV%2Flegacy-6135835d6319199b462f.png?alt=media)

If you want Order Desk to send your inventory counts from here to your shopping cart, check the shopping cart integration settings for the same feature and ensure it is enabled:

![](https://251457507-files.gitbook.io/~/files/v0/b/gitbook-x-prod.appspot.com/o/spaces%2FAQOLMUJWMYtrpQ7Oxxca%2Fuploads%2FRcSlmiyENSSnkO2TTUXt%2Flegacy-b548685b369e88b07995.png?alt=media)

Due to the differences in different services, this is not available for all integrations. If you do not see an inventory sync setting in an integration, it isn’t available.

If both are enabled, Order Desk will pull inventory numbers from your fulfillment service and send them to your shopping cart. You can opt to only have one or the other enabled if you prefer.

If you have your store set up so inventory counts are synced in from your fulfillment service and sent to your shopping cart, and you import your products from your shopping cart, this can mess up your counts. It should correct itself on the next pull from your fulfillment service that will then be pushed to your shopping cart, but please import products with caution if you are currently syncing counts to your shopping cart.

**Updating Stock Counts with Spreadsheets**

If your fulfillment integration doesn’t have an inventory sync feature, or if you are using a third party that is not integrated with Order Desk, they can still send your inventory counts to Order Desk using a spreadsheet. This can be sent in through email, FTP or manually uploaded to Order Desk by a store admin.

For instructions on how to set this up, please see the [Importing Spreadsheet Data](/guided-walkthroughs/templates-emails-and-order-documents/how-to-import-a-spreadsheet) guide.

If inventory sync is turned on for your shopping cart integration, this will work the same way as pulling inventory counts from a fulfillment integration. As your inventory numbers are updated in Order Desk, these will be pushed through to your shopping cart.

**Update Stock Counts as Orders are Added**

There is a setting in your [store settings](https://app.orderdesk.com/settings/details) that, if enabled, will reduce stock counts from Order Desk as your orders are imported.

![](https://251457507-files.gitbook.io/~/files/v0/b/gitbook-x-prod.appspot.com/o/spaces%2FAQOLMUJWMYtrpQ7Oxxca%2Fuploads%2FgVeFQPVrfMKb5MsjWLuy%2Flegacy-aee570ef446171e3560c.png?alt=media)

If you are syncing inventory to your shopping cart, be careful not to bypass Order Desk by updating your inventory counts directly in your shopping cart. Update inventory in Order Desk instead, if you have this setting enabled, so the numbers in Order Desk will always be accurate, even when a new order comes in. Those numbers will be synced back to your cart.

### Send Counts Between Order Desk Stores

If you need to keep your inventory synced between two or more of your Order Desk stores, please see the [How to Sync Inventory Between Order Desk Stores guide](/guided-walkthroughs/products-and-inventory/how-to-sync-inventory-between-order-desk-stores) for more information.

### Safety Levels

If you need to set some safety levels on certain products to prevent them from overselling, use the special metadata fields described here.

**Adjustment Percentage**

Let Order Desk tell your shopping cart a certain percentage of what stock is actually available by using `adjustment_percent` in your item metadata.

If you set the adjustment percent to 50% and your actual stock is 70 items, your cart will be told there are only 35 items available.

![](https://251457507-files.gitbook.io/~/files/v0/b/gitbook-x-prod.appspot.com/o/spaces%2FAQOLMUJWMYtrpQ7Oxxca%2Fuploads%2FKA0IiRNmrCF87M68ikut%2Flegacy-a334174d627115e3f796.png?alt=media)

**Min/Max Levels**

Another option is to set a minimum or maximum number of items available in your cart, regardless of the actual stock level. To do this, add `min` or `max` to the item metadata and set your preferred min or max number.

For minimum, the number you set will be used to tell your shopping cart that you have 0 items in stock when that stock level is reached. A `min` of 3 means that when less than 3 items are in stock, Order Desk will tell your shopping cart that you are out of stock.

![](https://251457507-files.gitbook.io/~/files/v0/b/gitbook-x-prod.appspot.com/o/spaces%2FAQOLMUJWMYtrpQ7Oxxca%2Fuploads%2FOu7B5OE3FSeBr8eKK0F1%2Flegacy-797c687fcfc554884614.png?alt=media)

For maximum, the number you set will be used to tell your shopping cart the highest stock level you want displayed if your actual stock is higher. A `max` of 25 means any time your stock level is actually over 25, Order Desk will tell your shopping cart that you only have 25 items in stock.

![](https://251457507-files.gitbook.io/~/files/v0/b/gitbook-x-prod.appspot.com/o/spaces%2FAQOLMUJWMYtrpQ7Oxxca%2Fuploads%2FoU0eIwP8YhRt914v1ZcB%2Flegacy-f594b9d33ae1ab90f6fc.png?alt=media)

**Inventory Helper**

If you would like to receive email notifications when stock is low in your Order Desk store, you can use the Inventory Helper integration. For more information on setting this integration up, please refer to the [Inventory Helper](/integration-setup-guides/tools-and-productivity/inventory-helper-integration) guide.

### Skip Sync

**Skip Pull from Fulfillment Services**

If you are syncing inventory in from any fulfillment services and there are any specific items that you do not want them to update, you can tell Order Desk to “skip the pull” for that item.

To do this, set `skip_pull` as item metadata and set the value to 1.

![](https://251457507-files.gitbook.io/~/files/v0/b/gitbook-x-prod.appspot.com/o/spaces%2FAQOLMUJWMYtrpQ7Oxxca%2Fuploads%2FoEclJko1tw5BrZTAttdr%2Flegacy-f627ba1803bb4cc9c69a.png?alt=media)

Items with `skip_pull` added will not pull in any inventory updates from your fulfillment service.

**Skip Push to Shopping Carts**

Similarly, if you are syncing inventory to any shopping carts and there are specific items that you do not want Order Desk to update, you can skip these items when inventory is pushed to your carts.

To do this, set item metadata called `skip_push` with a value of 1 to any inventory items to be skipped.

![](https://251457507-files.gitbook.io/~/files/v0/b/gitbook-x-prod.appspot.com/o/spaces%2FAQOLMUJWMYtrpQ7Oxxca%2Fuploads%2FZYjHrmIoBX3BgHnHLgS3%2Flegacy-b86b233a19e9630f0a78.png?alt=media)

Items with `skip_push` added will not receive any inventory updates *from* Order Desk when the inventory in your shopping cart is updated.

### Inventory Quantities for Replaced SKUs

If you are replacing SKUs before sending orders for fulfillment, this may impact your store’s ability to sync inventory counts back to your shopping cart. For more information on replacing SKUs using code replace or product code match, please refer to [**this guide**](/guided-walkthroughs/products-and-inventory/how-to-use-code-replace).

**Code Replace**

If you need to sync inventory counts for bundles back into your shopping carts, code\_replace is the best option.

To sync inventory using code\_replace, the SKU with the code\_replace on it should be set to a quantity of 0 in Order Desk. The inventory quantity on the new SKU will be used to tell the shopping cart how much is in stock for the original SKU.

For [code\_replace bundles](/guided-walkthroughs/products-and-inventory/how-to-use-code-replace#code-replace-bundles), set the bundle item (the one with the code\_replace in it) to 0. The lowest inventory quantity from all of the items in the bundle will be sent back to the shopping cart as the amount in stock for the entire bundle.

**Product Code Match**

If using [product code match](/integration-setup-guides/fulfillment-services/fulfillment-integration-product-settings#product-code-match) with any fulfillment integrations, the inventory counts cannot be synced back into the shopping carts for the original SKUs.

**Rules**

If you create [rules](/guided-walkthroughs/rules-and-automations/how-to-work-with-rules) to replace SKUs on any items in an order, the inventory counts cannot be synced back into the shopping carts for the original SKUs.


# How to Sync Inventory Between Order Desk Stores

If you have more than one Order Desk store on your account, you can push your products from one store to another and keep the details and quantities synced between them.

If you are unfamiliar with managing multiple stores on your Order Desk account, please first see [this guide](/guided-walkthroughs/using-order-desk/how-to-manage-multiple-stores-on-one-account) for more information.

For more information on managing inventory in a single Order Desk store, see the [How to Work with Inventory Details](/guided-walkthroughs/products-and-inventory/how-to-work-with-inventory-details) and [How to Work with Inventory Quantities](/guided-walkthroughs/products-and-inventory/how-to-work-with-inventory-quantities) guides.

### How Inventory is Synced

Each Order Desk store can be set up to manage its own inventory, independent of your other Order Desk stores.

In some cases, you may need inventory to stay synced across Order Desk stores, for instance, if you have multiple shopping carts or marketplaces that need to know the quantity in stock for the same items. Rather than updating each store manually with this information, you can tell Order Desk to push the products and their quantities from one store to another.

If enabled, whenever inventory items from the main store that do not exist in the selected store(s) are added, they will also be added to the other stores selected. Updates made to the inventory will be pushed to the selected store(s), and the quantity from the main store will override the quantity from the selected store(s) if different. These updates will happen automatically whenever changes are made to the inventory in the main store.

### How to Enable Sync on Your Stores

To enable this setting, click on **Store Settings** from the left sidebar under the Settings menu and select the **Keep Inventory Synced with Other Stores** option.

![](https://251457507-files.gitbook.io/~/files/v0/b/gitbook-x-prod.appspot.com/o/spaces%2FAQOLMUJWMYtrpQ7Oxxca%2Fuploads%2Fslnol5vVGUw17N4G6kXt%2Flegacy-3bca9a242f08a1dc79ee.png?alt=media)

Once selected, you can choose which stores you want inventory synced to:

![](https://251457507-files.gitbook.io/~/files/v0/b/gitbook-x-prod.appspot.com/o/spaces%2FAQOLMUJWMYtrpQ7Oxxca%2Fuploads%2FvwbGcuk2TycOoNoceeLF%2Flegacy-cbff402e42e7ee20d344.png?alt=media)

Once enabled, this will work on all inventory updates moving forward, however, if you need to push all of your inventory from one store to another to make sure they’re in sync, you can do so by going to the Inventory Items page in your main store:

![](https://251457507-files.gitbook.io/~/files/v0/b/gitbook-x-prod.appspot.com/o/spaces%2FAQOLMUJWMYtrpQ7Oxxca%2Fuploads%2FYnVra9jIRlIFfYinC82p%2Flegacy-2218b9ee7b8a310c7968.png?alt=media)

And at the bottom of the page, selecting the store you want to send all of the inventory to:

![](https://251457507-files.gitbook.io/~/files/v0/b/gitbook-x-prod.appspot.com/o/spaces%2FAQOLMUJWMYtrpQ7Oxxca%2Fuploads%2Fpc9pe3JjrDp38SklCfMp%2Flegacy-c065f150816d3381b5a0.png?alt=media)

### Notes

If the same field is on an item in two or more stores but the values are different for that field, the item in the selected store(s) will be updated with the value from the main store.

If you have added users to your stores, but they do not have access to some of the stores selected from the main store, they can unintentionally override this setting by visiting the Store Settings page and saving the settings. Users must have access to all selected stores to be able to work in the Store Settings page.


# How to Sync Item Details Into Orders

If you need to add extra item details to the items in your orders as they come into Order Desk, you can do so by adding those details to your inventory items here in Order Desk and syncing them into orders.

As an example, this order came in with a product that only has the name, the SKU and the price:

![](https://251457507-files.gitbook.io/~/files/v0/b/gitbook-x-prod.appspot.com/o/spaces%2FAQOLMUJWMYtrpQ7Oxxca%2Fuploads%2FVgOqJVaN20bom7J5oqs7%2Flegacy-7440cf392ecc897228ca.png?alt=media)

However, before sending this order for fulfillment, it needs to have extra details included. Those details can be saved to the item in Order Desk, so long as it has the same SKU:

![](https://251457507-files.gitbook.io/~/files/v0/b/gitbook-x-prod.appspot.com/o/spaces%2FAQOLMUJWMYtrpQ7Oxxca%2Fuploads%2FiOBzj368KQ7s2PLdP6kf%2Flegacy-73eaa75718e649594ab2.png?alt=media)

If inventory sync is enabled on the store, when an order for this item comes in, the extra details will be synced into the order:

![](https://251457507-files.gitbook.io/~/files/v0/b/gitbook-x-prod.appspot.com/o/spaces%2FAQOLMUJWMYtrpQ7Oxxca%2Fuploads%2FAcYDUhzc6kAySf1DuPFn%2Flegacy-d1452e1611272bbbd013.png?alt=media)

This guide will go over the steps necessary to set this up in your store as well as how to enable automatic sync, how to sync manually, and how to sync with a rule.

### Add Inventory

If you need to sync extra item details into your orders, you will first need to add your inventory items to Order Desk. There are a few ways to do this. This [inventory guide](/start-here/getting-started-series/quick-start-orders-and-inventory#working-with-inventory) goes into detail about your options.

If you have a print on demand store, you can follow the instructions in the [print on demand fulfillment guide](/guided-walkthroughs/print-on-demand-walkthrough/print-on-demand-fulfillment) for more specific details to your product requirements.

### Enable Automatic Sync

If you want your inventory items to sync into *all* orders as they come into Order Desk, you will need to enable the automatic sync option in your store.

To do this, go into your [Store Settings](https://app.orderdesk.com/settings/details) (under the Settings menu in the left sidebar) and look under the Inventory Settings section for the **Add Inventory Details to Order Items** option.

Check to enable:

![](https://251457507-files.gitbook.io/~/files/v0/b/gitbook-x-prod.appspot.com/o/spaces%2FAQOLMUJWMYtrpQ7Oxxca%2Fuploads%2F2oTr4a4cO0XxnydUr2y9%2Flegacy-876aa2b9066a8c67034c.png?alt=media)

If you do not want to sync item details into *every* order that comes into your Order Desk store, leave this setting unchecked and follow the instructions below for manually syncing orders or syncing orders with a rule.

### Item Metadata In Orders

Item metadata can come in from the shopping cart, be added from a spreadsheet if the orders were imported from a file, or will need to be added by syncing details in from the inventory.

To see if the details you need are already in an order, click on the **Show Metadata** button on the item. The information that drops down is item metadata:

![](https://251457507-files.gitbook.io/~/files/v0/b/gitbook-x-prod.appspot.com/o/spaces%2FAQOLMUJWMYtrpQ7Oxxca%2Fuploads%2F43jZVviJr6qEm5xr1vco%2Flegacy-a1c3ee85bd30784c7a3c.gif?alt=media)

### Sync Orders Manually

Enabling automatic sync will not work for orders that are already in Order Desk. The easiest way to sync these orders is to choose one of the two manual sync methods:

1. If the inventory item details are already accurate in Order Desk, you can update or re-save the item in the order to sync the details into it.
2. If you need to update the inventory item first, you can manually sync the entire order after the inventory is updated.

**1. Update the order**

If the inventory item details are already accurate, click on the item name in the order and make any changes necessary (if you need to fix the SKU, for instance), and then re-save.

When you save the item, it will pull in the inventory details as long as the SKUs match each other:

![](https://251457507-files.gitbook.io/~/files/v0/b/gitbook-x-prod.appspot.com/o/spaces%2FAQOLMUJWMYtrpQ7Oxxca%2Fuploads%2FYIjw94GexzmlW1QpVB4r%2Flegacy-097801fa1f303f69bfba.gif?alt=media)

**2. Sync the entire order**

If you need to update the inventory item details first, the quickest way to sync the order when you’re ready is to scroll to the bottom of the order details page and click the **Sync Item Details With Inventory** button:

![](https://251457507-files.gitbook.io/~/files/v0/b/gitbook-x-prod.appspot.com/o/spaces%2FAQOLMUJWMYtrpQ7Oxxca%2Fuploads%2F3cfpdW2FZtZU7jG3EH2j%2Flegacy-f01bbd8fc14a66d0f06d.gif?alt=media)

### Sync Orders with a Rule

To sync inventory into specific orders, rather than all orders, create a rule with the **Sync Order Items With Inventory Details** action. If you aren’t familiar with the Rule Builder, see the [How to Work with Rules guide](/guided-walkthroughs/rules-and-automations/how-to-work-with-rules) for more information.

Create a rule using the **Order Rule** rule type, and select the event you want to happen for the sync to run:

![](https://251457507-files.gitbook.io/~/files/v0/b/gitbook-x-prod.appspot.com/o/spaces%2FAQOLMUJWMYtrpQ7Oxxca%2Fuploads%2F6GRdB6TeRIg39PCyfdJR%2Flegacy-1c744ebbd7eb78fb9d96.png?alt=media)

Add the filters necessary to tell Order Desk which orders this rule should run on, and then select the **Sync Order Items with Inventory Details** action:

![](https://251457507-files.gitbook.io/~/files/v0/b/gitbook-x-prod.appspot.com/o/spaces%2FAQOLMUJWMYtrpQ7Oxxca%2Fuploads%2FYUR37RdhQunXXQkt4eQj%2Flegacy-906cf53d3e174bed8669.png?alt=media)

**Sync Orders with a Custom Button**

Similar to this rule, you can also create a custom button if you would prefer to sync the orders you select on the click of a button. To create a custom button, follow [these instructions](/guided-walkthroughs/rules-and-automations/how-to-use-custom-buttons), making sure to set your filters and the **Sync Order Items with Inventory Details** action.

### Sync Price

You may notice that the price doesn’t sync into orders from the inventory. This is because Order Desk honors the price already on the order (typically from the shopping cart) to ensure that reporting between stores and vendors remains consistent.

If you need to sync a different price into orders, you can do so by using a special item metadata field in your inventory items stored here in Order Desk.

Use **price\_override** set to 1 (for true) to set the price for the item:

![](https://251457507-files.gitbook.io/~/files/v0/b/gitbook-x-prod.appspot.com/o/spaces%2FAQOLMUJWMYtrpQ7Oxxca%2Fuploads%2FUYNjqrcTxL9ai4EyxYSl%2Flegacy-427a4e2f2eeb81b8958e.png?alt=media)

This price will be synced into the order as the price for that item, overriding what is already on the order.


# Print On Demand Walkthrough


# Print on Demand Custom Artwork

**IMPORTANT**\
If you’re looking for information on how to set up a print on demand store and won’t be working with custom artwork for each order, you can read our [print on demand fulfillment guide](/guided-walkthroughs/print-on-demand-walkthrough/print-on-demand-fulfillment) for more information.

**IMPORTANT**\
If you’re looking for information on how to set up a print on demand store and won’t be working with custom artwork for each order, you can read our [print on demand fulfillment guide](/guided-walkthroughs/print-on-demand-walkthrough/print-on-demand-fulfillment) for more information.

Accessing customized print files on a per-order basis is a common scenario that print on demand stores are facing. Sometimes the custom files have unique artwork supplied by the customer or sometimes a plugin is building custom files with special text from the buyer. The problem to solve is how to attach the custom artwork file to the order so it can be sent to a printer for fulfillment.

Every store will have a different set of factors at play, so the best way to find out how this will work for your store is to start sending test orders into Order Desk. We’ll go over the process of getting this set up in this guide and tell you what the next steps are you need to take and at what point our developers will be able to step in and work with you to finalize this setup.

**IMPORTANT**\
If you’re looking for information on how to set up a print on demand store and won’t be working with custom artwork for each order, you can read our print on demand fulfillment guide for more information.

### Manually Adding Artwork in Order Desk

You can manually add artwork to the items in your orders here in Order Desk. To do this, open up the order in Order Desk and click on the item name:

![](https://251457507-files.gitbook.io/~/files/v0/b/gitbook-x-prod.appspot.com/o/spaces%2FAQOLMUJWMYtrpQ7Oxxca%2Fuploads%2FKppSuUQHga6ZCDBLptw0%2Flegacy-09fefe4d43649ead0517.png?alt=media)

Click on **Add Variation**, add print\_url and the link to the artwork file, and save your changes:

![](https://251457507-files.gitbook.io/~/files/v0/b/gitbook-x-prod.appspot.com/o/spaces%2FAQOLMUJWMYtrpQ7Oxxca%2Fuploads%2FlDkEVYQqM1F8abYkr8EJ%2Flegacy-fa8c219110bf2099e895.png?alt=media)

You will also need to include the print\_sku (the printer’s code for the product) either as a variation or metadata. For more information on how to work with print on demand products in Order Desk, please review our [print on demand fulfillment guide](/guided-walkthroughs/print-on-demand-walkthrough/print-on-demand-fulfillment).

### Automatically Sending Artwork to Order Desk

Realistically, what you are looking for is how to do this automatically so you don’t have to manually add the artwork file every time an order comes in. This will take some testing and either setting up some more advanced rules using Twig or having your developer build a custom script to the Order Desk API.

First, you’ll want to see if your shopping cart or website provides any way to attach a custom file with an order. If so, set this up on your side and you can start sending test orders through to Order Desk. After sending some test orders into Order Desk, contact Order Desk support and let us know:

* your Order Desk store name
* the order number(s) for any tests you sent through
* what the artwork files are that you are testing (the URLs)

With this information, we will look at your store to see if the files are coming through. If we don’t see them, we’ll check the API connection from your shopping cart to see if we can access the file. If so, we’ll make sure to update how we pull the files for your store so they’ll be added as the print\_url for your items.

If your shopping cart doesn’t provide any way to do this, you will need your own developer to build a custom script that will add a specific URL to these items when they’re ordered and downloaded into Order Desk.

### Related Articles

* Print on Demand Providers
* Print On Demand Fulfillment
* Print on Demand Order Syncing


# Print On Demand Fulfillment

Print on demand fulfillment companies accept orders from merchants with designs they want printed on items like apparel, office and home goods. As a customer orders an item, the merchant sends the order with the artwork to the printer who then creates and ships the item to the customer.

Because shopping carts aren’t always able to store print details or send orders to a printer, merchants have to find a way to send order to their printers with the print details included. They also might need to split orders to send different items to different print companies.

Order Desk facilitates this process for merchants by downloading and splitting orders, syncing in the print details and submitting the orders to the right printers. This process can happen automatically and immediately once an Order Desk store is set up for it. The printer receives the order seconds after it was placed.

You can see [our list](/integration-setup-guides/print-on-demand/print-on-demand-providers) of print on demand integrations with details about each company. This list is always growing, so if you use a print service you would like to see supported, contact Order Desk support and provide the service name, website and the API docs so our developers can review your request.

In this guide we’ll show you how to place an order with your printer manually to show you how the app works. Once you are familiar with what is happening, you can set up your Order Desk store to run automatically. This guide includes instructions for adding print details, splitting orders and setting up a store to submit orders to different printers.

### First Steps

#### Connect Integrations

Enable your integrations from the **Manage Integrations** link in the left sidebar. You will find the print integrations under the **Print on Demand** tab.

![](https://251457507-files.gitbook.io/~/files/v0/b/gitbook-x-prod.appspot.com/o/spaces%2FAQOLMUJWMYtrpQ7Oxxca%2Fuploads%2FmYfMgMBDHRL2eDs2yG8I%2Flegacy-1e623ef3afba13c7e2a9.jpg?alt=media)

Click **Enable** for any integrations you need and fill in the details to connect. If you don’t know your credentials, contact your printer for help.

Most integrations have folder settings that let you choose which folder an order is moved into after it submits to an integration and when tracking is added from the integration, completing the order. Choose the folder, shipping and other settings you want for your store in each integration.

If you use Gooten, you can follow the rest of the instructions in this guide to learn how to set up your products in Order Desk, or refer to the [Gooten guide](/integration-setup-guides/print-on-demand/gooten-integration#send-product-details-to-gooten) to learn about an easier way to set up your products directly in Gooten and how that works with Order Desk.

#### Get Product Codes from Printer

When you send an order to your printer, it will need to include their product code so they know what item to print on. Gather their product codes for the items you sell. Your sales rep at the print company will be able to help you get these codes.

These codes will be stored as the “print\_sku” with your items in Order Desk. This is a different code from your own SKU for the item.

#### Prepare Artwork Files

Prepare your artwork files according to the requirements or templates each printer has. Your artwork files will need to be stored online and have to be publicly available so your printer can access them. If you don’t have a personal website for this, or if you prefer, you can use [Dropbox](https://www.dropbox.com/) or [Amazon S3](https://aws.amazon.com/s3/) for more advanced users. [See this guide](/integration-setup-guides/tools-and-productivity/how-to-make-your-dropbox-artwork-files-shareable) for instructions on how to get the public URL for Dropbox files.

These files will be stored as the “print\_url” with your items in Order Desk.

If you have any items that require more than one print\_url to be printed in different locations on the item (such as the front and back of a shirt), these will be added to your item as:

print\_url\_1 = [*www.dropbox.com/your-file-url-1*](http://www.dropbox.com/your-file-url-1)

print\_location\_1 = front

print\_url\_2 = [*www.dropbox.com/your-file-url-2*](http://www.dropbox.com/your-file-url-2)

print\_location\_2 = back

Contact your sales rep at the print company for the specific location names for items with more than one print location.

### Place an Order Manually

We recommend placing at least one order with your printer manually to learn how Order Desk works.

#### Add or create order

If your shopping cart integrations are already connected, you may already have an order that needs to be sent to a printer. If you don’t have any orders in Order Desk yet, you can add an order manually [following these steps](/start-here/getting-started-series/quick-start-orders-and-inventory#working-with-orders).

#### Add print details to item in order

Once you have an order to work on in Order Desk, click on the item name in the order to add your print details (the print\_sku and the print\_url).

![](https://251457507-files.gitbook.io/~/files/v0/b/gitbook-x-prod.appspot.com/o/spaces%2FAQOLMUJWMYtrpQ7Oxxca%2Fuploads%2FaWWxWZUvXa9CBqsS7ntY%2Flegacy-30c61ed7906853110741.png?alt=media)

Click **Add Variation** twice so you can add two variations to the item.

![](https://251457507-files.gitbook.io/~/files/v0/b/gitbook-x-prod.appspot.com/o/spaces%2FAQOLMUJWMYtrpQ7Oxxca%2Fuploads%2F4uCNYjOZmdubsScULDJA%2Flegacy-2ae2d3a88998acd93c2e.png?alt=media)

The two variations you will be adding are the print\_sku and the print\_url, using the printer’s product code for the item and the link to your artwork file as the values.

![](https://251457507-files.gitbook.io/~/files/v0/b/gitbook-x-prod.appspot.com/o/spaces%2FAQOLMUJWMYtrpQ7Oxxca%2Fuploads%2F7IifBnLvuA80bUrERhrg%2Flegacy-9f65a9187ab5b51dca0b.png?alt=media)

If you have more than one print\_url for this item, add more variations to cover the locations and extra URLs following the guidelines in the [Prepare Artwork Files](#prepare-artwork-files) section.

Click **Save Item**.

#### Send order to printer

You’ll see a button for every print on demand integration you have under the item in your order. Click the appropriate button to submit your order to that printer.

![](https://251457507-files.gitbook.io/~/files/v0/b/gitbook-x-prod.appspot.com/o/spaces%2FAQOLMUJWMYtrpQ7Oxxca%2Fuploads%2FhUt45W42LaFyLTQGktwf%2Flegacy-18909174a5db1f5eacf7.png?alt=media)

When you click this button, it queues up the order for export to the printer. It can take a couple seconds for the appointment to run, so give it a moment, then refresh the page to see if the order went through or not.

#### Did the order successfully submit?

Scroll down to the **Order History** section near the bottom of the page. Order History shows all the events that happen to an order from the moment it is created. When you submit an order to an integration, an event is added to the history to say that the order was scheduled to be sent to the integration. If the submission was successful, an event is added a moment later to say it was submitted:

![](https://251457507-files.gitbook.io/~/files/v0/b/gitbook-x-prod.appspot.com/o/spaces%2FAQOLMUJWMYtrpQ7Oxxca%2Fuploads%2FweoynQ8o94NT9gOk8Dkt%2Flegacy-2281995c04d45913c034.png?alt=media)

If the submission was not successful, an event will be added to say it wasn’t submitted with a message about why. In most print on demand orders, the error is that the print details are missing or wrong. If you get an error, double check that your variations are accurate, and contact Order Desk support if you still need help figuring out the error.

After an order is sent to a printer, we will check for shipment notifications and automatically add the tracking details to the order when we hear from the printer.

### Add Inventory to Order Desk

Now that you have successfully submitted a manual order, the next step is to automate the process. To do this, you will need to set up Order Desk to add the print details to your orders automatically. This is done by storing your print details in your inventory items here in Order Desk. When an order comes into your store, the app will look at the SKUs on the items, find those same SKUs stored here and sync the print details into the order for each item.

#### Order Desk Inventory

There are several ways to add inventory to Order Desk. How you choose to do this is up to you and will likely depend on how many items you have. For more information on your options, refer to our [getting started guide on adding inventory](/start-here/getting-started-series/quick-start-orders-and-inventory#working-with-inventory).

For print on demand stores, an additional option for adding one item at a time is to use the Add Print on Demand button in the top right corner of the inventory page.

![](https://251457507-files.gitbook.io/~/files/v0/b/gitbook-x-prod.appspot.com/o/spaces%2FAQOLMUJWMYtrpQ7Oxxca%2Fuploads%2FYF27AFBJi8F2XUDtyNmx%2Flegacy-c18a109e031e0047123c.png?alt=media)

You can add your item information to each of the fields. The print\_sku and print\_url will be added to the metadata of the item. This will also add the printer name as the print location, which is necessary for splitting orders if you use more than one printer. We will cover splitting orders later in this guide.

If you prefer, you can use the **Add New Item** option instead, but make sure to add your print\_sku and print\_url as metadata to your items and set the printer’s name as the location:

![](https://251457507-files.gitbook.io/~/files/v0/b/gitbook-x-prod.appspot.com/o/spaces%2FAQOLMUJWMYtrpQ7Oxxca%2Fuploads%2FYSK8AIhQAuuM7Fu60bDW%2Flegacy-74845870da320b597a3d.png?alt=media)

If you have a lot of items, you can use a spreadsheet to import them all at once. [Download a sample spreadsheet](https://251457507-files.gitbook.io/~/files/v0/b/gitbook-x-prod.appspot.com/o/spaces%2FAQOLMUJWMYtrpQ7Oxxca%2Fuploads%2FlfTVcNqxz7WdikxnpWkw%2Flegacy-621f136949bc437063a2.csv?alt=media). Your spreadsheet needs to be saved as a CSV file and should have these columns:

**Product Name, Your SKU, print\_sku, print\_url, Printer Name**

Follow [these instructions](/guided-walkthroughs/templates-emails-and-order-documents/how-to-import-a-spreadsheet) to import your spreadsheet. When matching the columns in your import template, use metadata|print\_sku and metadata|print\_url for your print details.

![](https://251457507-files.gitbook.io/~/files/v0/b/gitbook-x-prod.appspot.com/o/spaces%2FAQOLMUJWMYtrpQ7Oxxca%2Fuploads%2F1oWcoZ9Ab3oW0f3k2aI0%2Flegacy-2607016fca889c8661b8.png?alt=media)

### Turn on automatic sync

Once your items are all added to Order Desk, you want them to automatically sync into your orders as they are added or downloaded. The inventory setting that does this is enabled on stores when a print on demand integration is added, but double check your store.

Click on **Store Settings** in the left sidebar. Under the **Inventory Settings** section, **Add Inventory Details to Order Items** should be checked.

![](https://251457507-files.gitbook.io/~/files/v0/b/gitbook-x-prod.appspot.com/o/spaces%2FAQOLMUJWMYtrpQ7Oxxca%2Fuploads%2FC8iKZNFMFbaGkv3utkc7%2Flegacy-2e9f2f1d653540c1dcad.png?alt=media)

When your inventory details sync into your order items, you’ll see the print details by clicking on the down arrow under each item.

![](https://251457507-files.gitbook.io/~/files/v0/b/gitbook-x-prod.appspot.com/o/spaces%2FAQOLMUJWMYtrpQ7Oxxca%2Fuploads%2FitZjjatvtHRqDeCynCvf%2Flegacy-e5205a35165416dda1f2.gif?alt=media)

If this setting was disabled or you updated an order or an item after the order had already been added to Order Desk, you can manually sync the print details into your order by scrolling to the bottom of the order page and clicking the **Sync Item Details With Inventory** button.

![](https://251457507-files.gitbook.io/~/files/v0/b/gitbook-x-prod.appspot.com/o/spaces%2FAQOLMUJWMYtrpQ7Oxxca%2Fuploads%2FaqQGVEzK7QiBgk93WMPG%2Flegacy-a5b23222410943b24b2c.gif?alt=media)

### Automate the Process

Now that your print details are being added to your orders automatically, you can tell Order Desk to submit your orders to your printers. If you sell other kinds of products that don’t get sent for on-demand printing or if you work with more than one printer, the app can split your orders first.

#### Submitting orders to only one printer (no splitting needed)

If all of the items in your orders are meant for one printer, you can create a rule to automatically submit orders to that printer.

In the Rule Builder, select the **Order Rule** rule type:

![](https://251457507-files.gitbook.io/~/files/v0/b/gitbook-x-prod.appspot.com/o/spaces%2FAQOLMUJWMYtrpQ7Oxxca%2Fuploads%2FhgrTY2i3WPawSMUAv8yI%2Flegacy-8240ce210fa25c3cb6ca.png?alt=media)

Select the event that needs to happen for the order to be submitted to the printer. This will most likely be Order is Imported but will be your preference:

![](https://251457507-files.gitbook.io/~/files/v0/b/gitbook-x-prod.appspot.com/o/spaces%2FAQOLMUJWMYtrpQ7Oxxca%2Fuploads%2FGIWt9y6Apt6taEcBMsyc%2Flegacy-3adabf6dfaf25dcb3533.png?alt=media)

Under the Filters & Actions tab, select the Submit Order action for the print integration you use:

![](https://251457507-files.gitbook.io/~/files/v0/b/gitbook-x-prod.appspot.com/o/spaces%2FAQOLMUJWMYtrpQ7Oxxca%2Fuploads%2FYGyoRQ4qtzLy5rQf9ItZ%2Flegacy-3ec95b99c0e749c2c2ad.png?alt=media)

With this rule in place, every order you get will immediately be sent to your printer.

#### Submitting orders to multiple printers or vendors (splitting needed)

[Shopify](/guided-walkthroughs/integration-specific-walkthroughs/how-to-split-by-vendor-with-shopify) and [BigCommerce](/guided-walkthroughs/integration-specific-walkthroughs/how-to-split-by-vendor-with-bigcommerce) have different instructions for splitting orders. See the linked guides for more information. All other integrations split using the instructions below. For detailed instructions on splitting orders, read the [How to Split Orders guide](/guided-walkthroughs/orders-and-folders/how-to-split-orders).

Orders that need to be sent to different printers and/or vendors, will be split based on the location field in the item details.

![](https://251457507-files.gitbook.io/~/files/v0/b/gitbook-x-prod.appspot.com/o/spaces%2FAQOLMUJWMYtrpQ7Oxxca%2Fuploads%2FyNWslFnPlRQhYaN8rbNs%2Flegacy-cedead1ea6cf750ffaf0.png?alt=media)

To create your split rules, in the Rule Builder, select the Order Rule rule type and choose your event, such as Order is Imported.

Under the Filters & Actions tabs, select the **Split Order** action. Choose Metadata as the **Split Type**, set the **Field Name** as *inventory\_location*,

![](https://251457507-files.gitbook.io/~/files/v0/b/gitbook-x-prod.appspot.com/o/spaces%2FAQOLMUJWMYtrpQ7Oxxca%2Fuploads%2FP3YASUDasM2PnazWUKns%2Flegacy-3f8e022f41c3dd1d3f1e.png?alt=media)

Create a separate split rule for each printer or vendor you want to split. The punctuation, capitalization and spaces of the location name have to be exactly the same in the rule as in the item.

If you have the inventory location set for all of your items and you want to automatically split all orders by that vendor name, you can simply create one rule that says:

![](https://251457507-files.gitbook.io/~/files/v0/b/gitbook-x-prod.appspot.com/o/spaces%2FAQOLMUJWMYtrpQ7Oxxca%2Fuploads%2FUAGcf9Qz1S3HnjY9yllF%2Flegacy-0db092715795ab708d0b.png?alt=media)

### Submit Split Orders to Printers/Vendors

Create another rule to submit the split orders to the appropriate printer or vendor. Choose the action for when **Order is Split**.

Click **Add a Filter** and use **If Item Metadata inventory\_location** ***Contains*** **XXX**, where XXX is replaced with the printer name set in the location field:

![](https://251457507-files.gitbook.io/~/files/v0/b/gitbook-x-prod.appspot.com/o/spaces%2FAQOLMUJWMYtrpQ7Oxxca%2Fuploads%2Ffc4r57DCyIWrCYHhEJj5%2Flegacy-bf5072c2fe278e98f12b.png?alt=media)

For the action, select the print on demand integration where the order should be submitted. Set up a new rule for each printer you are using.

If any of your printers or other vendors are not integrated with Order Desk, you can set your rule action to email them or move them into a folder to be exported with a file. For more information on these other options, read our [Split and Dropship Orders guide](/guided-walkthroughs/shipping-fulfillment-and-returns/how-to-split-and-dropship-orders-for-separate-vendors) and our [Building Export Templates guide](/guided-walkthroughs/templates-emails-and-order-documents/how-to-build-export-templates).

### FAQ

#### I’m getting errors when trying to submit orders to my printer. What do they mean?

Some errors say exactly what the problem is, such as “print details missing.” If the error makes sense, double check what it’s saying is wrong about the order and after fixing it, try to submit the order again.

Some errors don’t give enough information about the order to know what is wrong. For a list of common errors and what they mean, please see [this guide](/technical-documentation/api-and-integration-reference/common-errors-from-integrations). If you’re dealing with an error that you can’t figure out, contact Order Desk support.

#### How does syncing work and why is it necessary for Print on Demand orders?

You can learn more about how order syncing works and how to fix common problems with print on demand orders in [this guide](/guided-walkthroughs/print-on-demand-walkthrough/print-on-demand-order-syncing).

### Related Articles

* Print on Demand Providers
* How to Make Your Dropbox Artwork Files Shareable


# Print on Demand Order Syncing

![](https://251457507-files.gitbook.io/~/files/v0/b/gitbook-x-prod.appspot.com/o/spaces%2FAQOLMUJWMYtrpQ7Oxxca%2Fuploads%2F8oDer5YyeuGKqxe2ErpF%2Flegacy-f682219d1ce980818d4f.gif?alt=media)

***Why won’t my print on demand order sync?***\
***I’m not sure if my order submitted; how can I tell?***\
***Why does it say print details are missing? What does that mean?***

These are the most common questions we hear from print on demand merchants as they are setting up their Order Desk store and learning how to submit print orders. For extensive instructions on how to set up your store, read the [Print on Demand Fulfillment guide](/guided-walkthroughs/print-on-demand-walkthrough/print-on-demand-fulfillment).

However, for a brief explanation about the most common problems with sending print orders to your printer, please continue reading this guide.

First, we’ll go into a little background on how and why order syncing is important. If you already have a solid understanding of this, skip ahead to the sections on how to [check](#how-to-check-for-errors) for and [fix](#quick-fix-to-submit-an-order) errors in orders.

### How Does Syncing Work?

Unlike working with a warehouse, where a SKU is typically all that is needed for the supplier to fulfill an order, print on demand orders are made by combining your artwork with the printer’s item. This requires specific information be sent to your printer with each order: your artwork, the printer’s product code for the item you want them to print on, and any other necessary details the printer will need to create the product (location of the print, etc.) All of these details combined are referred to as the “print details”.

Since it isn’t always possible to store the print details with items in your shopping cart, these will need to be added to the order after your customer has already purchased the item. This is what syncing is.

When the order comes in from a shopping cart, Order Desk looks through the inventory items you have already saved here to find the print details and sync them into the order. The goal is to make this happen automatically and instantaneously so you don’t have to edit every order before sending it to your printer.

### Why is Syncing Necessary?

Without syncing, you would have to manually edit every order to add in the print details. Not only is this unnecessary and time-consuming, it opens up the possibility for costly errors and a longer wait for your customers.

Without the print details, the order won’t successfully submit to your printer.

***A printer won’t accept an order if it doesn’t tell them what you want them to print.***

### How to Check for Errors

If an order doesn’t go through to your print integration, you should receive an email from Order Desk letting you know there was an error.

If you have any doubt about the status of an order, open up the order page and scroll down to the bottom where you’ll find the **Order History** section:

![](https://251457507-files.gitbook.io/~/files/v0/b/gitbook-x-prod.appspot.com/o/spaces%2FAQOLMUJWMYtrpQ7Oxxca%2Fuploads%2FnKxmGb6rngnuKhgM7EbJ%2Flegacy-c1293539a408fd89b4e1.png?alt=media)

This section says when the order was imported or created, if anything was edited on the order as well as any other actions taken on it, including if the order was scheduled to be sent to a printer and whether or not the submission was successful.

If the submission failed, the reason for the failure will be included. In most cases, the error is that the print details are missing.

### Quick Fix to Submit an Order

Check to see if the print details are in the items in your order. These details will either be set up as variations or as item metadata.

If set as variations, you’ll see them when you look at the order details, just to the right of the item name and SKU:

![](https://251457507-files.gitbook.io/~/files/v0/b/gitbook-x-prod.appspot.com/o/spaces%2FAQOLMUJWMYtrpQ7Oxxca%2Fuploads%2FCkLejXPr2e7zFnlUqZMJ%2Flegacy-0a7d212400a80af8c060.png?alt=media)

If set as metadata, click the arrow under the item name to see if your print details have already been synced into the order:

![](https://251457507-files.gitbook.io/~/files/v0/b/gitbook-x-prod.appspot.com/o/spaces%2FAQOLMUJWMYtrpQ7Oxxca%2Fuploads%2F5bCkUiIvkynmexwZvvFZ%2Flegacy-a04ec2e3740e213c0bc1.png?alt=media)

If the print details are there, you’ll see them with the metadata that drops down after clicking the arrow:

![](https://251457507-files.gitbook.io/~/files/v0/b/gitbook-x-prod.appspot.com/o/spaces%2FAQOLMUJWMYtrpQ7Oxxca%2Fuploads%2FRj1BJTcX0KeULtvCoS3R%2Flegacy-1ee39ac3bfc7ae9adeea.png?alt=media)

If you don’t see your print details as either variations or metadata, you’ve found the problem. These need to be added to the items in the order before it is submitted to your printer.

To quickly add these details and submit the order, click on the item name and add the print details as variations:

![](https://251457507-files.gitbook.io/~/files/v0/b/gitbook-x-prod.appspot.com/o/spaces%2FAQOLMUJWMYtrpQ7Oxxca%2Fuploads%2FRJZxHMmSGULtyz90xYp6%2Flegacy-f5e68f0d2d7b22eb12e1.png?alt=media)

Save the item and resubmit the order to the printer by clicking on the submit button.

However, once done, you’ll still want to fix the problem that prevented your order from syncing and submitting automatically when it was initially placed.

### Permanent Fix So It Doesn’t Happen Again

There are two key factors to ensuring your orders will sync automatically.

1\. **Add Inventory Details to Order Items** must be enabled on your store.

To make sure this is enabled, go into your [Store Settings](https://app.orderdesk.com/settings/details) (under the Settings menu in the left sidebar) and check the Inventory Settings section.

![](https://251457507-files.gitbook.io/~/files/v0/b/gitbook-x-prod.appspot.com/o/spaces%2FAQOLMUJWMYtrpQ7Oxxca%2Fuploads%2FSoXUA6jVfKo8ZugmeAwH%2Flegacy-6dac8f40f0c8478976c6.png?alt=media)

2\. You must have your **Inventory Items** stored in Order Desk with the print details added to either the metadata or as variations.

To check this, look at your [Inventory Items](https://app.orderdesk.com/inventory) (under the Tools menu in the left sidebar) and make sure you have your products stored in Order Desk.

Look for any specific items from orders that didn’t sync when they imported.

![](https://251457507-files.gitbook.io/~/files/v0/b/gitbook-x-prod.appspot.com/o/spaces%2FAQOLMUJWMYtrpQ7Oxxca%2Fuploads%2FGuPLgxAHrBVNP6GbWhdX%2Flegacy-a5b2404a4dfd9c3cf8fb.png?alt=media)

Each item needs to have your SKU saved in the Code/SKU field and all the print details added in either the metadata or variations fields.

That’s it! However, maybe you checked and both of those are already in place but your order still didn’t sync. Read on for the most likely culprit.There are several ways to add your inventory to Order Desk. This guide provides instructions for the most efficient way to import a large number of print on demand products all at once.

### Common Reasons Orders Don’t Sync

You’ve checked to make sure everything is set up properly, but your order still didn’t sync automatically.

The single most common reason this happens is because there’s either a typo in the SKU or there is no SKU at all on the item in the order.

Let’s say you have an item, Art Print, with the SKU 1025, and all the print details are already saved in Order Desk:

![](https://251457507-files.gitbook.io/~/files/v0/b/gitbook-x-prod.appspot.com/o/spaces%2FAQOLMUJWMYtrpQ7Oxxca%2Fuploads%2F8FaYXpNrrvj9MfwpsadV%2Flegacy-2636159090f474887f29.png?alt=media)

An order for this item comes into Order Desk, but the print details never synced in:

![](https://251457507-files.gitbook.io/~/files/v0/b/gitbook-x-prod.appspot.com/o/spaces%2FAQOLMUJWMYtrpQ7Oxxca%2Fuploads%2FLqSiAGVVlNWGsfTEyvCR%2Flegacy-154d185f04144247aaa8.png?alt=media)

The reason this didn’t work is because the SKUs don’t match between the item in the order and the item in Order Desk. In some cases, there may be no SKU at all in the order.

There’s a typo either in the shopping cart (10025) or in Order Desk (1025). You can quickly adjust this by either clicking on the item name in the order and changing the SKU to 1025 or opening up the item in your inventory and changing the SKU to 10025. If the SKU in your shopping cart is the wrong one or hasn’t been set at all yet, be sure to fix it there as well so future orders will have the right SKU.

Once the SKU is updated, your order can sync. If you edited the SKU in the order itself, when you save the item, it should automatically update.

If you edited the SKU in the inventory item rather than the order, go back into the order and scroll to the bottom of the page to click the **Sync Item Details with Inventory** button in the lower right corner:

![](https://251457507-files.gitbook.io/~/files/v0/b/gitbook-x-prod.appspot.com/o/spaces%2FAQOLMUJWMYtrpQ7Oxxca%2Fuploads%2FHZDoKxUC6bXkuhFD5tiu%2Flegacy-183ad826cc8d482c7c84.gif?alt=media)

Double check that the print details are now in the order, and if you see them, submit your order again.

Wait a few seconds then refresh the page and scroll down to the Order History section one last time to see if the order successfully submitted to your printer.


# Print on Demand Integration Product Settings

In several print on demand integrations, there are product settings under the Product Code Match section. In most cases, you will *not* need to use these settings, however, this guide will cover what they are used for in case you do have a reason for them.

![](https://251457507-files.gitbook.io/~/files/v0/b/gitbook-x-prod.appspot.com/o/spaces%2FAQOLMUJWMYtrpQ7Oxxca%2Fuploads%2FCVw3WMFLabLBTe5QLook%2Flegacy-176205f3865f1e27eca2.png?alt=media)

Please note that many other fulfillment integrations also have these same features, but the product code match settings work differently in print on demand integrations than regular fulfillment integrations. If you are trying to find more information about these settings for an integration that is not a print company, please refer [to this guide](/guided-walkthroughs/products-and-inventory/how-to-use-code-replace) instead.

If you are here because you use a print on demand company to fulfill your orders, make sure you fully understand the [print on demand fulfillment process](/guided-walkthroughs/print-on-demand-walkthrough/print-on-demand-fulfillment) before attempting to use these settings.

### Product Code Match

**Match Product Codes**

In print on demand integrations, the product code match feature allows you to set up and send a product to more than one printer. Every printer has their own product code for an item, so in order to send the same product to more than one printer, you will need to match the print\_sku from one printer to the print\_sku another printer uses for the same item.

To set this up, make sure you already have your item(s) saved in your Order Desk inventory. Go into the integration for the printer you want to also support for an item you already have. In the Product Code Match field, set the original print\_sku to = the new printer’s print\_sku.

As an example, if one printer uses the print\_sku 1000, and another uses PRT-X-4454 for the same item, match the print\_skus as:

**1000=PRT-X-4454**

![](https://251457507-files.gitbook.io/~/files/v0/b/gitbook-x-prod.appspot.com/o/spaces%2FAQOLMUJWMYtrpQ7Oxxca%2Fuploads%2F8SU6epekWt8vN3vA6xvl%2Flegacy-107c52f7f530bb837c63.png?alt=media)

As long as the print details are saved in the item where the print\_sku is set up as 1000, they can also be sent to the second printer.

For information on storing multiple print\_skus in your Order Desk inventory, take a look at our guide on [How to Work With Inventory Details](/guided-walkthroughs/products-and-inventory/how-to-work-with-inventory-details#printer-specific-printsku-fields).

**Color Conversion**

If you need to convert the the color variation or metadata of an item, you can do so with the product code match feature. To do this, add **Color:** to the product code match box in the print integration where the color needs to be converted. Then set the color match behind it using an = to map the colors to each other. For example:

**Color:Light Gray=Sport Gray**

![](https://251457507-files.gitbook.io/~/files/v0/b/gitbook-x-prod.appspot.com/o/spaces%2FAQOLMUJWMYtrpQ7Oxxca%2Fuploads%2FzGIR1dju0ZpULoJH36lj%2Flegacy-b0e09c9e04e35be28f26.png?alt=media)

Notes about the color conversion feature:

* Variation is checked before item metadata, so if a different color is set for variation and metadata on the same item, the variation color will be used.
* The variation/metadata name as well as the color match name support both spellings—color and colour.

**Color Conversion by SKU**

Color conversion can also be applied to a specific SKU instead of to an entire color variation or metadata field. To do this, set your personal SKU for the item first. Using AT-1010 as an example, follow it with the color match:

**AT-1010:Light Gray=Sport Gray**

![](https://251457507-files.gitbook.io/~/files/v0/b/gitbook-x-prod.appspot.com/o/spaces%2FAQOLMUJWMYtrpQ7Oxxca%2Fuploads%2FCLNep8VGQw8hdoCN3jcB%2Flegacy-bc37eef6b9b67502576d.png?alt=media)

**Creating Bundles**

Product bundles can be created for a specific SKU by following the original SKU with multiples of the replacement SKU. Using 3000 and PRT-Y-4455 as examples:

**3000=PRT-Y-4455,PRT-Y-4455,PRT-Y-4455**

![](https://251457507-files.gitbook.io/~/files/v0/b/gitbook-x-prod.appspot.com/o/spaces%2FAQOLMUJWMYtrpQ7Oxxca%2Fuploads%2FIOvpSvIfMZM1YWwrzWNt%2Flegacy-4a8bae9b0da838385752.png?alt=media)

### Product Code Skip

In the product code skip box, you can add any SKUs that you do not want sent to this print on demand integration. Separate multiple SKUs with a comma or add them on separate lines.

If no part of an order can be submitted to the printer, it will be skipped.**IMPORTANT**\
This feature should only be used if you have a relatively simple setup. If you have a more complex process in place, especially if you are sending orders to more than one integration or vendor, [splitting your orders](/guided-walkthroughs/orders-and-folders/how-to-split-orders) will be a better option for you.

### Inventory Location Match

You can submit your orders to the print on demand integration by using the inventory location match field. For instance, if the inventory location on your items is set as “printerz” for the PrinterZ integration, add printerz in this field. When an order comes in with items in it that have “printerz” in the location field, those items/orders will be submitted to this integration.

This is case and space sensitive. If you use this, please be mindful that the inventory location name you set on each item matches what you put in this field exactly. Orders where the inventory location field is not an exact match will not be submitted to the printer.

For more information on the inventory location for an item, please see the [Inventory Details](/guided-walkthroughs/products-and-inventory/how-to-work-with-inventory-details#store-extra-item-details-in-order-desk) guide.**IMPORTANT**\
Like with Product Code Skip, [splitting your orders](/guided-walkthroughs/orders-and-folders/how-to-split-orders) properly is a much better method. This field is designed for merchants with a simple setup who do not need to split orders.

### Picklist Message Field

In some print on demand integrations, you may also see a Picklist Message Field.

If this option is available in the integration you are using and you want to send a message through to your printer to be added to their picklist, you can do so by placing the message as checkout data on the order you send to them. Set the exact checkout data field name for that message here. This is case and space sensitive.

For information on what checkout data is and how to use it, please read the [How to Work with Checkout Data](/guided-walkthroughs/orders-and-folders/how-to-work-with-checkout-data) guide.

### Gift Message Field

Some print on demand integrations will also have a Gift Message Field.

If you want to send gift messages through to your printer to include with the order, add the checkout data field name here.

For information on what checkout data is and how to use it, read the [How to Work with Checkout Data](/guided-walkthroughs/orders-and-folders/how-to-work-with-checkout-data) guide.

### Related Articles

* Print On Demand Fulfillment


# Rules and Automations


# How to create Your First Automation

The Rule Builder allows you to create powerful automations, without requiring any coding knowledge. It’s the foundation of what makes Order Desk unique and customizable, and is easily one of the most exciting features to implement. It can be used to update order statuses, add an artwork file to an item before fulfillment, flag potential fraud risks, create a PDF with order details, and so much more.

### Watch and Learn

For a quick visual explanation of how the Rule Builder works, check out the following video:

{% embed url="<https://player.vimeo.com/video/604146814?dnt=1&amp;app_id=122963>" %}

### What is a rule?

Rules tell the Order Desk app how it should automate workflows, based on the specific needs of your store.

Think of rules as an *If/Then* statement. *If* something specific happens, *then* you want Order Desk to take action on certain orders or items within orders. In the app, we call these *Events* and *Actions*, respectively.

Rules also contain *Filters*, which allow for fine-tuned, complex automations to be built for the most specific scenarios.

We’ll walk you through a sample rule so you can get a feel for how they operate.

Let’s say that when an order is imported, you’d like to have it automatically tagged with the color **==red==** if the shipping address includes a specific country. That rule would look something like this:

\*\*Event:\*\**Order is Imported*

\*\*Filter:\*\**If Shipping Country* (equals) *FR*

\*\*Action:\*\**Tag Order Red*

The expected end result would be that all imported orders that need to be shipped to France would be tagged red.

Perhaps you sell in multiple regions and want to make sure that the right orders go to the right places for fulfillment. You could create a rule that looks like this:

\*\*Event:\*\**When Order is Imported*

\*\*Filter:\*\**If Sales Channel* (is) *Shopify*

\*\*Filter:\*\**If Shipping Country* (equals) *UK*

\*\*Action:\*\**Change Folder* (to) *New UK Orders*

You’ll notice that this rule has two filters to help specify that *only* orders from Shopify that have a shipping country of UK should be moved into the *New UK Orders* folder.

There are many different actions that can be taken on orders with a rule, and even more are added to your store when certain integrations are enabled.

To build a rule in your store, navigate to the **Rule Builder** page from the sidebar:

![](https://251457507-files.gitbook.io/~/files/v0/b/gitbook-x-prod.appspot.com/o/spaces%2FAQOLMUJWMYtrpQ7Oxxca%2Fuploads%2FqxDyqgCj8ijq1AocVjdV%2Flegacy-0550576317f412e9d947.png?alt=media)

You can build two types of rules. An *Order Rule* takes effect on an entire order, while an *Order Item Rule* will only affect the items within the order. You’ll need to choose a Rule Type before you can set up your rule.

Next, in the **Event** tab, you’ll be able to choose when you’d like your rule to run. *Order Rules* and *Order Item Rules* run on different events, so you’ll see different options here depending on which type you choose.

![](https://251457507-files.gitbook.io/~/files/v0/b/gitbook-x-prod.appspot.com/o/spaces%2FAQOLMUJWMYtrpQ7Oxxca%2Fuploads%2FZGuGs6lpsMq6Du3PCMIb%2Flegacy-826253addea0c003c7fd.png?alt=media)

In the **Filters & Actions** tab, you will be able to specify the criteria in which the rule should run. If you want it to run every time your chosen even occurs, don’t add any filters. Multiple filters can be added to target specific scenarios by narrowing the scope of a rule.

Under **Actions**, you’ll be able to tell Order Desk what to do when all of your chosen criteria are met. Multiple actions can take place, and they occur in order from top to bottom.

![](https://251457507-files.gitbook.io/~/files/v0/b/gitbook-x-prod.appspot.com/o/spaces%2FAQOLMUJWMYtrpQ7Oxxca%2Fuploads%2FODOUAdnJFXmJRxn9RSVj%2Flegacy-3cc477f1c6af6145fc71.png?alt=media)

Before you hit the *Save* button, don’t forget to give your rule a name to help you locate it in your list of rules (example: “Tag France Orders Red”).

### How can I tell when a rule runs?

If you’re not sure whether or not a rule ran successfully, there are tools in place to help you check. Open an order where a rule should have run, then scroll to the **Order History** section. When a rule runs successfully, a record of that action will be logged within the order.

![](https://251457507-files.gitbook.io/~/files/v0/b/gitbook-x-prod.appspot.com/o/spaces%2FAQOLMUJWMYtrpQ7Oxxca%2Fuploads%2F9Z0CEmbwTeBIClBlK58G%2Flegacy-6259a9461002d1d1759e.png?alt=media)

### Why didn’t my rule run?

Sometimes, a rule won’t work when you’d expect it to run. A few quick things you can check could include:

* Did the filters in the rule match the order or item?
* Was your rule enabled? Check to see if the toggle is set to the red or green position.
* Was the event different than the one you chose for your rule? Some events can have similar names.
* Maybe it was the wrong Rule Type. You might have needed to choose another instead.
* When was the rule created? Rules won’t run retroactively.

In many cases, the issue is a small, easy to miss difference between what’s written in the rule and the contents of the order data. If you’re certain the rule filters should have applied but didn’t, contact Order Desk support to review it with you.


# How to Work with Rules

Use the Rule Builder to tell Order Desk how to take action automatically on your orders, items within your orders, or shipments. If you are unfamiliar with rules, please take a few minutes to read [**How Customizable is Order Desk Really?**](/start-here/getting-started-series/quick-start-how-customizable-is-order-desk-really#the-order-desk-rule-builder)

For an explanation of all events, filters and actions, see the [**Rules Reference**](/resources/rules-reference-events-filters-and-actions) guide.

### How to Create a Rule

To create a rule, click on **Rule Builder** under the **Settings** menu in the left sidebar.

![](https://251457507-files.gitbook.io/~/files/v0/b/gitbook-x-prod.appspot.com/o/spaces%2FAQOLMUJWMYtrpQ7Oxxca%2Fuploads%2FkLm9BcPATyiUXHqQ5JpI%2Flegacy-9888fb41e23e9602b9f6.png?alt=media)

When you first visit this page, follow the prompts to create a new rule, or if you don’t see anything on the page, click the **New Rule** button in the top right corner.

![](https://251457507-files.gitbook.io/~/files/v0/b/gitbook-x-prod.appspot.com/o/spaces%2FAQOLMUJWMYtrpQ7Oxxca%2Fuploads%2FLEJPq0jLCLxBGQePm5PT%2Flegacy-2d04061e5ae79943d5eb.png?alt=media)

#### Rule Type

Choose the type of rule you want to create from these options:

* **Order Rule:** the rule will take action on an entire order.
* **Order Item Rule:** the rule will take action on all or certain items within an order.
* **Shipment Rule:** the rule will take action on a shipment added to an order. ![](https://251457507-files.gitbook.io/~/files/v0/b/gitbook-x-prod.appspot.com/o/spaces%2FAQOLMUJWMYtrpQ7Oxxca%2Fuploads%2FWwyy0iLKS9M1KdX5b7kk%2Flegacy-4b8f8fb99184eec047fa.png?alt=media)

#### Event

![](https://251457507-files.gitbook.io/~/files/v0/b/gitbook-x-prod.appspot.com/o/spaces%2FAQOLMUJWMYtrpQ7Oxxca%2Fuploads%2FXV24yTX7EQlToNlpIz8j%2Flegacy-48449abb14ae3835fbbb.png?alt=media)

An event is what happens to an order that can trigger a rule to run. Events include Order is Imported, Shipment is Added and Folder is Changed, to name a few. [**A list of all events can be found here**](/resources/rules-reference-events-filters-and-actions).

You can also create or select a **Custom Event** (an event where you decide the schedule) or a **Custom Button** (an event that runs when you click a button) from the Event tab.

If you are unfamiliar with these options, please refer to the [Custom Event](/guided-walkthroughs/rules-and-automations/how-to-use-custom-events) and [Custom Button](/guided-walkthroughs/rules-and-automations/how-to-use-custom-buttons) guides for information.

#### Filters

![](https://251457507-files.gitbook.io/~/files/v0/b/gitbook-x-prod.appspot.com/o/spaces%2FAQOLMUJWMYtrpQ7Oxxca%2Fuploads%2F0THsGW7j99D8V9tb9Cju%2Flegacy-ad57ae976b1bc4b1683e.png?alt=media)

Filters determine what a rule should run on. If you want a rule to run on every order, you won’t need any filters, but if you need to specify actions for certain orders or items, use filters to tell Order Desk this information.

#### Multiple Filters—AND/OR

Multiple filters can be used in a single rule but will need to be set as either AND or OR.

AND tells the rule that all filters must be true, while OR tells the rule that only one of the filters must be true for the rule to run.

#### AND/OR Example 1

![](https://251457507-files.gitbook.io/~/files/v0/b/gitbook-x-prod.appspot.com/o/spaces%2FAQOLMUJWMYtrpQ7Oxxca%2Fuploads%2FIAVxudglBD3CROxM5Ifo%2Flegacy-0c065b0baad2ed13d1dd.png?alt=media)

In the above rule, when an order is imported, if the shipping country on the order is FR **OR** BE, the order will be sent to Amazon FBA France.

However, what if the same rule uses AND instead of OR?

![](https://251457507-files.gitbook.io/~/files/v0/b/gitbook-x-prod.appspot.com/o/spaces%2FAQOLMUJWMYtrpQ7Oxxca%2Fuploads%2F7vbYN9FVdUHsyTSYYXlk%2Flegacy-69d224239353a0f1c2d2.png?alt=media)

This rule says that when an order is imported, if the shipping country is both FR **AND** BE, to submit it to FBA France. An order can’t have two shipping countries in the address, so this rule will never work.

#### AND/OR Example 2

![](https://251457507-files.gitbook.io/~/files/v0/b/gitbook-x-prod.appspot.com/o/spaces%2FAQOLMUJWMYtrpQ7Oxxca%2Fuploads%2Fr3LZ72UB35ca9OXVGjHQ%2Flegacy-b04bf30d30b289781c19.png?alt=media)

In the above example, if the shipping country is FR **AND** if the order has the SKU 132ML in it, the order will be submitted to FBA France. Both filters have to be true for the rule to send the order to FBA.

However, what if the same rule uses OR instead?

![](https://251457507-files.gitbook.io/~/files/v0/b/gitbook-x-prod.appspot.com/o/spaces%2FAQOLMUJWMYtrpQ7Oxxca%2Fuploads%2FypUF7VC584M3c894SBSp%2Flegacy-fda1c3c91659fd1210c1.png?alt=media)

In this case, the order will either need the shipping country to be FR **OR** a product SKU to be 132ML. If only one of these filters is true, the order will be sent to FBA France.

#### Actions

Actions are what happens when the rule runs and takes action on your orders or order items. Multiple actions can be added to a single rule. For a complete list of actions available and what each means, see the [**Rules Reference**](/resources/rules-reference-events-filters-and-actions) guide:

* [**Order Rule Actions Reference**](/resources/rules-reference-events-filters-and-actions#order-rule-actions-reference)
* [**Order Item Rule Actions Reference**](/resources/rules-reference-events-filters-and-actions#order-item-rule-actions-reference)
* [**Shipment Rule Actions Reference**](/resources/rules-reference-events-filters-and-actions#shipment-rule-actions-reference)

### How to Run an Event

You may need to manually run an event instead of waiting for it to happen.

For example, if you created a rule for the Order is Imported event, but there were already orders that had imported before the rule existed that you need to run the rule on. To force an event to run, click the **Run an Event** button:

![](https://251457507-files.gitbook.io/~/files/v0/b/gitbook-x-prod.appspot.com/o/spaces%2FAQOLMUJWMYtrpQ7Oxxca%2Fuploads%2Ffj8YgK3aA6HbPPadkt4M%2Flegacy-1f87f6a418c179b294b6.png?alt=media)

From here, select the event you want to run and your target folder or order, then click **Run Event**.

![](https://251457507-files.gitbook.io/~/files/v0/b/gitbook-x-prod.appspot.com/o/spaces%2FAQOLMUJWMYtrpQ7Oxxca%2Fuploads%2FLio5jmn59nvhZ76VAfu8%2Flegacy-a066fa709b829a162799.png?alt=media)

Order ID is the order number. Internal ID is the number from the Order Desk URL for the order.

### How to Test Rules

To test a rule, first disable the rule by clicking on the toggle on the rule, turning it red. This will prevent the rule from running accidentally while testing.

![](https://251457507-files.gitbook.io/~/files/v0/b/gitbook-x-prod.appspot.com/o/spaces%2FAQOLMUJWMYtrpQ7Oxxca%2Fuploads%2F1bBYZ3mQ0Z4zypA3ZPdb%2Flegacy-d44073f362f40136eb74.gif?alt=media)

Next, duplicate that rule by clicking on the duplicate button:

![](https://251457507-files.gitbook.io/~/files/v0/b/gitbook-x-prod.appspot.com/o/spaces%2FAQOLMUJWMYtrpQ7Oxxca%2Fuploads%2FxjPnalWOo00ShITThCb3%2Flegacy-51ded57637041d890b46.png?alt=media)

This is so you can test with the copied rule while ensuring the original rule still exists and isn’t changed.

On the copied rule, change the event to **Order Confirmed**.

![](https://251457507-files.gitbook.io/~/files/v0/b/gitbook-x-prod.appspot.com/o/spaces%2FAQOLMUJWMYtrpQ7Oxxca%2Fuploads%2FRH79EYbnlMv6cTNuh5yi%2Flegacy-b35f7033579192ab4545.png?alt=media)

If you are already using the Order Confirmed event for any other rules, disable those rules before doing any testing on this rule.

Keep the filters the same, but remove all actions from the copied rule. Add a new action to tag the order a color of your choice.

![](https://251457507-files.gitbook.io/~/files/v0/b/gitbook-x-prod.appspot.com/o/spaces%2FAQOLMUJWMYtrpQ7Oxxca%2Fuploads%2FVv4m9M8kFTAWytf5VjXv%2Flegacy-61412691c5ee8e24681e.png?alt=media)

Enable the rule.

Find an order that should be affected by the rule and follow the instructions for [how to run an event](#how-to-run-an-event). Choose the Order Confirmed event and enter the order number as the target.

If the rule successfully ran on the order, the order will have changed to the color you selected. It’s a good idea to run the event on a few other orders where the rule shouldn’t apply to ensure that it does not take action.

If the rule is working as expected, you can delete the copied rule and enable the original rule.

### Rule Order

Rules will run in sequential order based on their location under the trigger event. The order of your rules can be edited by simply dragging and dropping them in the Rule Builder.

![](https://251457507-files.gitbook.io/~/files/v0/b/gitbook-x-prod.appspot.com/o/spaces%2FAQOLMUJWMYtrpQ7Oxxca%2Fuploads%2F2xJN0qN7z200Qa3S9myk%2Flegacy-6aa0a74c5f1a54e82502.gif?alt=media)

### Loops

Be careful to avoid loops, which are rules where the event and action will loop continuously. For example, a rule that says to create a PDF when a PDF is created will continuously create PDFs, causing your store to slow down considerably.

To protect against an infinite loop, you can only run 100 rule actions on a single order for a single event before the Rule Builder stops running.

If in doubt, contact Order Desk support to review your rules.


# How to Add an Item to an Order with a Rule

With Order Desk, you can set up a rule to add a new item to an order. This guide walks you through how to create this type of rule. Please note that this will not replace one item with another, but will instead add an additional item to the order. If you need to replace one item with another, see the [**Code Replace**](/guided-walkthroughs/products-and-inventory/how-to-use-code-replace) guide for instructions.

### Adding Filters

In the Rule Builder, start by selecting the **Order Rule** rule type:

![](https://251457507-files.gitbook.io/~/files/v0/b/gitbook-x-prod.appspot.com/o/spaces%2FAQOLMUJWMYtrpQ7Oxxca%2Fuploads%2Fum0lGCqrFypFhdy47jEU%2Flegacy-2248dada8189996b8978.png?alt=media)

For this example, we’ll use the **Order is Imported** event to create a rule that adds a new item when the order is imported. You can choose a different event depending on when you want the item added:

![](https://251457507-files.gitbook.io/~/files/v0/b/gitbook-x-prod.appspot.com/o/spaces%2FAQOLMUJWMYtrpQ7Oxxca%2Fuploads%2FPipSAPg92MvTGqlgcI9K%2Flegacy-086ba5f631de983fe3c8.png?alt=media)

Under the **Filters & Actions** tab, click **Add a Filter** to set any conditions that must be met for the rule to run.

![](https://251457507-files.gitbook.io/~/files/v0/b/gitbook-x-prod.appspot.com/o/spaces%2FAQOLMUJWMYtrpQ7Oxxca%2Fuploads%2Fpk5n8JnJPYPUlfGQ95Aj%2Flegacy-8c571406fb0109a7b100.png?alt=media)

In this example, we’ll apply a filter that says **If Item Code** is **YT-2400**, run the rule. This means the rule will run on any order that contains the SKU **YT-2400**.

![](https://251457507-files.gitbook.io/~/files/v0/b/gitbook-x-prod.appspot.com/o/spaces%2FAQOLMUJWMYtrpQ7Oxxca%2Fuploads%2FTzN6BxFhb2tv1CcglIKo%2Flegacy-2609c1cc5628709d8b18.png?alt=media)

**YT-2400** is just an example SKU. For your rule, use the SKU or filters that match your needs. You can also add additional filters if needed.

### Adding Actions

Select **Add an Order Item** as the action:

![](https://251457507-files.gitbook.io/~/files/v0/b/gitbook-x-prod.appspot.com/o/spaces%2FAQOLMUJWMYtrpQ7Oxxca%2Fuploads%2FEKvNaGDy60teH6Hqlzw5%2Flegacy-ab0b0f30ab986144aeee.png?alt=media)

In the empty box below **Add an Order Item**, you’ll need to enter order JSON. Here’s a sample format:

```
{ "name": "XXX", "code": "XXX", "quantity": 1, "price": 2.00 }
```

Copy the JSON above, or use the order\_item section in the [**field name list**](/resources/order-desk-field-names) to find the fields you need. Replace the XXX values with your product name and SKU, then paste it into the box:

![](https://251457507-files.gitbook.io/~/files/v0/b/gitbook-x-prod.appspot.com/o/spaces%2FAQOLMUJWMYtrpQ7Oxxca%2Fuploads%2FlsgTDLVDoUZRGw6HVf96%2Flegacy-74334bccaf2f9a8d72e0.png?alt=media)

Name the rule and save it.


# How to Use Custom Events

Use the [Rule Builder](/start-here/getting-started-series/quick-start-how-customizable-is-order-desk-really#the-order-desk-rule-builder) to create custom events that will run on a schedule that you set up. A custom event by itself will only look at the orders in a folder and not take any action on them, however you can create rules to run on your custom events that will take action when orders in the folder match the filters in the rule.

This is ideal for having the Rule Builder watch a timestamp or the order date and then take action when a certain amount of time has passed.

### Create Custom Event

Custom Events can be created in the **Rule Builder**.

![](https://251457507-files.gitbook.io/~/files/v0/b/gitbook-x-prod.appspot.com/o/spaces%2FAQOLMUJWMYtrpQ7Oxxca%2Fuploads%2FUEuNK4bFujYtsqDwPnma%2Flegacy-b819100d142137d4ae2f.png?alt=media)

After choosing your Rule Type, in the Event tab, you will be able to create a custom event.

![](https://251457507-files.gitbook.io/~/files/v0/b/gitbook-x-prod.appspot.com/o/spaces%2FAQOLMUJWMYtrpQ7Oxxca%2Fuploads%2F5UzdqZNKG7v6UmPuKlqt%2Flegacy-6854ef05a75a3e703d1d.png?alt=media)

Fill out the details for your custom event.

![](https://251457507-files.gitbook.io/~/files/v0/b/gitbook-x-prod.appspot.com/o/spaces%2FAQOLMUJWMYtrpQ7Oxxca%2Fuploads%2F6BwSzlABAI7Y0TURoDI7%2Flegacy-aaba7937249d7c538ef6.png?alt=media)

**Event Name**

Give the custom event a unique and easily identifiable name so you can select the event in your rule and view it in your appointments later.

**Target Folder**

Choose the folder you want the custom event to run on. A custom event can only run on a single folder.

**Repeat Every**

Set how often you want to run the custom event. The minimum repeat time is 5 minutes.

**Start Time**

If you need to set the exact date and/or time that the custom event starts to run, adjust that here, otherwise your event will begin to run immediately once created. You can change the time the event runs after it is created from the **View Appointments** page, accessible from the left sidebar under the **Tools** menu.

### Create Rule

Once you have a custom event, you will need to make a rule that will take action on any orders if the filters match when the event runs.

**Late Orders Example**

The most common use for custom events is to find orders that have not shipped yet.

For example, if you want to check your Prepared folder every 2 hours for orders that are older than 5 days, you can make a custom event that runs every 120 minutes on the Prepared folder. Create a rule for that custom event that says:

**Event: When Custom Event Runs**\
**Filter: If Order Date Created&#x20;*****before time*****&#x20;-5days**

Then set the actions you want to happen, such as moving the order to a different folder or sending the admin an email notification.

To create your rule, in the Event tab, find your custom event from the dropdown, or select it from the available custom events in the lower right corner of the Rule Builder.

![](https://251457507-files.gitbook.io/~/files/v0/b/gitbook-x-prod.appspot.com/o/spaces%2FAQOLMUJWMYtrpQ7Oxxca%2Fuploads%2FEpD78XzIsogW3C1P1Bo7%2Flegacy-a82691dc7054354984a8.png?alt=media)

For the filter choose **If Order Date Created** or **If Order Date Updated**, set the operator to **before time**, and set the value to *negative* with the time you want to have passed, such as **-5days**, **-12hours** or **-2weeks**.

![](https://251457507-files.gitbook.io/~/files/v0/b/gitbook-x-prod.appspot.com/o/spaces%2FAQOLMUJWMYtrpQ7Oxxca%2Fuploads%2FnEhgWUNdb5QiJclw6UKh%2Flegacy-70ec169b39032ca71812.png?alt=media)

Add the actions you want to have taken on late orders. If you want to send the admin an email notification, follow the instructions in [this guide](/guided-walkthroughs/templates-emails-and-order-documents/how-to-work-with-email-templates) for setting up that email template.

Make sure to move the order into a different folder as one of your actions unless you want the same actions to be taken on the order each time the custom event runs while it is still in this same folder and the filters continue to match. Alternatively, set a metadata tag with your rule (example: late|true) and then add an additional filter to the rule to look for that metadata tag on the order (example: If Order Metadata Field late Does Not Equal true). If you need help with this step, please contact Order Desk support.

**Using Timestamps**

If you need to set your delay based on an event that happened to the order after it imported into Order Desk, you can add your own timestamps with the Rule Builder. For detailed instructions, please see the [How to Work with Timestamps](/guided-walkthroughs/orders-and-folders/how-to-work-with-timestamps) guide.

### FAQ

**Why can’t I make my custom event more frequent than 5 minutes?**

Appointments running more than once every 5 minutes will cause extreme data usage which can impact the performance of the app. For optimum performance, we request that your appointments not be more often than necessary and have found that 5 minutes is an adequate timeframe frequency for most merchants using Order Desk who need to regularly and frequently check their orders with custom events.

If you are looking to automatically refresh orders every few seconds with new information or details using custom events, this may not be the right app for your needs. If this is the case, please contact Order Desk support and we will be happy to provide further advice or assistance for your specific situation.

**Can I edit a custom event after it’s been created?**

Custom events cannot be edited after they are created, with one exception. You can change the time they run (not the frequency) from your store’s appointments.

To do this, click on **View Appointments** in the left sidebar under the **Tools** menu.

Find the custom event you want to update and click on **Edit**, then adjust the **Next Run Date**.

**How do I delete a custom event?**

> When rules that run on Custom Events are deleted, the Custom Events aren’t deleted with them. This means that the events can keep running in the background even when there’s no rule available for them to trigger.

To delete a custom event, click on **View Appointments** in the left sidebar under the **Tools** menu.

Find the custom event you want to delete and click on **Edit**, then click **Delete Appointment**.

**How do I know which folder my custom event is running on?**

You can view the name of the folder your custom event is running on by clicking on **View Appointments** in the left sidebar under the **Tools** menu and looking beside the name of the custom event:

![](https://251457507-files.gitbook.io/~/files/v0/b/gitbook-x-prod.appspot.com/o/spaces%2FAQOLMUJWMYtrpQ7Oxxca%2Fuploads%2FzGKyfIKnQuecVTfeBTsu%2Flegacy-74a37cb92e7f4152270c.png?alt=media)


# How to Use Custom Buttons

Custom buttons can be created to run a rule when the button is clicked for an order or a group of orders.

If you aren’t familiar with the Rule Builder yet, take a few minutes to read through [this guide](/start-here/getting-started-series/quick-start-how-customizable-is-order-desk-really#the-order-desk-rule-builder).

### Create Button

Custom buttons are created in the Event tab of the Rule Builder.

![](https://251457507-files.gitbook.io/~/files/v0/b/gitbook-x-prod.appspot.com/o/spaces%2FAQOLMUJWMYtrpQ7Oxxca%2Fuploads%2F3N6XHMnMT998ZnY8RmfY%2Flegacy-f199cb614ebe85cd764c.png?alt=media)

When creating a custom button, give it a name that will be easy to understand later when working on your orders.

Once created, the button will appear in your folders:

![](https://251457507-files.gitbook.io/~/files/v0/b/gitbook-x-prod.appspot.com/o/spaces%2FAQOLMUJWMYtrpQ7Oxxca%2Fuploads%2FVoLstbUjyWnkm0zNtyhi%2Flegacy-d9d9631c9e75bc4ee58f.png?alt=media)

and on the order details page:

![](https://251457507-files.gitbook.io/~/files/v0/b/gitbook-x-prod.appspot.com/o/spaces%2FAQOLMUJWMYtrpQ7Oxxca%2Fuploads%2FayQkX1kemHjfB24bLvue%2Flegacy-3ef02fad9dfa4d458377.png?alt=media)

### Create Rule

To set up a rule to run on the click of your custom button, first make sure the button you created is selected for the Event.

![](https://251457507-files.gitbook.io/~/files/v0/b/gitbook-x-prod.appspot.com/o/spaces%2FAQOLMUJWMYtrpQ7Oxxca%2Fuploads%2FaJi9RdUqn22wWKfaf6SR%2Flegacy-5faf79620d35c055cbaa.png?alt=media)

Add filters, if necessary, and choose the action(s) you want to have happen to an order when the button is clicked.

![](https://251457507-files.gitbook.io/~/files/v0/b/gitbook-x-prod.appspot.com/o/spaces%2FAQOLMUJWMYtrpQ7Oxxca%2Fuploads%2FgSe6iQETSQTusbolcOKd%2Flegacy-97000e6a8f29779871a5.png?alt=media)

Name and save the rule.

When creating a custom button, you will have the option to create a dropdown out of multiple rules attached to the button.

To set this up, select **This button will be a dropdown to select from any attached rule**:

![](https://251457507-files.gitbook.io/~/files/v0/b/gitbook-x-prod.appspot.com/o/spaces%2FAQOLMUJWMYtrpQ7Oxxca%2Fuploads%2FmDWGW6KbHWCMEFvSYO5y%2Flegacy-66612d340dceb5e64ed2.png?alt=media)

Once created, you can add as many rules to the button as you need:

![](https://251457507-files.gitbook.io/~/files/v0/b/gitbook-x-prod.appspot.com/o/spaces%2FAQOLMUJWMYtrpQ7Oxxca%2Fuploads%2FeAm2p3FnXEn2YQJVth5U%2Flegacy-0c4e72eaf5768c5df04a.png?alt=media)

Each rule’s action will act as a separate option in a dropdown that appears when you click the button:

![](https://251457507-files.gitbook.io/~/files/v0/b/gitbook-x-prod.appspot.com/o/spaces%2FAQOLMUJWMYtrpQ7Oxxca%2Fuploads%2FPosXTG9cPdOEAheKkdUk%2Flegacy-41f3a6078bc53699de9d.gif?alt=media)

### Delete Button

You can delete custom buttons from the Event tab in the Rule Builder.

![](https://251457507-files.gitbook.io/~/files/v0/b/gitbook-x-prod.appspot.com/o/spaces%2FAQOLMUJWMYtrpQ7Oxxca%2Fuploads%2FZGOpbkLM3ydybp5k6GS3%2Flegacy-ef53f8fc1180a3da5965.png?alt=media)

After clicking Delete a Button, you can click the x next to any button you want to delete.


# How to Post Order Information to a Custom Script

With Order Desk, you can post order information to a custom script using the [Rule Builder](/guided-walkthroughs/rules-and-automations/how-to-work-with-rules). One of the rule actions that can be triggered on an event of your choice is to send order details to a third-party endpoint.

This is helpful if you want to keep track of inventory or perform a custom function when something happens to an order—when a shipment is added or it’s put in the Closed folder, as examples. The action in the rule builder for this is called **Post Order JSON**:

![](https://251457507-files.gitbook.io/~/files/v0/b/gitbook-x-prod.appspot.com/o/spaces%2FAQOLMUJWMYtrpQ7Oxxca%2Fuploads%2FcljE0KRMYh87x0FNG9TJ%2Flegacy-2d198d06a58c2f5c601b.png?alt=media)

You can also choose whether to include the order’s history in the data being posted by setting the **Include History** option to **Yes**.

### Format

The order data will be sent in JSON format via POST to your custom URL with the field name *order*.

The format will be using Order Desk field names, for a reference to these, [click here](/resources/order-desk-field-names).

### Testing

The easiest way to test this functionality and see the data returned is to set up a temporary request bin at a service like [Mockbin](https://mockbin.org/).

Set up your rule and use the testing mechanism to send order data to this URL. You can then inspect it to see exactly what you will be getting from Order Desk.

To send immediately, after you perform the test, go to your [View Appointments](https://app.orderdesk.com/tools/appointments) page and run the pending **Send Order To Website** action:

![](https://251457507-files.gitbook.io/~/files/v0/b/gitbook-x-prod.appspot.com/o/spaces%2FAQOLMUJWMYtrpQ7Oxxca%2Fuploads%2FOWc71vYP0xPNoQrKcaC6%2Flegacy-58bf001215324180497a.png?alt=media)

If there’s an error, you’ll see the response returned.

While testing, you may want to set your response status code to 400 so you can continue to run the appointment over and over while making sure everything returns correctly.

### Response

Order Desk expects your script to return a status code of 200 or 201. If your script returns a status code higher than 201, the post will be considered failed and will be retried up to five times over the course of two hours.

**A timeout will occur after 30 seconds and will last 10 seconds before the next try.**

After the two hours has elapsed, you will need to manually resubmit your request from the [View Appointments](https://app.orderdesk.com/tools/appointments) page.

### Security

Order Desk will pass in an “X-ORDER-DESK-STORE-ID” header with the ID of your store. You can use this to help avoid any spoofing.

For extra security, set an API key and another header will be set called “X-ORDER-DESK-HASH”. This will be an hmac encoded string of the order value being posted.

Here is sample PHP code to ensure that the posted order details came from Order Desk:

### Embedded code sample

```
<?php
//Check For Order
if (!isset($_POST['order'])) {
        header(':', true, 400);
        die('No Data Found');
}
 
//Cbeck Store ID
//Be sure to set your store ID. Ask Order Desk support if you aren't sure what it is.
if (!isset($_SERVER['HTTP_X_ORDER_DESK_STORE_ID']) || $_SERVER['HTTP_X_ORDER_DESK_STORE_ID'] != "YOUR-STORE-ID") {
        header(':', true, 403);
        die('Unauthorized Request');
}
 
//Check the Hash (optional)
//The API Key can be found in the Advanced Settings section. Order Desk Pro only
if (!isset($_SERVER['HTTP_X_ORDER_DESK_HASH']) || hash_hmac('sha256', $_POST['order'], 'YOUR_API_KEY') !== $_SERVER['HTTP_X_ORDER_DESK_HASH']) {
        header(':', true, 403);
        die('Unauthorized Request');
}
 
//Check Order Data
$order = json_decode($_POST['order'], 1);
if (!is_array($order)) {
        header(':', true, 400);
        die('Invalid Order Data');
}
 
//Everything Checks Out -- do your thing
echo "<pre>" . print_r($order, 1) . "</pre>";
```


# Templates, Emails, and Order Documents

These guides cover how to work with spreadsheets, generate files, create order documents, and create and send emails in Order Desk.


# How to Import a Spreadsheet

In some cases, you may need to import your data into Order Desk, whether that be orders, updates to orders, inventory items or shipments (package tracking information). This is useful, for instance, when you have orders coming in from a source that we don’t have an integration with. You might also have a large inventory that you would rather add to Order Desk from a spreadsheet instead of manually entering each item. Many people also use this feature to import shipments from their warehouse.

To import data into Order Desk, you will need to have a.csv,.xlsx, or.txt file with your data. You won’t be able to simply import that data directly into Order Desk, however. Since each file will be unique per store, fulfillment service, personal preference, etc., you’ll first have to create a template to match the information in your specific file so that it can be translated into Order Desk’s names for each field.

### Import Data Page

To access the Import Data page in Order Desk, click on **Import Data** under the **Tools** menu in the left sidebar.

![](https://d33v4339jhl8k0.cloudfront.net/docs/assets/57b0032590336059d4edf94f/images/5a55004e042863193800bb88/file-RtS6cGLLfF.png)

If you haven’t set up any templates yet, you’ll be directed to the **Setup Import Template** page, where you can begin to create your first template.

![](https://d33v4339jhl8k0.cloudfront.net/docs/assets/57b0032590336059d4edf94f/images/5ce5698b0428634b855992c9/file-0hiUIoVbWj.png)

If you already have at least one import template created, you’ll be directed to the **Manage Import Templates** page. From here you can edit an existing template or create a new one by clicking on **Add New Import Template** in the top right.

![](https://d33v4339jhl8k0.cloudfront.net/docs/assets/57b0032590336059d4edf94f/images/636e73846c146d4e429d04c0/file-OMFxGZDZKc.png)

**Set Up Your Template**

![](https://d33v4339jhl8k0.cloudfront.net/docs/assets/57b0032590336059d4edf94f/images/5ce569b00428634b855992d1/file-gydrNvgpLl.png)

To begin, you will need either your full file or a smaller sample file with a few entries already added to it. If you are planning to upload a file with more than a few dozen lines, we recommend using a sample file of just the first few lines to create the template.

**Name**

Give your template a name that will be easy for you to identify later. You may end up with several templates, so naming each something uniquely identifiable will allow you to work more quickly in the future when looking at your list of templates.

**Import Type**

Select the import type for this specific template from Orders, Shipments, Inventory Items or Order Modify:

* Select Orders to create a template to import a file of new orders into Order Desk.
* Select Shipments to create a template to import a file of tracking and fulfillment details for orders in Order Desk that have been fulfilled and need to be updated.
* Select Inventory Items to create a template to import your product details into Order Desk so they can be [synced with your orders](/guided-walkthroughs/products-and-inventory/how-to-work-with-inventory-details#sync-details-into-orders).
* Select Order Modify to create a template that will let you update orders that are already in Order Desk. Add a fulfillment ID, order notes, checkout data, metadata, payment status or change the folder with this template.

**Delimiter**

Select the delimiter type of the sample file you are using (.csv files are generally Comma Separated Values). The file may have a tab, pipe or semicolon separating the values. It’s important to choose the correct delimiter type based on how your specific file separates each field.

Add your file and upload it to Order Desk.

**IMPORTANT**

You will need to create a new template or update your existing one if your file layout or number of columns changes. Each template will only work when importing data from a file that matches the exact same columns in the exact same order as the template was created to receive.

### Edit Your Template: Details

![](https://d33v4339jhl8k0.cloudfront.net/docs/assets/57b0032590336059d4edf94f/images/581ccc27c697914aa837fdfb/file-XdO7ihSz4H.png)

Once your file is uploaded, you’ll be able to configure your import template. Let’s look at **Details** first.

**Template Name**

You can name or re-name your import template in this field.

**Order Match Column**

Templates for importing orders will have one extra setting that templates for shipments and inventory items don’t have, the **Order Match Column**.

![](https://d33v4339jhl8k0.cloudfront.net/docs/assets/57b0032590336059d4edf94f/images/5a5510432c7d3a194367fdc6/file-3sLUIk6gHe.png)

If your file has more than one line per order (separate lines for each item in the order, for instance), you can set the template up to read a specific column of your file to compare the data to the same column in the previous line. If the data is the same (for instance, if the Order Number is the same on more than one line), Order Desk will add the item details into one order instead of multiple orders or skipping the extra lines.

Choose which column in your file Order Desk should read to compare details from line to line from the Order Match Column dropdown, or leave it set to None if you only have one line per order.

**Skip First Line**

If the first line of your file is used to describe each column, you can select **Skip First Line** to ignore this information:

![](https://d33v4339jhl8k0.cloudfront.net/docs/assets/57b0032590336059d4edf94f/images/5a54de37042863193800b9e1/file-wCh2SjsWnI.png)

If, however, the first line of your file is data that needs to be imported, make sure to leave this unchecked:

![](https://d33v4339jhl8k0.cloudfront.net/docs/assets/57b0032590336059d4edf94f/images/5a54de7f2c7d3a194367fb80/file-xS9cERYEMH.png)

**Send Email Confirmation**

A unique email address is created for each import template. This can be found just above the Import Template details:

![](https://d33v4339jhl8k0.cloudfront.net/docs/assets/57b0032590336059d4edf94f/images/5a5513042c7d3a194367fdd6/file-9hNnpTD5HP.png)

This email address can be used to import files to your Order Desk store as long as the file matches the import template. If you email your file to this unique address, you can select the **Send Email Confirmation** setting in the details to receive a report on the import. This will be sent to the email address that sent the file.

![](https://d33v4339jhl8k0.cloudfront.net/docs/assets/57b0032590336059d4edf94f/images/5a55218b042863193800bd01/file-N8CZNQ5ZbU.png)

**Automatically Download Files From FTP Server**

Another option to import data into Order Desk is to download your files through FTP. Select **Automatically Download Files From FTP Server** to bring up the credential fields for this option. Order Desk will check your FTP server every 12 hours. The specific timing of this check can be adjusted on the View Appointments page after you enable this setting.

![](https://d33v4339jhl8k0.cloudfront.net/docs/assets/57b0032590336059d4edf94f/images/68f106f459e40a723dfa85b2/file-YSbZNVJR7S.png)

**TIP: TESTING YOUR FTP CONNECTION**

After entering your credentials, you can test your FTP connection by clicking **Test Connection**.

![](https://d33v4339jhl8k0.cloudfront.net/docs/assets/57b0032590336059d4edf94f/images/68f10868c1888b0a1bdec1a2/file-5x08PdCZ9n.png)

A dialog will appear where Order Desk attempts to connect to your FTP server. After a few seconds, you’ll see a message confirming whether the connection was successful.

![](https://d33v4339jhl8k0.cloudfront.net/docs/assets/57b0032590336059d4edf94f/images/68f10886403b9b58df8df6d8/file-0lQ2XGvE2X.png)

This provides a handy way to verify and troubleshoot any connection issues before starting your actual imports.

**Skip Unlisted Items**

Available only when the **Import Type** is set to **Inventory Items**, this option tells Order Desk to skip products that don’t already exist in your inventory.

This is useful if you’re importing a spreadsheet that includes SKUs you don’t want in your store. With this setting enabled, Order Desk will only update items that are already in your inventory and ignore anything else.

### Edit Your Template: Match Fields

The most important part of the import template setup process is field matching. When you upload your sample file, Order Desk will display each of the columns from your file with the sample data and let you choose which Order Desk field is the right match for each piece of information. This allows Order Desk to import your data with the right field names, and lets you import your data without changing your file format.

The Match Fields section will look something like this, though it will use the data from your own file:

![](https://d33v4339jhl8k0.cloudfront.net/docs/assets/57b0032590336059d4edf94f/images/663d06db5027f87fcc6be6d7/file-qJjqvdyqCp.png)

The column number will be listed down the left, the First Row, with your field descriptions, is listed next. **Field Setup** is where you will choose which Order Desk field matches yours. Your Sample Data will be listed down the right side to help you choose which Order Desk Field should be used to match your data.

In this screenshot, as you can see, the first field is the Item Code. If you want this field included in your import template, click on the Field Setup dropdown and scroll through the available fields until you find the one that matches yours. In this example, we’re looking for Order ID, which is called Code/SKU in Order Desk.

![](https://d33v4339jhl8k0.cloudfront.net/docs/assets/57b0032590336059d4edf94f/images/663d07071bee2d183948cd94/file-RBDpNlMBnz.gif)

Match each field necessary. Your fields likely won’t all match Order Desk’s name for each, which is why this matching process is necessary. In the second column, for instance, the sample file calls it First Name, but Order Desk will need it to either be Shipping First Name or Customer First Name.

**IMPORTANT** When a file has multiple tracking numbers in one row for an order, Order Desk will only accept the first tracking number to prevent any upload errors. As an example, if Order #1234 has three tracking numbers listed under the Tracking Number field (**trackingnumber1**, **trackingnumber2**, **trackingnumber3**), only **trackingnumber1** will be imported.

**💡 ADDING TRACKING NUMBERS TO SPECIFIC ITEMS IN AN ORDER**

When mapping shipment files, if you need to specify the items associated with each tracking number, you can use any of the following formats for the item column in your import file:

1. `"123,456"` — ***A quoted, comma-separated format***

This marks the order lines as shipped regardless of quantity. The main delimiter of your file doesn’t matter in this case.

Here’s an example of how this might look in a raw CSV file:

![](https://d33v4339jhl8k0.cloudfront.net/docs/assets/57b0032590336059d4edf94f/images/6911eb32cedbe252e8ccd239/file-Toqtkc3Kok.png)

In this example, SKUs **123** and **456** will be marked as shipped with the first tracking number (**testtrack1**), while only SKU **789** will be marked as shipped with the second tracking number (**testtrack2**).

This option is useful if you don’t need to specify item quantities for each tracking number.

If you do need to specify item quantities, use one of the JSON-based formats below.

1. A ***JSON format using double-quoted*** **strings**

`"[{""code"": ""123"", ""quantity"": 1}, {""code"": ""456"", ""quantity"": 1}]"`

The main delimiter of your file doesn’t matter here either.

![](https://d33v4339jhl8k0.cloudfront.net/docs/assets/57b0032590336059d4edf94f/images/6911ebf8a98e972e040fa6c5/file-lEFDWLYfEx.png)

This will mark both SKUs **123** and **456** as shipped with the tracking number, and it also includes the quantity of each item shipped.

1. ***A standard JSON format***

`[{"code": "123", "quantity": 1}, {"code": "456", "quantity": 1}]`

![](https://d33v4339jhl8k0.cloudfront.net/docs/assets/57b0032590336059d4edf94f/images/6911ec80b7a3ac1862c59c75/file-cJrhLDS1Dj.png)

This works the same way as the previous example but requires that the main delimiter in your file be something other than a comma. If you prefer a format that isn’t delimiter-sensitive, use the previous (double-quoted JSON) option instead.

### Edit Your Template: Manual Mapping

![](https://d33v4339jhl8k0.cloudfront.net/docs/assets/57b0032590336059d4edf94f/images/5a9eabbb04286374f7089b8f/file-GVVhtgNAex.png)

The manual mapping section allows you to set specific data in your imports. For instance, you can always set the *shipping.country* to “US” or the *source\_name* to “Shopify”. Add one per line in this format: `name=value` for example:

**shipping.country = US**

**source\_name = Shopify**

For a list of field names, [refer to this guide](/resources/order-desk-field-names) or contact Order Desk support for help.

There are also some special mapping features that can be used in the manual mapping box. Details are given for each below.

**source\_id\_prefix**

For order imports, use `source_id_prefix` to set a value as the prefix on all Order IDs. For example, if you want all Order IDs to have the prefix SH, use:

**source\_id\_prefix = SH**

**code\_prefix**

For inventory item imports, use `code_prefix` to set a prefix on all SKUs being imported. For example, if you want all SKUs in the import to have the prefix SH, use:

**code\_prefix = SH**

**SKU Replace**

To replace any part of a SKU on an inventory import, use the following code, replacing **a** and **b** with the characters you need to look for (a) and replace (b):

**code\_twig={{ code|replace({‘a’: ‘b’}) }}**

As an example, if you need to change the SKU 12 34 to 12-34 (replacing the space with the dash), you would enter this in the manual mapping field:

`code_twig={{ code|replace({' ': '-'}) }}`

**order\_id\_prefix\_requirement**

For shipment and order import templates, if a specific prefix is required on the order number in the file for it to be added to Order Desk, use `order_id_prefix_requirement` to look for it in the file. For example, if a file has several types of orders in it, but only the orders with the prefix OD are meant for Order Desk, use:

**order\_id\_prefix\_requirement = OD**

All other orders in the file will be skipped.

**order\_id\_remove**

For shipment and order import templates, use order\_id\_remove to remove a specific part of the order number when adding it to Order Desk. As an example, if a fulfillment service adds its own prefix of WHS- to order numbers before sending a shipment file back to Order Desk, remove the prefix by using:

**order\_id\_remove = WHS-**

This can be used for any part of the order number, not just a prefix.

**carrier\_conversion**

For shipment imports, use `carrier_conversion` to correct a non-standard carrier code. For example, if the shipper writes FDX for FedEx shipments, to correct it when the file imports into Order Desk, use:

**carrier\_conversion = FDX=FedEx**

**N/A = BLANK**

For any import type, add `N/A = BLANK` to the manual mapping box to remove any fields that have N/A in the file import. These fields will be left blank instead.

**remove\_leading\_zeroes = true**

To remove leading zeros from a shipment file, use `remove_leading_zeroes = true` to the manual mapping box.

When importing a shipment file that does not include the carrier with the tracking details, you can pull the carrier name from the order directly if it was pre-set as order metadata by a rule.

To do this, create a rule, using the Order Rule type, and choose the event you want this rule to run on. Add filters, if necessary, then for the action, choose **Set Order Metadata Value** as the action and set the Field Name to **carrier** and the Field Value to the carrier name you need to use:

![](https://d33v4339jhl8k0.cloudfront.net/docs/assets/57b0032590336059d4edf94f/images/5e82558704286364bc978655/file-uExrWe2tQk.png)

In the manual mapping field of the import template, add `metadata_carrier_reference_field=carrier` to pull the order metadata value from the order. It will be added to the order shipment information when the tracking details are added from the file.

**checkout\_data\_carrier\_reference\_field\_name=carrier**

When importing a shipment file that does not include the carrier with the tracking details, you can pull the carrier name from the order directly if it was pre-set as checkout data with a rule.

To do this, create a rule, using the Order Rule type, and choose the event you want this rule to run on. Add filters, if necessary, then for the action, choose **Set Checkout Data Value** as the action and set the Field Name to **carrier** and the Field Value to the carrier name you need to use:

![](https://d33v4339jhl8k0.cloudfront.net/docs/assets/57b0032590336059d4edf94f/images/5e82593c2c7d3a7e9aea10ec/file-NhOW4SVFgl.png)

In the manual mapping field of the import template, add `checkout_data_carrier_reference_field_name=carrier` to pull the checkout data value from the order. It will be added to the order shipment information when the tracking details are added from the file.

**tracking\_url\_template**

Set `tracking_url_template=http://customcarrierurl/?tracking=XXXXXX`. We will replace the X’s with your tracking number and set this as the tracking URL on the shipment.

**metadata\_tracking\_url\_field**

Set `metadata_tracking_url_field=CUSTOM_URL` and we will look in the metadata of the for the CUSTOM\_URL field in order to build our tracking URL template. This is a way to use rules to set your custom tracking URL per order.

**reset\_stock\_to\_zero**

Set `reset_stock_to_zero` in an inventory import template to have all SKUs reset to 0 right before the import runs. The SKUs from the file will then be adjusted accordingly, and all other SKUs will remain 0.

**stock\_subtract**

When importing an inventory file, you can use **stock\_subtract=0** in the Manual Mapping field to have any negative quantities set to 0 on import. As long as the stock\_subtract value is higher than the quantity value in the file, the quantity will be set to 0 on import.

If the stock\_subtract value is lower than the quantity value in the file, the difference between the two numbers (the quantity minus the stock\_subtract value) will be set as the quantity.

### Import Your File

Once all the mapping is complete, you can save your import template and go back to the list of import templates. Your new template will be available and ready for you to use to import your data.

You can import your data through one of the three methods discussed earlier in this guide: uploading, emailing or FTP.

To upload your file, return to the Import Data page and, using the import template you created, choose your file and click Upload. If you want to test your file before uploading, you can select **Just Preview Output** first to see if there are any errors.

![](https://d33v4339jhl8k0.cloudfront.net/docs/assets/57b0032590336059d4edf94f/images/636e73ebaad33a6d7c946990/file-JbGvl7KE6Y.png)

To email your file to Order Desk, send your file as an attachment to the email address listed just above the template details:

![](https://d33v4339jhl8k0.cloudfront.net/docs/assets/57b0032590336059d4edf94f/images/5a5513042c7d3a194367fdd6/file-9hNnpTD5HP.png)

To download your files automatically through FTP, click on **Automatically Download Files From FTP Server** and configure the template to connect to a provided FTP server:

![](https://d33v4339jhl8k0.cloudfront.net/docs/assets/57b0032590336059d4edf94f/images/68f106f459e40a723dfa85b2/file-YSbZNVJR7S.png)

Order Desk checks the provided FTP server twice a day and will process all files it finds. After processing, the files will either be archived or deleted, based on your preference. If you would like to specify what time the files are downloaded, you can edit the appointment on the **View Appointments** page.

Files should be no larger than 8MB in size, and imports should not exceed a few thousand records at a time as larger file sizes can cause the request to time out.

**IMPORTANT**

Item Code/SKUs will overwrite themselves when being added to Order Desk if they share the same code. Please make sure each of your items have unique SKUs for all items to successfully import.

### Remove Variations and Metadata from Inventory Items

If you need to remove certain variations or metadata fields from your inventory items without deleting the entire product or going through manually to delete the specific fields from each item, you can do this using an import template and the special field value `[REMOVE]`.

To set this up, add `[REMOVE]` to the field that you want to delete for each item in your spreadsheet:

![](https://d33v4339jhl8k0.cloudfront.net/docs/assets/57b0032590336059d4edf94f/images/5a552408042863193800bd19/file-3f0dk3MIgJ.png)

Follow the steps in this guide for creating an import template (if one does not already exist for this spreadsheet), and when imported, those fields will be deleted from the inventory items, leaving the rest of the fields and/or adding any new ones based on the data in the spreadsheet.

Using the above example, the Blue Mug item had the print\_sku field set as BM9903 in Order Desk:

![](https://d33v4339jhl8k0.cloudfront.net/docs/assets/57b0032590336059d4edf94f/images/5a5522ff2c7d3a194367fe6d/file-i3uFax94hH.png)

And after importing the spreadsheet with `[REMOVE]` in the print\_sku field, it was deleted from the item in Order Desk:

![](https://d33v4339jhl8k0.cloudfront.net/docs/assets/57b0032590336059d4edf94f/images/5a5522b2042863193800bd0d/file-JhCWqoVBwV.png)

**Bulk Delete Inventory Items**

If you need to delete inventory items in bulk, you can import an inventory file to do so. Make sure the item SKUs are in the file, so Order Desk can find the items in your store. Set the item name to **REMOVE** (this must be capitalized).

When the file is imported, any SKU in the file that has the item name **REMOVE** will be deleted from your Order Desk store.

**Check Import Results**

Once your spreadsheet has been imported, you’ll see a link appear to **Show All Completed Imports**. Click this link to see the results of all the imports that you’ve done thus far.

![](https://d33v4339jhl8k0.cloudfront.net/docs/assets/57b0032590336059d4edf94f/images/5f161eff04286306f807229c/file-wgiwn8m7kV.png)

Your imports will be listed based on the import templates that were used for each template.

![](https://d33v4339jhl8k0.cloudfront.net/docs/assets/57b0032590336059d4edf94f/images/5f161f3c04286306f807229f/file-tFQB6AAmVU.png)

Under results you’ll see three different columns. Green results have been added/updated, grey results were skipped, and red results were invalid results that have not been added. If your results are coming up red, you’ll need to check the mapping on your import template to make sure it matches up with the columns and fields on the spreadsheet you’re importing.

### Copying a Template to Another Store

If you have multiple Order Desk stores and would like to duplicate a template, you can copy the template over to another store. If you’re not sure how to manage multiple stores in Order Desk, you can refer to our guide [here](/guided-walkthroughs/using-order-desk/how-to-manage-multiple-stores-on-one-account).

When you’re viewing all the templates you’ve created, there will be an option on the right side of the screen called **Copy Template**.

![](https://d33v4339jhl8k0.cloudfront.net/docs/assets/57b0032590336059d4edf94f/images/636e76d0aad33a6d7c946992/file-Qox5GPX7Qo.png)

Clicking on this button will present you with a dropdown menu where you can select which of your stores you would like to copy the template over to, as well as offering the option to overwrite an existing template there if needed.

![](https://d33v4339jhl8k0.cloudfront.net/docs/assets/57b0032590336059d4edf94f/images/636e76fb6c146d4e429d04c3/file-46bXBnW0RY.png)

Once the template has been copied, you can then begin to use it in your other store and make any necessary changes to it.


# How to Build Export Templates

Build your own customized CSV, XLSX, or TXT files with the export template feature in Order Desk. These files can be used to send orders or other information to third party vendors or for keeping more detailed records and custom reports for your store.

An export template lets you indicate the information you want in your file. You can create as many different export templates as you need.

To access export templates in Order Desk, click on **Export Templates** under the **Settings** menu in the left sidebar.

![](https://d33v4339jhl8k0.cloudfront.net/docs/assets/57b0032590336059d4edf94f/images/5a9ee6272c7d3a754951641e/file-HbE1FzAd5o.png)

If you already have export templates, they’ll be listed on the page with the option to create a new one at the bottom of the list.

![](https://d33v4339jhl8k0.cloudfront.net/docs/assets/57b0032590336059d4edf94f/images/5a9ee5cf2c7d3a7549516418/file-SAC9Zti4tf.png)

If you haven’t created any yet, click on the **Add New Export Template** button to begin creating a new template.

![](https://d33v4339jhl8k0.cloudfront.net/docs/assets/57b0032590336059d4edf94f/images/645d3253817a7b0924b22f0c/file-yJuvBRPp45.png)

This guide will go over all of the settings in an export template and what they mean, [Template Details](#create-your-template-details), [Template Actions](#create-your-template-actions), [Automatic Processing](#automatic-exports), [Selected and Available Fields](#create-your-template-fields) and [Field Filters](#create-your-template-filters), and it will cover how to export files once you have a template created.

### **Create Your Template: Details**

![](https://d33v4339jhl8k0.cloudfront.net/docs/assets/57b0032590336059d4edf94f/images/645bd3971140db1f380b7e12/file-2RaeZhYPLZ.png)

#### Name

Give your a template a unique and easily identifiable name so you can differentiate between multiple templates if you create more than one.

#### File Name

Choose your file name if you want to change it from the default.

Set {datetime} in the file name for it to display the date and time.

Set {date} in the file name for it to display the date only.

Set {date1} in the file name for it to display the date in yyyymmdd format.

Set {weekdayname} in the file name for it to display the name of the weekday the file is exported.

Set {storename} in the file name for it to display the name of the store.

Set {sequence} in the file name to append a new sequential number to each exported file.

Set {ordercount} in the file name to add the number of orders in the file. You can also use {ordercount-pad3} to pad the number by up to 2 zeros before the number, or use {ordercount-pad5} to add up to 4 zeros.

To export a TXT file instead of a CSV file, change the extension to.txt in the file name.

To export an XLSX file, change the extension to.xlsx and add XLSX as a [custom parameter](#custom-parameters) to the template.

#### **One Line Per**

#### Order

If no product fields are added to the template, set to **One Line Per Order**.

Each separate order will be on its own line, and the product information from the orders won’t be included:

![](https://d33v4339jhl8k0.cloudfront.net/docs/assets/57b0032590336059d4edf94f/images/5a9f0c8204286374f708a02e/file-Jce1wRNUxd.png)

#### Order Item

If you add any product fields to the template (fields specifically about the items that were ordered), you must choose **One Line Per Order Item**, so an order with more than one item in it will export each item on a separate line in the file.

Each separate item (product) in an order will get its own line in the exported file:

#### Shipment

Set to **One Line Per Shipment** if your file will be exporting the shipment info from the Order Shipment Fields:

![](https://d33v4339jhl8k0.cloudfront.net/docs/assets/57b0032590336059d4edf94f/images/645d1af41140db1f380b7f53/file-nhEbMR4a9H.gif)

If you are exporting a Shipment type file but an exported order does not have any shipment info in it, the entire line for that order (regardless of what other fields are being exported) will be empty. The order will not export in that file.

#### Delimiter

The delimiter is how the data is separated in a file. Most files use comma separated values (CSV), even if you can’t see the commas when looking at a spreadsheet. If you don’t know what delimiter you need, it’s usually safe to keep it set to comma. You can always adjust this setting later if you find out the file needs a different delimiter type.

#### Custom Parameters

For some added functionality, these parameters can be used in the custom parameters field in an export template. If using more than one parameter, separate them with a space.

| Custom Parameter      | Description                                                                                                                                                                                                 |
| --------------------- | ----------------------------------------------------------------------------------------------------------------------------------------------------------------------------------------------------------- |
| NO-TITLE-LINE         | Skip the title line                                                                                                                                                                                         |
| CRLF                  | Use Windows line endings (\r\n), default is Unix (\n)                                                                                                                                                       |
| NO-BOM                | Skip the UTF-8 encoding characters placed at the front of the document                                                                                                                                      |
| XLSX                  | Use to export an XLSX file. You will also need to change the file name extension to.xlsx                                                                                                                    |
| ISO-8859-1            | Convert the character encoding from UTF-8 to ISO-8859-1                                                                                                                                                     |
| NO-WEEKEND            | Do not run the report on Saturday or Sunday local store time                                                                                                                                                |
| NO-SUNDAY             | Do not run the report on Sunday local store time                                                                                                                                                            |
| FORCE-QUOTES          | Put quotes around all fields regardless of whether they are actually required                                                                                                                               |
| LITERAL-HEADER-QUOTES | Quotes added if they are typed into a header                                                                                                                                                                |
| MAX5K                 | Override the 2000 order limit; export up to 5000 orders                                                                                                                                                     |
| EACH-LINE-TOTAL       | Order totals shown on each line item when more than one item per order                                                                                                                                      |
| COLUMN-NAME-FILTERING | Run filters against column names as well as field names                                                                                                                                                     |
| ORDER-DETAILS-ONCE    | Export order details only once; extra lines per order will be item details only                                                                                                                             |
| ORDER-BY-SOURCE-ID    | Orders will be sorted by source ID as text. This will only work for files with fewer than 500 records.                                                                                                      |
| ORDER-BY-CODE         | Orders with more than one item will have the lines arranged alphabetically by the code/SKU.                                                                                                                 |
| ORDER-BY-NAME         | Orders with more than one item will have the lines arranged alphabetically by the product name.                                                                                                             |
| CUSTOM-DELIMITER:\*   | If your file does not use comma, tab, pipe or semicolon as the delimiter, use CUSTOM-DELIMITER:\* and replace the \* with the delimiter, e.g. CUSTOM-DELIMITER:^, CUSTOM-DELIMITER::, or CUSTOM-DELIMITER:- |

#### Inventory Location Match

[Inventory location](/guided-walkthroughs/products-and-inventory/how-to-work-with-inventory-details) is a field that can be set on individual inventory items in Order Desk.

You can set the inventory location name in the inventory location match field of an export template to include only items with that location name. If any orders selected for export have items that do not match this inventory location, they will not be included in the file.

**Add Lines Per File | Add Lines Per Order | Add Lines Per Order Item**

If you need to add a line in the exported file, set this up with the **Add Line Per File** option.

![](https://d33v4339jhl8k0.cloudfront.net/docs/assets/57b0032590336059d4edf94f/images/5c79585f04286350d0888850/file-XAQtkLBOeh.png)

The exported file will have this information added in an extra line:

![](https://d33v4339jhl8k0.cloudfront.net/docs/assets/57b0032590336059d4edf94f/images/5c795b5204286350d0888890/file-28joAZzPS4.png)

If you need extra lines per order or per order item, you can set this up with the **Add Lines Per Order** and **Add Lines Per Order Item** settings.

Select the option(s) you need and add the field names to the corresponding box in the layout in which it should be exported. Separate columns with a comma. New lines will be created in the exported file for each new line added in the box.

For example, if you need the item name and SKU on the first line and the item price on the second line, set it up as:

![](https://d33v4339jhl8k0.cloudfront.net/docs/assets/57b0032590336059d4edf94f/images/5aa14a3a04286374f708b3f6/file-WBjVFjAt7T.png)

This would be exported into a file as:

![](https://d33v4339jhl8k0.cloudfront.net/docs/assets/57b0032590336059d4edf94f/images/5aa14b1c2c7d3a7549517809/file-YPVxwbGgZp.png)

Use the field names that are in the [Available Fields](#create-your-template-fields) section below.

### Create Your Template: Actions

![](https://d33v4339jhl8k0.cloudfront.net/docs/assets/57b0032590336059d4edf94f/images/68f10992f5304b5c25e3c55b/file-0670DWKD9P.png)

#### **Move After Export**

Select the folder you want to move orders to after this export template is run. If you don’t want your orders to move, keep this set to –None–.

**IMPORTANT**

If you set up your template to run automatically, it will export the same orders over and over unless you move them into another folder after the export runs.

#### Download CSV File

If this setting is enabled, when you manually run an export, the file will download to your computer.

If the export template is running automatically and you also have this setting enabled, the file will not download automatically, but you can download it from your completed exports, accessible by clicking on Show All Completed Exports from the export templates page.

![](https://d33v4339jhl8k0.cloudfront.net/docs/assets/57b0032590336059d4edf94f/images/5aa1522e2c7d3a7549517869/file-85tgbdpFDB.png)

#### Send To Email

If you want to send the exported file to a specific email address, set it here. Multiple email addresses can be separated with a comma.

The file will be emailed as an attachment. The email that is sent can be customized from the [templates page](https://app.orderdesk.com/templates) under the Order Export Email Templates section. If you have created any custom templates, you’ll be able to choose from a dropdown under the email address which template to use. If you have not created any custom templates, the default template will be used and you will not see a dropdown here.

For more information on working with email templates, please refer to [this guide](/guided-walkthroughs/templates-emails-and-order-documents/how-to-work-with-email-templates).

#### Send To FTP

If exporting the file through FTP, set the FTP credentials here:

![](https://d33v4339jhl8k0.cloudfront.net/docs/assets/57b0032590336059d4edf94f/images/68f109fb23b9c0441ff1cbf0/file-lzCyWbA8cP.png)

**TIP: TESTING YOUR FTP CONNECTION**

After entering your credentials, you can test your FTP connection by clicking **Test Connection**.

![](https://d33v4339jhl8k0.cloudfront.net/docs/assets/57b0032590336059d4edf94f/images/68f10a5e23b9c0441ff1cbf3/file-qIir0qPTF7.png)

A dialog will appear where Order Desk attempts to connect to your FTP server. After a few seconds, you’ll see a message confirming whether the connection was successful.

![](https://d33v4339jhl8k0.cloudfront.net/docs/assets/57b0032590336059d4edf94f/images/68f10886403b9b58df8df6d8/file-0lQ2XGvE2X.png)

This provides a handy way to verify and troubleshoot any connection issues before starting your actual exports.

### Create Your Template: Automatic Processing

![](https://d33v4339jhl8k0.cloudfront.net/docs/assets/57b0032590336059d4edf94f/images/645d244b817a7b0924b22eef/file-AOQJgcKkz1.png)

If you want your export template to run automatically on a schedule, select the Process This Export Automatically option. For automatic processing to work, your template actions must be set to either send a file through email or FTP.

#### Schedule

Select the schedule to tell the template how often to run automatically. Options are: Hourly, Four Times Daily, Twice Daily, Daily, Weekly and Monthly.

**IMPORTANT**

The Four Times Daily schedule will run every six hours. The Twice Daily option will run every twelve hours. If you need to run your exports at specific times outside of those intervals, copy your template and set each copy to run Daily at the specific times.

#### Folder

Select the folder from which the export template should pull orders. If there are no orders in the folder, the template will not run.

If you are running the template automatically, you will probably want to move the orders into another folder after they export. Set this in the [Move After Export](#move-after-export) dropdown in the Template Actions.

#### Start Date

The appointment will run on the schedule starting from when the template is created. If you need the appointment to run at a specific time, adjust the start date and time to your preference.

{% hint style="info" %}
**Need to update the schedule for a template that has already been running?**

If so, please change the time for the template in this setting and not from the appointments page. Make sure to also update the date, as a date in the past will never *start* running at a new time. For all the features Order Desk offers, time travel is not one of them.
{% endhint %}

### Create Your Template: Fields

#### Available Fields

Your export template will need some fields in it—the data that will be exported into your file.

Add, customize, and arrange these fields under the **Selected Fields** section. You can choose your fields by selecting them from the drop down options and clicking **Add**.

![](https://d33v4339jhl8k0.cloudfront.net/docs/assets/57b0032590336059d4edf94f/images/645d310b817a7b0924b22f09/file-4sw6QFihxQ.gif)

Rearrange the fields into the order you want by dragging them into place:

![](https://d33v4339jhl8k0.cloudfront.net/docs/assets/57b0032590336059d4edf94f/images/5aa170aa2c7d3a7549517a19/file-Z5wftLR2Bc.gif)

Rename the fields if you need them to have specific names.

As an example, if you need the code field to be called “SKU” or the name to be “PRODUCT” in the title line of the exported file, edit the default names that were added by Order Desk:

![](https://d33v4339jhl8k0.cloudfront.net/docs/assets/57b0032590336059d4edf94f/images/5aa1716d04286374f708b665/file-0yUiv9YvTz.gif)

The value field can be left alone unless you need to combine data or customize any metadata, variations or checkout data.

For example, if you need the Shipping First Name and Shipping Last Name to be in the same column in your file, add both fields to the same value box: {shipping\_first\_name} {shipping\_last\_name}. You can rename the field to “Shipping Name”. Don’t forget to remove the Shipping Last Name column now that both names are in the same column.

![](https://d33v4339jhl8k0.cloudfront.net/docs/assets/57b0032590336059d4edf94f/images/5aa172aa04286374f708b674/file-5ng7ytAoqc.gif)

To add individual metadata, variation or checkout data fields to the file, select the appropriate field from the available fields and adjust the value to match the specific name you have set for the metadata, variation or checkout data.

For example, let’s say you have two variations on some of your products, specifically Color and Pattern:

![](https://d33v4339jhl8k0.cloudfront.net/docs/assets/57b0032590336059d4edf94f/images/5aa173d604286374f708b682/file-YFvhOnDuO8.png)

Choose Single Variation from the available fields for as many variations as you want to include in the exported file. In this example, we’ll add it twice, one for Color and one for Pattern.

The title will say Single Variation and the value will be {variation\_list|?}.

![](https://d33v4339jhl8k0.cloudfront.net/docs/assets/57b0032590336059d4edf94f/images/5aa1745f04286374f708b685/file-HK7RHObRYR.png)

These need to be tweaked to fit your specifications. In our example, we’ll change the names to Color and Pattern, and we need to swap out the? with the actual variation name. The variation name replacing the? will need to be an exact match and case sensitive. These two variations will look like this in the template:

![](https://d33v4339jhl8k0.cloudfront.net/docs/assets/57b0032590336059d4edf94f/images/5aa174b304286374f708b68b/file-SoU5qQpwSq.png)

Do the same for any metadata and checkout data fields that will be added to your template.

**IMPORTANT**

If you add any product fields to your template, make sure your template is [One Line Per Order Item](#order-item). If set to One Line Per Order, product details will be left out of the file.

### Custom Fields

There are some custom fields that can also be used in your export template, though they aren’t listed under Available Fields. These fields are listed below with a description of each. Remember to set them inside {curly braces}.

| empty                          | Keeps the field empty in the file. The field can also be left blank for it to stay empty.               |
| ------------------------------ | ------------------------------------------------------------------------------------------------------- |
| today                          | Adds the current date of the day the file is exported.                                                  |
| yesterday                      | Adds the date of the day before the file is exported.                                                   |
| tomorrow                       | Adds the date of the day after the file is exported.                                                    |
| line\_number                   | Numbers each of the line items in an order starting at 1.                                               |
| order\_line\_number            | Counts the number of orders in the file but adds repeat numbers for orders with multiple line items.    |
| current\_line\_number          | Shows the current file line number, starting with 1 and going through the number of lines the file has. |
| current\_line\_item            | This references the current item being looked at in a one-line-per-item export.                         |
| shipping\_country\_abbr        | Use for the two digit country code.                                                                     |
| shipping\_country\_abbr\_three | Use for the three digit country abbreviation.                                                           |
| shipping\_state\_abbr          | Use the two digit state code.                                                                           |
| shipping\_country\_full        | Use for the full country name.                                                                          |
| coupon\_list                   | Lists all coupon/discounts used on order.                                                               |

### Create Your Template: Filters

![](https://d33v4339jhl8k0.cloudfront.net/docs/assets/57b0032590336059d4edf94f/images/5aa176512c7d3a7549517a54/file-w3KlzQMplQ.png)

For instructions on how to work with the field filters in an export template, please refer to the [Export Template Field Filters](/guided-walkthroughs/templates-emails-and-order-documents/how-to-build-export-templates-filters-and-custom-fields#filters) guide.

Special and custom fields are also covered.

### Copy Templates from Other Stores

If you have more than one Order Desk store, you can copy any of your export templates into another one of your stores. To do this, go into the store you want to copy a template into, and on the Export Templates page, look underneath any export templates you may already have.

The dropdown will show a list of all export templates for each store you have. Select the template you want to copy into your current store and click **Import To This Store**.

![](https://d33v4339jhl8k0.cloudfront.net/docs/assets/57b0032590336059d4edf94f/images/5aa176ed2c7d3a7549517a5b/file-Nxs08DWuES.png)

### Export Files

Now that you have an export template created, you can begin to export your files.

If an exported file includes more than 500 records, it will be queued and completed by background services to prevent a timeout that could keep you waiting. When complete, the file will be processed as normal, unless set to download, in which case it will be emailed to the [Order Desk store admin email](https://app.orderdesk.com/settings/email).

#### Automatic Exports

If you’ve set up the template to export automatically, it will begin exporting on the schedule you chose. You won’t need to do anything else. However, if you ever want to run the template ahead of schedule, you can do so from your [View Appointments page](https://app.orderdesk.com/tools/appointments). Find the appointment for your export template and click on Run.

![](https://d33v4339jhl8k0.cloudfront.net/docs/assets/57b0032590336059d4edf94f/images/5aa179822c7d3a7549517a7a/file-JifmC8QBsj.png)

#### Manual Exports

Before doing a manual export, don’t forget that if your export template has the [Move After Export](#move-after-export) option set to a specific folder, any orders you export, even manually, will be moved into that folder after the file is sent. If you don’t want your orders to move into another folder, make sure this is set to –None–.

To manually export orders, select the orders you want to export and then click the Export Checked button and choose the export template you want to use.

![](https://d33v4339jhl8k0.cloudfront.net/docs/assets/57b0032590336059d4edf94f/images/5aa1817404286374f708b725/file-VoczM6nqhr.png)

Alternatively, you can export an entire folder by clicking the Export All Pages button while viewing that folder. Select the template you want to export.

![](https://d33v4339jhl8k0.cloudfront.net/docs/assets/57b0032590336059d4edf94f/images/5aa1818e2c7d3a7549517ad5/file-p3Q1Ca9DxU.png)


# How To Build Export Templates: Filters and Custom Fields

With export templates, you can export any orders or other order data from Order Desk in a file you can customize. For an overview of how to set up and work with export templates, read through the [Building Export Templates guide](/guided-walkthroughs/templates-emails-and-order-documents/how-to-build-export-templates).

In this guide, we will cover field filters and other custom fields that can be used or added to your export templates.

Field filters give you a little more control over what does (or doesn’t) get included with your exported files. These filters let you make some changes to your export template, such as replacing, formatting and/or skipping certain data.

Custom fields, separate from field filters, are special fields you can add to your template that may require special formatting that will be covered at the end of this guide.

### Filters

To access the field filters in your export template, look at the lower right corner of the template page, underneath the list of Available Fields.

![](https://251457507-files.gitbook.io/~/files/v0/b/gitbook-x-prod.appspot.com/o/spaces%2FAQOLMUJWMYtrpQ7Oxxca%2Fuploads%2FFXYFoBB3YANBHKml40Tc%2Flegacy-8965d654ad4dab2ea38c.png?alt=media)

Click the Add Filter button to set up your first filter.

![](https://251457507-files.gitbook.io/~/files/v0/b/gitbook-x-prod.appspot.com/o/spaces%2FAQOLMUJWMYtrpQ7Oxxca%2Fuploads%2FMmFVcuf1RkcgohrPbNgh%2Flegacy-7d94037a644b6fde8c3c.png?alt=media)

You can add as many separate filters as needed.

Filters are case sensitive and do *not* have curly brackets around them. Values need to match your orders exactly.

**Search & Replace**

Use the Search & Replace filter to change specific data from your orders when exported into a file. You can change a SKU, an address, a shipping method, or any other field name available.

**EQUALS Special Setting**

If one of the values you need to search for or replace has an = sign in it already, use \_EQUALS\_ in the filter instead to avoid problems.

For example, if you need to replace the code 12=34 with 1234, instead of setting the filter to 12=34=1234, set it to 12\_EQUALS\_34=1234.

**Replace SKU Example**

If you need to replace a SKU, set the field name “code” in the field name to target box.

Add your SKU followed by = and the SKU to replace it in the file, one per line:

![](https://251457507-files.gitbook.io/~/files/v0/b/gitbook-x-prod.appspot.com/o/spaces%2FAQOLMUJWMYtrpQ7Oxxca%2Fuploads%2FvqffzxMW7IwEIULzBvRx%2Flegacy-ecfa800a22b51a256eef.png?alt=media)

This can be used to completely change a SKU or to reformat a SKU such as adding or removing extra spaces.

The SKU in your order in Order Desk will not change, but the SKU in the exported file will reflect the filter.

**Replace Shipping Method Example**

Search & Replace lets you change any field in the order that can be exported. For instance, if the shipping method on the order is Standard:

![](https://251457507-files.gitbook.io/~/files/v0/b/gitbook-x-prod.appspot.com/o/spaces%2FAQOLMUJWMYtrpQ7Oxxca%2Fuploads%2FHgWMfzy5dLOtrENX4cd9%2Flegacy-7284754f66266a046b6d.png?alt=media)

But in the exported file, you may need that to be a specific carrier and method. If so, you can change this with the Search & Replace filter targeting shipping\_method:

![](https://251457507-files.gitbook.io/~/files/v0/b/gitbook-x-prod.appspot.com/o/spaces%2FAQOLMUJWMYtrpQ7Oxxca%2Fuploads%2F1aPGFwIUYa6BpeVM699n%2Flegacy-784524ee4978425a3c14.png?alt=media)

The date format filter is to change the way dates are displayed in your exported file. The default format in Order Desk (Y-m-d H:i:s) can be changed in your [store settings](/guided-walkthroughs/using-order-desk/manage-store-settings#store-settings) or with this filter for exported files only.

For instance, change the order date targeting date\_added, using this [PHP reference](http://php.net/manual/en/function.date.php) for options:

![](https://251457507-files.gitbook.io/~/files/v0/b/gitbook-x-prod.appspot.com/o/spaces%2FAQOLMUJWMYtrpQ7Oxxca%2Fuploads%2FYtBO5nb68WsebyRYTL6v%2Flegacy-62d811a7d4c481466448.png?alt=media)

**Skip Line**

The skip line filter is for removing lines from the file that would otherwise be exported based on the fields in the template.

Exclude specific lines from a field that you otherwise want in the file. As an example, if you want to export all of your closed orders but leave out a specific SKU, target the code field and enter the SKU you want left out of the file:

![](https://251457507-files.gitbook.io/~/files/v0/b/gitbook-x-prod.appspot.com/o/spaces%2FAQOLMUJWMYtrpQ7Oxxca%2Fuploads%2F7ptKLDsWGt3F6iqM7jqv%2Flegacy-2c81d1e834b5280b3cfa.png?alt=media)

This can be used for any field name in your template as long as you have a specific value that you want to skip. Another example is to export all orders except any with a specific shipping country, such as France:

![](https://251457507-files.gitbook.io/~/files/v0/b/gitbook-x-prod.appspot.com/o/spaces%2FAQOLMUJWMYtrpQ7Oxxca%2Fuploads%2FaFG1WlaI5KhoUXNC3kHx%2Flegacy-3eda2fe843bb774c5828.png?alt=media)

Or even a specific type of item based on the product name, for instance, skip all products named Mug:

![](https://251457507-files.gitbook.io/~/files/v0/b/gitbook-x-prod.appspot.com/o/spaces%2FAQOLMUJWMYtrpQ7Oxxca%2Fuploads%2F7SSViDH0MLdy3zVKQixG%2Flegacy-b8eb43ef09bc15d5f865.png?alt=media)

You can even export all of your orders from Order Desk, but skip any that are in a specific folder. Make sure the folder is one of the fields in the template, then target that field, folder\_name, and add the name of the folder you want left out of the file, for instance “Canceled”:

![](https://251457507-files.gitbook.io/~/files/v0/b/gitbook-x-prod.appspot.com/o/spaces%2FAQOLMUJWMYtrpQ7Oxxca%2Fuploads%2FFpiXBvhRuGBcILyQUJET%2Flegacy-d571f25df4ab0bc072e8.png?alt=media)

### Special Fields

**Custom Fields**

If you have any specific fields that will always be the same for every order in your file, such as your vendor ID, business name, or any other field value that won’t change on an order by order basis, you can type this directly into the field in your template.

Unlike Order Desk field names, with curly brackets around them, that pull specific information from each order to use in the exported file, these will be exported exactly as you write them in the template:

![](https://251457507-files.gitbook.io/~/files/v0/b/gitbook-x-prod.appspot.com/o/spaces%2FAQOLMUJWMYtrpQ7Oxxca%2Fuploads%2FdkoDElU4bLOqMMcXSSZp%2Flegacy-204503463a2557d2ead7.png?alt=media)

This can also be used in combination with Order Desk field names in the template. For instance, if you need to add a prefix to your SKUs in the file, you can type this ahead of the field name in the template.

![](https://251457507-files.gitbook.io/~/files/v0/b/gitbook-x-prod.appspot.com/o/spaces%2FAQOLMUJWMYtrpQ7Oxxca%2Fuploads%2FAukmNYM7Wd8dTmUYtLZp%2Flegacy-cb3f803c265ac47b75ff.png?alt=media)

**Order Confirmation URL**

You can add the order confirmation URL to your file if sending the file to a vendor or fulfillment service that won’t be sending a file back with shipments.

![](https://251457507-files.gitbook.io/~/files/v0/b/gitbook-x-prod.appspot.com/o/spaces%2FAQOLMUJWMYtrpQ7Oxxca%2Fuploads%2FITCqd8CVWQWyYw6zJbyP%2Flegacy-9f47fb3ea14e0a10e635.png?alt=media)

The recipient can use this URL to add a shipment back to each order directly without needing to send a file back or have access to your Order Desk account. This is the same URL that is used in the [dropship email template](/technical-documentation/templates-and-documents/sample-dropship-email-template).

**Current Store Datetime**

You can export your store’s current datetime, applied to each row in the file when the template is exported, by using the field **{** **current\_store\_datetime** **}**. The format will use the default Y-m-d H:i:s.

![](https://251457507-files.gitbook.io/~/files/v0/b/gitbook-x-prod.appspot.com/o/spaces%2FAQOLMUJWMYtrpQ7Oxxca%2Fuploads%2FBLFV4HyacUaIjd6fPwGQ%2Flegacy-fec24e240b45d5c43c1d.png?alt=media)

**Using Twig**

You can use Twig to add extra or customized information to an export that isn’t otherwise available.

As an example, set `{{ order_shipments.0.carrier_code }}` in the export template to export the Carrier Code from the shipment.

![](https://251457507-files.gitbook.io/~/files/v0/b/gitbook-x-prod.appspot.com/o/spaces%2FAQOLMUJWMYtrpQ7Oxxca%2Fuploads%2FFyntpZ33le8lqKQjkarZ%2Flegacy-b44603761e928a75ccc9.png?alt=media)

[See this](/technical-documentation/templates-and-documents/how-to-build-custom-templates) for more information on Twig.


# How to Work with Email Templates

Create custom email templates to be sent to your customers, your vendors, your staff, yourself or anyone else who may need to be notified regarding your orders. These emails can be sent out automatically based on certain events and filters with your orders, or you can send them manually.

You can create multiple email templates and customize each of them to pull any information from your orders in Order Desk, and they can be designed to fit your brand.

For more information, please see our [How to Send Email From Order Desk](/guided-walkthroughs/templates-emails-and-order-documents/how-to-send-email-from-order-desk) guide.

### Create Email Templates

To create an email template, click on **Templates** in the Settings menu in the left sidebar. Under the Email Templates section, click on **Add New Email Template**.

![](https://251457507-files.gitbook.io/~/files/v0/b/gitbook-x-prod.appspot.com/o/spaces%2FAQOLMUJWMYtrpQ7Oxxca%2Fuploads%2FhS4oxJJP4OcSZMjK543I%2Flegacy-0348f5aa7993d8a5e77d.png?alt=media)

When you first add a new email template, it will be populated with the default shipment notification template.

![](https://251457507-files.gitbook.io/~/files/v0/b/gitbook-x-prod.appspot.com/o/spaces%2FAQOLMUJWMYtrpQ7Oxxca%2Fuploads%2FI93Xq8jl9dBzTWWfnfoz%2Flegacy-ed89036fe20b555d9813.png?alt=media)

You can either use this template as is, delete it and replace it with another template, delete it to create your own template, or edit it to include the specific information and customizations you want.

#### Sample Templates

A few sample email templates already exist and can be found below. You can use or customize any of these for your own emails.

**Template Guides:**

* [**Sample Dropship Email Template**](/technical-documentation/templates-and-documents/sample-dropship-email-template)
* [**Customer Receipt Email Template**](/technical-documentation/templates-and-documents/customer-receipt-email-template)

You can search for more templates in our [**Technical Documentation guides here**](/technical-documentation/templates-and-documents).

**IMPORTANT:**

Email templates and receipt templates do not use the same syntax. The code that works in a receipt template will not work if copied into an email template.

### Edit Email Templates

When starting with the default shipment notification template, to edit or replace the body of the template, you will need at least some knowledge of HTML.

**IMPORTANT**

Using code or email templates copied from other websites will not work. If you wish to customize your templates but are unfamiliar with code, please work with a skilled designer or developer.

There are three sections to the template page.

### Template Fields and Email Overrides

![](https://251457507-files.gitbook.io/~/files/v0/b/gitbook-x-prod.appspot.com/o/spaces%2FAQOLMUJWMYtrpQ7Oxxca%2Fuploads%2F7a6eVZ8iUmz2TMTgvJa5%2Flegacy-6f5f788175533455c5c5.png?alt=media)

TEMPLATE NAME

Give your template a name so you can easily identify it from a list of templates in the Rule Builder or from the email icon dropdown.

EMAIL SUBJECT

This will be the subject of the email that is sent to your recipients.

FROM NAME OVERRIDE

This field overrides the default from name on the email, which will be your Order Desk store unless otherwise specified here.

FROM EMAIL OVERRIDE

Put in the email address you want this email say it is from if you don’t want to use your customer facing store email pulled from your [store settings](/guided-walkthroughs/using-order-desk/manage-store-settings#email).

**Please note: if your emails will be sent using Google Servers, this setting will not override the email. You’ll need to make that change using the email in your Order Desk store settings or in your Google account settings.**

EMAIL DELIVERY OVERRIDE

Put the email address you want this email to be sent to if different from the customer’s email address. If no address is used here, this email *will* be sent to the customer.

EMAIL BCC

Put the an additional email address where you want the email be sent.

ATTACHMENT FIELD NAMES

If any URLs have been added to your order metadata or checkout data fields, add the field names here to include them as attachments in your email.

For example, you can [create a PDF](/guided-walkthroughs/templates-emails-and-order-documents/how-to-create-pdf-files-for-order-documents) from an order receipt and attach it to the email.

> **Make Attachments Optional**

> By default, Order Desk will throw an error and stop the email from sending if you’ve set an attachment field name and that field isn’t present on the order.

> If you’d like emails to be sent whether or not the attachment is present, enable the **Make Attachments Optional** setting.

### Email Template Code

![](https://251457507-files.gitbook.io/~/files/v0/b/gitbook-x-prod.appspot.com/o/spaces%2FAQOLMUJWMYtrpQ7Oxxca%2Fuploads%2FBd0d7hj5TQv3jwDDMtGl%2Flegacy-047e229e1b9d064d681a.png?alt=media)

This is the code that creates the email template and will need to be edited if you want to change the order data pulled into the template or customize the message displayed in the email.

For a list of field names and a few examples of code that can be added to email templates, [scroll down to the next section](#common-code-examples).

### Send Preview Email

You can send yourself a preview email using an actual order from your store to check that your code is working and see what you recipients will receive.

To send a preview of your email template, use a real order number from your store and the email address you want to send the preview to:

![](https://251457507-files.gitbook.io/~/files/v0/b/gitbook-x-prod.appspot.com/o/spaces%2FAQOLMUJWMYtrpQ7Oxxca%2Fuploads%2FsneHXx7T3nIoNMbs2V9E%2Flegacy-1759d5434ee20429581c.png?alt=media)

If the code is formatted properly, you will see a green SENT message after clicking to send the email.

![](https://251457507-files.gitbook.io/~/files/v0/b/gitbook-x-prod.appspot.com/o/spaces%2FAQOLMUJWMYtrpQ7Oxxca%2Fuploads%2FPAupgIlt1oCJBympNxVG%2Flegacy-2eedf433ed53c3ad4ea5.png?alt=media)

If any part of the code is not formatted correctly, you will see a little spinning icon, and the email will not be sent. If this happens, refresh the page and check your code for any errors before trying to send a preview again.

### Common Code Examples

For a list of Order Desk field names, refer to [this reference guide](/resources/order-desk-field-names). The most commonly used field names in email templates are:

**{{ store\_name }}** – to pull in your Order Desk store name anywhere it is used in the template

**{{ source\_id }}** – the Order ID (also known as the Order Number)

**{{ item.name }}** – the product name

**{{ item.code }}** – the product SKU

**{{ item.quantity }}** – the quantity ordered of an individual product

**{{ item.price }}** – the price of the product

**{{ shipping.first\_name }}**

**{{ shipping.last\_name }}**

**{{ shipping.address1 }}**

**{{ shipping.city }}**

**{{ shipping.state }}**

**{{ shipping.postal\_code }}**

**{{ shipping.phone }}**

#### Adding Item Variations

**{{ item.variation\_list }}**

As an example where the variation “size” is used:

![](https://251457507-files.gitbook.io/~/files/v0/b/gitbook-x-prod.appspot.com/o/spaces%2FAQOLMUJWMYtrpQ7Oxxca%2Fuploads%2FCmVKN3zqQNIXFvffvIVW%2Flegacy-2f459070f02d903317bf.png?alt=media)

Use:

`{% if item.variation_list|length > 0 %}`

`{% if item.variation_list['size'] is defined %}`

`Size: {{ item.variation_list['size'] }}`

`{% endif %}`

`{% endif %}`

#### Add Item Metadata

**{{ item.metadata }}**

As an example where a metadata field for “image” is used (with a link to the image as the value):

![](https://251457507-files.gitbook.io/~/files/v0/b/gitbook-x-prod.appspot.com/o/spaces%2FAQOLMUJWMYtrpQ7Oxxca%2Fuploads%2Fjdq5gmoVW8tuI8ARaYyi%2Flegacy-7f17ce09827e098f6e4d.png?alt=media)

Use:

`{% if item.metadata.image is defined %}`

`<img src="{{ item.metadata.image }}" width="100">`

`{% endif %}`

#### Add Logo Image to Email Header

`<div class="header_logo"><img src="https://www..." width="250" alt="{{ store_name }}"></div>`

Replace “[https://www…”](https://help.orderdesk.com/guided-walkthroughs/templates-emails-and-order-documents/https:/www…”) with a direct link to your image, which must be securely stored on a site with an SSL certificate.

#### Add Inventory Cost of Items

`{{ (item.quantity * item.metadata.inventory_cost)|money_format }}`

#### Add Internal Order Notes

`{% for note in order_notes %}`

`<p>{{ note.content }}</p>`

`{% endfor %}`

### Send Emails

#### Send Email Manually

To manually send an email, click on the email icon in an order. If you do not see the email icon on an order, make sure there is an email address associated with the order. This is necessary even if the email you are sending will go to someone other than the customer.

![](https://251457507-files.gitbook.io/~/files/v0/b/gitbook-x-prod.appspot.com/o/spaces%2FAQOLMUJWMYtrpQ7Oxxca%2Fuploads%2FfBgZu0CHGBpl1QRVG2Io%2Flegacy-79c78d4dc07570182a6a.png?alt=media)

If you have more than one email template, choose the template you want to use from the dropdown. After you select the template, or if you only have one template, a Send Email dialog box will appear on screen so you can make changes before sending the email.

#### Send Email Automatically

Create a rule to tell Order Desk when you want an email to be sent. If you aren’t familiar with the Rule Builder yet, read through this [introduction](/start-here/getting-started-series/quick-start-how-customizable-is-order-desk-really#the-order-desk-rule-builder).

* To send tracking details to a customer, see [this guide](/guided-walkthroughs/shipping-fulfillment-and-returns/how-to-print-thermal-labels/how-to-send-shipment-tracking-info-to-customers) for instructions
* To send a dropship email to a vendor, see [this guide](/guided-walkthroughs/shipping-fulfillment-and-returns/how-to-split-and-dropship-orders-for-separate-vendors) for instructions.

When creating your rule, first choose the event that needs to happen for the email to be sent. Typically this would be when order is imported, when shipment is added, or when folder is changed, but you should choose the event that best fits your workflow. Add any filters, if necessary.

Select the **Send Email to Customer** action for emails meant for customers, vendors and any other third parties. Remember, if the email is being sent to someone other than the customer, the email address should be in the email delivery override for that template. If there is no email delivery override, the email will be sent to the customer. If you have more than one email template, select the right template from the dropdown.

To send the email to the Order Desk admin on your store, choose **Send Email to Admin** as the action instead. Unless the email delivery override has been set to another email address, the email will go to the [admin’s email address](/guided-walkthroughs/using-order-desk/manage-store-settings#email), never to the customer. Select the template to be used from the dropdown.

Add any additional actions, if necessary.

When the event you chose happens, Order Desk will look at the filters in your rule, and if they match the order the event happened to, the email will automatically be sent.

For a walkthrough of how to manage your email settings in Order Desk, please visit our [How To Send Email From Order Desk](/guided-walkthroughs/templates-emails-and-order-documents/how-to-send-email-from-order-desk) guide.

### FAQ

#### What kinds of emails can I send using templates?

Some common email examples include:

* Order confirmations, shipment notifications and thank you emails for customers
* Order summaries and order notifications for admins, vendors or customers
* Dropship notifications for vendors
* Potential fraud notifications for store admins

#### I need help with my code. Can you create a custom template for me?

Code can be difficult, which is precisely why you should hire a skilled developer or designer to create your templates for you! The templates we provide work for most scenarios, but if you aren’t able to customize them yourself, we do ask that you hire a skilled professional to take the time necessary to write your code.

#### Why doesn’t the code I copied from a receipt template work in my email template?

The syntax necessary for email and receipt templates is different. What works in one won’t work in the other. For email templates, please refer to our [API docs](https://apidocs.orderdesk.com/#orders) for a list of field names that will work in the code or scroll up to the [Common Code Examples section](#common-code-examples) of this guide.

### Related Articles

* How to Send Shipment/Tracking Info to Customers
* Sample Dropship Email Template
* Quick Start: How Customizable is Order Desk Really?
* How to Split and Dropship Orders for Separate Vendors
* How to Use Barcodes
* Customer Receipt Email Template
* VAT Receipt Template


# How to Send Email From Order Desk

Order Desk can be used to send emails to your customers or yourself, and the system will periodically email an alert to store admins regarding order statuses. Changes can be made to how emails are sent from your Order Desk store by navigating to the **Email** tab in your [Store Settings](/guided-walkthroughs/using-order-desk/manage-store-settings#email).

To learn more about creating email templates to use in your Order Desk store, please read our [How to Work with Email Templates](/guided-walkthroughs/templates-emails-and-order-documents/how-to-work-with-email-templates) guide.

### Sending Email with Order Desk’s Server

![](https://251457507-files.gitbook.io/~/files/v0/b/gitbook-x-prod.appspot.com/o/spaces%2FAQOLMUJWMYtrpQ7Oxxca%2Fuploads%2FiR77VDg4UJVhIIjk4B7I%2Flegacy-1b692a92de9ee95df87f.png?alt=media)

While Order Desk’s email will appear, your store name will be included in the **From** field and all reply emails will be routed to the email you have set up in your Store Settings.

### Custom SMTP

![](https://251457507-files.gitbook.io/~/files/v0/b/gitbook-x-prod.appspot.com/o/spaces%2FAQOLMUJWMYtrpQ7Oxxca%2Fuploads%2F9j5KnmusPEyixzSQypzQ%2Flegacy-cbde094c7d0c18fbb7ed.png?alt=media)

If you prefer to deliver the message from your domain, you can enter your own SMTP credentials and we will deliver the email via your SMTP server. You can also enter custom headers. Separate headers with a semi-colon. Example:

`X-CUSTOM-NAME: Order Desk;X-CUSTOM-REF: Mailer`

If you do not have ready access to an SMTP account [SendGrid](http://www.sendgrid.com/), [MailGun](http://www.mailgun.com/), and [SparkPost](http://www.sparkpost.com/) all offer tiered pricing for email sending and will provide SMTP credentials for you.

**SMTP Testing Tools**

If you have added your private SMTP information, you can use the **Test SMTP Credentials** button to confirm that your connection is properly configured to Order Desk.

![](https://251457507-files.gitbook.io/~/files/v0/b/gitbook-x-prod.appspot.com/o/spaces%2FAQOLMUJWMYtrpQ7Oxxca%2Fuploads%2FjYtNxKF6EtJfBL4lZQKW%2Flegacy-f5057e989d8129b5d4f0.png?alt=media)

Clicking the button will trigger either a successful response or an error response. An error response would look similar to this:

![](https://251457507-files.gitbook.io/~/files/v0/b/gitbook-x-prod.appspot.com/o/spaces%2FAQOLMUJWMYtrpQ7Oxxca%2Fuploads%2Fz7ZML0akjbjr9pAx6zB3%2Flegacy-3e1b28d6fb90b9b6ea4e.png?alt=media)

If an email fails to send using your SMTP settings, Order Desk will send the email from our server as a backup.

In the case of a successful test, an **SMTP Accepted Email** alert will appear:

![](https://251457507-files.gitbook.io/~/files/v0/b/gitbook-x-prod.appspot.com/o/spaces%2FAQOLMUJWMYtrpQ7Oxxca%2Fuploads%2Fk4TpmpecmWXUBjchbhmr%2Flegacy-ecc4e77975d4193de87e.png?alt=media)

Successful test emails will be delivered from your Order Desk store email and sent to the email of the user who is logged into the store at the time of the test. Please note that a success response is not confirmation that the email has been received successfully by the customer. This is simply a confirmation that the *sending server* successfully received it.

### Sending Email with Mailer Integrations

![](https://251457507-files.gitbook.io/~/files/v0/b/gitbook-x-prod.appspot.com/o/spaces%2FAQOLMUJWMYtrpQ7Oxxca%2Fuploads%2FftxgIHREuS5yPT19BCMk%2Flegacy-933e9ea99631f8df333a.png?alt=media)

If you have enabled a mailer integration, you can select this option and choose the correct integration from the dropdown.

### Related Articles

* Store Settings


# How to Work with Order Documents

Order Desk provides a sample receipt template and the ability to create custom order documents out of the receipt. Use these templates to create and send a receipt to your customers, send a packing slip to your vendors, add barcodes, make PDFs, factor in specific VAT tax amounts, create purchase orders, or create invoices or any other custom order documents as necessary.

You can customize each receipt template to pull any information from an order in Order Desk, and it can be designed to fit your brand.

### Create Receipt Templates

To create a receipt template, click on **Templates** in the Settings menu in the left sidebar. Under the Order Documents section, click on **Add New Receipt Template**.

![](https://251457507-files.gitbook.io/~/files/v0/b/gitbook-x-prod.appspot.com/o/spaces%2FAQOLMUJWMYtrpQ7Oxxca%2Fuploads%2FhceIEVbDMJNYMvykpFSo%2Flegacy-7dc5a222dba4c0cc1213.png?alt=media)

The default receipt template will be added.

![](https://251457507-files.gitbook.io/~/files/v0/b/gitbook-x-prod.appspot.com/o/spaces%2FAQOLMUJWMYtrpQ7Oxxca%2Fuploads%2FwKZHd8fnSV4q3Pg5XKSa%2Flegacy-c4744e4885a3e1f2e836.png?alt=media)

You can either use this template as is, delete it and replace it with another template, delete it to create your own template, or edit it to include the specific information and customizations you want.

#### Sample Templates

Some sample receipt templates already exist and can be found [here](/technical-documentation/templates-and-documents). You can use or customize any of these to fit your needs.

**IMPORTANT** Receipt templates and email templates do not use the same syntax. The code that works in a receipt template will not work if copied into an email template. [Click here](/guided-walkthroughs/templates-emails-and-order-documents/how-to-work-with-email-templates) for more details on working with email templates.

### Edit Receipt Templates

When starting with the default receipt template, to edit or replace the body of the template, you will need at least some knowledge of HTML.**IMPORTANT** Using code or templates copied from other websites will not work. If you wish to customize your templates but are unfamiliar with code, please work with a skilled designer or developer.

There are two parts to a receipt template, the name and the code. Give your template an easy to identify name, especially if you plan to make several different templates.

![](https://251457507-files.gitbook.io/~/files/v0/b/gitbook-x-prod.appspot.com/o/spaces%2FAQOLMUJWMYtrpQ7Oxxca%2Fuploads%2FuiBXsM0HF9lT6lKuhngv%2Flegacy-19acd0cd220bb6686b1c.png?alt=media)

If you wish to change the type of template from receipt to something else, change the title on lines 5 and 30 from Receipt to what you want it called, such as Invoice or Packing Slip:

![](https://251457507-files.gitbook.io/~/files/v0/b/gitbook-x-prod.appspot.com/o/spaces%2FAQOLMUJWMYtrpQ7Oxxca%2Fuploads%2FoIrwSgcfy6M9JAtqtx0g%2Flegacy-a10e9adb24a94077f495.png?alt=media)

To do this, simply replace the word “Receipt” on both lines. Do not change any of the code:

![](https://251457507-files.gitbook.io/~/files/v0/b/gitbook-x-prod.appspot.com/o/spaces%2FAQOLMUJWMYtrpQ7Oxxca%2Fuploads%2FNRKmzabmloEPr6GBNYPP%2Flegacy-8cae0fbe5410ece9d39b.png?alt=media)

### Code Examples

Receipt templates require the order to be called in the key using `order.` before the key name. For keys that have a subset of information (order\_items, order\_notes, etc.) add the order. before the key and use the field names as usual from there.

In the following code, where you see an ‘xxx’, replace it with the name you are using for that particular field in your orders. For example, if adding the Size variation, change:

`{{ item.variation_list['xxx'] }}` to `{{ item.variation_list['Size'] }}`

This is case sensitive.

For a full list of values, please refer to our [API docs](https://apidocs.orderdesk.com/#orders), keeping in mind the syntax necessary for receipt templates.

#### General Order Properties

{{ order.store\_name }} {{ order.source\_id }} {{ order.quantity\_total }} {{ order.weight\_total }} {{ order.product\_total }} {{ order.shipping\_total }} {{ order.handling\_total }} {{ order.tax\_total }} {{ order.discount\_total }} {{ order.order\_total }}

#### Address Information

{{ order.shipping.first\_name }} {{ order.shipping.last\_name }} {{ order.shipping.address1 }} {{ order.shipping.city }} {{ order.shipping.state }} {{ order.shipping.postal\_code }}

#### Customer Information

{{ order.customer.first\_name }} {{ order.customer.last\_name }} {{ order.customer.company }} {{ order.customer.address1 }} {{ order.customer.city }}

#### Item Information

{{ item.name }} {{ item.code }} {{ item.quantity }} {{ item.price }}

#### Item Metadata

#### Variations

or

#### Checkout Data

#### Order Metadata

#### Order Notes

#### All Notes

**First Order Note Only** {{ order.order\_notes\[0].content }}

#### Order Shipments

#### Display All Tracking Numbers

**Display First (if Only) Shipment Details** {{ order.order\_shipments.0.carrier\_code }} {{ order.order\_shipments.0.shipment\_method }} {{ order.order\_shipments.0.weight }} {{ order.order\_shipments.0.cost }} {{ order.order\_shipments.0.tracking\_url }}

### View or Print Receipts

To view or print a receipt template, click on the printer icon in an order. A dropdown will appear with all of your receipt templates.

![](https://251457507-files.gitbook.io/~/files/v0/b/gitbook-x-prod.appspot.com/o/spaces%2FAQOLMUJWMYtrpQ7Oxxca%2Fuploads%2F8IfY03Zzvnkt3SfEnMar%2Flegacy-e195ba0c1878c040e7d2.png?alt=media)

Choose the template you want to see for the order, and your receipt will be created in a new browser window.

![](https://251457507-files.gitbook.io/~/files/v0/b/gitbook-x-prod.appspot.com/o/spaces%2FAQOLMUJWMYtrpQ7Oxxca%2Fuploads%2F6U4ntRAOCItRWaOWpVhL%2Flegacy-f6820ff9795ebc499104.png?alt=media)

You can save or print this page following the usual prompts for your specific browser and printer.

If you want to view or print multiple receipts at once, select the orders from the folder view and click the printer icon.

![](https://251457507-files.gitbook.io/~/files/v0/b/gitbook-x-prod.appspot.com/o/spaces%2FAQOLMUJWMYtrpQ7Oxxca%2Fuploads%2FMhUxifrwWRibpGX22XUD%2Flegacy-1a7c692b39bccde7c97e.png?alt=media)

All of the receipts for the selected orders will populate in a single window, in order, to be viewed or printed.

### Create PDFs

If you want to turn your receipt template into a PDF, follow the instructions [in this guide](/guided-walkthroughs/templates-emails-and-order-documents/how-to-create-pdf-files-for-order-documents). Also included are instructions for how to attach a PDF to an email or send a packing slip with an order to certain fulfillment services.

### FAQ

#### I need help with my code, but you keep telling me to hire a developer. Come on, do me a favor—it’s your app, shouldn’t you help?

We get it; code can be difficult, which is precisely why we tell you to hire a skilled developer or designer. The templates we provide work for most scenarios, but if you aren’t able to customize them yourself, we do ask that you hire a skilled professional to take the time necessary to write your code.

We appreciate your understanding that the Order Desk team is not your personal designer or developer.

#### I need an invoice, packing slip, etc., not a receipt. How do I do that?

Receipt is the default name for these templates. You can change the name of the template to anything you need and change or remove “receipt” from the code. These templates are customizable so you can make them anything you want them to be.

If you need to create purchase orders, you can do this with receipt templates as well, customized to your own purposes. If working with purchase orders, make sure that orders that have not been paid for yet are not sent for fulfillment until ready by using [custom folders](/start-here/getting-started-series/quick-start-overview#working-with-folders) and [rules](/start-here/getting-started-series/quick-start-how-customizable-is-order-desk-really#the-order-desk-rule-builder) to help you manage your order process.

#### Why doesn’t the code I copied from an email template work in my receipt template?

The syntax necessary for email and receipt templates is different. What works in one won’t work in the other. Email templates look at a single order, so the fields listed [in the field reference](/resources/order-desk-field-names) and in the [email template guide](/guided-walkthroughs/templates-emails-and-order-documents/how-to-work-with-email-templates) should work.

Receipt templates look at a list of orders, so most fields will typically need to have order. added to them. Where an email template uses `{{ source_id }}` to show the order number, the receipt template requires `{{ order.source_id }}` for the same. Look at your default receipt template for examples or scroll up to the [code section](#code-examples) of this guide for more examples.


# How to Create PDF Files for Order Documents

Order Desk allows you to create PDF files from an order document template and then either attach the PDF as a packing slip on an order or attach the file to an outgoing email.

For more information on working with order document templates, review [this guide](/guided-walkthroughs/templates-emails-and-order-documents/how-to-work-with-order-documents).

### Create PDF Files

PDFs can be created with a [rule](/start-here/getting-started-series/quick-start-how-customizable-is-order-desk-really#the-order-desk-rule-builder).

In the Rule Builder, select the **Order Rule** rule type:

![](https://251457507-files.gitbook.io/~/files/v0/b/gitbook-x-prod.appspot.com/o/spaces%2FAQOLMUJWMYtrpQ7Oxxca%2Fuploads%2FtdrHNyp9fF6MaYWbjzma%2Flegacy-fe6c39653f752db90331.png?alt=media)

Select the event that needs to happen for PDFs to be created. This will most likely be Order is Imported, but this will be your preference:

![](https://251457507-files.gitbook.io/~/files/v0/b/gitbook-x-prod.appspot.com/o/spaces%2FAQOLMUJWMYtrpQ7Oxxca%2Fuploads%2FXl7T4WOh68bGZXKA0kLq%2Flegacy-9d6ce74f38c7599a80f6.png?alt=media)

Under the Filters & Actions tab, set any filters if you need to determine which orders will get a PDF. For the action, select **Create PDF** and choose the template that should be used for this PDF:

![](https://251457507-files.gitbook.io/~/files/v0/b/gitbook-x-prod.appspot.com/o/spaces%2FAQOLMUJWMYtrpQ7Oxxca%2Fuploads%2FXukWt6tYyq5ZflFtOt8S%2Flegacy-0822a62da6a2e810703e.png?alt=media)

This rule will run a Create PDF action, which means you can now use the **PDF Created From Order** event to set up more rules after the PDF is created.

Please *do not add* any additional actions to this Create PDF rule. Sometimes additional actions will run before the PDF is finished being created, which will have unintended consequences. Instead, create a second rule with the PDF Created From Order event to add any additional actions that need to take place after the PDF is created.

After your rule starts running on orders, you can find the PDF in the order metadata.

Scroll to the bottom of an order page and you’ll see pdf\_ followed by the template ID:

![](https://251457507-files.gitbook.io/~/files/v0/b/gitbook-x-prod.appspot.com/o/spaces%2FAQOLMUJWMYtrpQ7Oxxca%2Fuploads%2FQAyy1dtPfS9DKHMCUqKn%2Flegacy-2896cdc65c691c174135.png?alt=media)

**Send Packing Slip with Order**

Some Print on Demand and fulfillment integrations can receive a packing slip when an order is submitted to them. Check the specific integration guide to find out if the ones you use accept the PackingSlip field. If they do, follow these instructions.

To set this up, after creating the PDF with a rule, create a new rule using the **PDF Created From Order** event:

![](https://251457507-files.gitbook.io/~/files/v0/b/gitbook-x-prod.appspot.com/o/spaces%2FAQOLMUJWMYtrpQ7Oxxca%2Fuploads%2FBtkcZtIN6ynEvSwQLjKQ%2Flegacy-9e5a7856247b16f2a9f6.png?alt=media)

Select **Set Checkout Data Receipt URL** as the action. For the Field Name add PackingSlip, then select the template you are using as your PDF:

![](https://251457507-files.gitbook.io/~/files/v0/b/gitbook-x-prod.appspot.com/o/spaces%2FAQOLMUJWMYtrpQ7Oxxca%2Fuploads%2FhEZkZsn6Vfx2fSTx93Oa%2Flegacy-569b1ffc9dc8c8402abf.png?alt=media)

When this rule runs, the link to the PDF will be added as a PackingSlip to the checkout data field on the order and will be sent to the printer when the order is submitted:

![](https://251457507-files.gitbook.io/~/files/v0/b/gitbook-x-prod.appspot.com/o/spaces%2FAQOLMUJWMYtrpQ7Oxxca%2Fuploads%2Fzk2gVNCxUYkbihTDo3jK%2Flegacy-9361fe86ed91d496d681.png?alt=media)

**Attach to an Email**

To add the PDF as an email attachment, get the PDF value from the order metadata:

![](https://251457507-files.gitbook.io/~/files/v0/b/gitbook-x-prod.appspot.com/o/spaces%2FAQOLMUJWMYtrpQ7Oxxca%2Fuploads%2FCctCQS83WTUQeIxK7cTw%2Flegacy-7941f9cc7548fc9460ad.png?alt=media)

Add this to the **Attachment Field Names** field in the email template where you want it added:

![](https://251457507-files.gitbook.io/~/files/v0/b/gitbook-x-prod.appspot.com/o/spaces%2FAQOLMUJWMYtrpQ7Oxxca%2Fuploads%2FNzCubqOqypPtLTUVi7Om%2Flegacy-9c58e4aeb7a8bfece962.png?alt=media)

Multiple field names can be entered, separated by comma. Order Desk will first look in the checkout data, then in the order metadata for the information to be attached to an email.

For more information on working with email templates, please see [this guide](/guided-walkthroughs/templates-emails-and-order-documents/how-to-work-with-email-templates).


# How to Create a Text or XML File

Order Desk provides a sample receipt template and the ability to create custom order documents out of the receipt. Use the Sample XML template or create your own, and Order Desk can create a text or XML order document file.

Follow the steps in this guide to learn how to create your own XML files in Order Desk. For more information on working with Order Documents, see [this guide](/guided-walkthroughs/templates-emails-and-order-documents/how-to-work-with-order-documents).

### Create Order Document Template

To create a receipt template, click on **Templates** in the Settings menu in the left sidebar. Under the Order Documents section, click on **Add New Receipt Template**.

![](https://251457507-files.gitbook.io/~/files/v0/b/gitbook-x-prod.appspot.com/o/spaces%2FAQOLMUJWMYtrpQ7Oxxca%2Fuploads%2FIO0rUUkqMDnnqruORVWk%2Flegacy-7a54d51e665ee1c3085d.jpg?alt=media)

The default receipt template will be added.

![](https://251457507-files.gitbook.io/~/files/v0/b/gitbook-x-prod.appspot.com/o/spaces%2FAQOLMUJWMYtrpQ7Oxxca%2Fuploads%2F8pkA2TpZjkfK58e4Phzr%2Flegacy-c214aa0fea21922e9a5f.png?alt=media)

Delete this code and replace it with the Sample XML template, or you can write your own template if you prefer.

**Sample XML Template**

Copy the code from this template to paste into your Order Document, rename the template and then click **Add New Template** to save it, like so:

![](https://251457507-files.gitbook.io/~/files/v0/b/gitbook-x-prod.appspot.com/o/spaces%2FAQOLMUJWMYtrpQ7Oxxca%2Fuploads%2FMZ0t6bAWHrWfPP53qQHO%2Flegacy-8348afd86b7b73b41230.png?alt=media)

### Create Rule

Once your template has been created, head into the Rule Builder to to create a rule that will add the XML file to your orders.

To create your rule, start with the **Order Rule Rule Type**. The event can be whatever you need to set it to, but for this example, we’ll use **Order is Imported**.

Under Filters & Actions, choose the **Create Text File** action and select your XML template from the dropdown:

![](https://251457507-files.gitbook.io/~/files/v0/b/gitbook-x-prod.appspot.com/o/spaces%2FAQOLMUJWMYtrpQ7Oxxca%2Fuploads%2FXhQcwpUgxGgDkR4fj6im%2Flegacy-ea5252233ab7275ad5ad.png?alt=media)

Now, whenever an order is imported, the XML file will be created and applied to the order metadata.

For more information on working with the Rule Builder, including how to use different events and set filters so the Rule Builder knows which orders to apply the Create Text File action to, see [this guide](/guided-walkthroughs/rules-and-automations/how-to-work-with-rules).

To find the link to your file, look down at the bottom of the order details page in the Order Metadata section. The file will be added under txt\_xxx, where xxx is the template ID, which can be found in the URL of the template you created in the first step:

![](https://251457507-files.gitbook.io/~/files/v0/b/gitbook-x-prod.appspot.com/o/spaces%2FAQOLMUJWMYtrpQ7Oxxca%2Fuploads%2FzOLG9yNs2D7jmq2UAM9M%2Flegacy-8fc517da8330511d4557.png?alt=media)

#### Attach File to Email Template

To add the file as an email attachment, get the file value from the order metadata as described in the last step.

Add this to the **Attachment Field Names** field in the email template where you would like it to be an attachment:

![](https://251457507-files.gitbook.io/~/files/v0/b/gitbook-x-prod.appspot.com/o/spaces%2FAQOLMUJWMYtrpQ7Oxxca%2Fuploads%2Fjr6gcf3MWqvOX4yp7IK4%2Flegacy-89486231b8930274e27f.png?alt=media)

Multiple field names can be entered if separated by comma.

For more information on working with email templates, please see [this guide](/guided-walkthroughs/templates-emails-and-order-documents/how-to-work-with-email-templates).

### Embedded code sample

```
<?xml version="1.0" encoding="UTF-8"?>
<orders>
{% for key, order in orders %}
    <order>
        <source_id>{{ order.source_id|e }}</source_id>
        <first_name>{{ order.shipping.first_name|e }}</first_name>
        <last_name>{{ order.shipping.last_name|e }}</last_name>
        <address1>{{ order.shipping.address1|e }}</address1>
        <address2>{{ order.shipping.address21|e }}</address2>
        <city>{{ order.shipping.city|e }}</city>
        <state>{{ order.shipping.state|e }}</state>
        <zip>{{ order.shipping.zip|e }}</zip>
        <country>{{ order.shipping.country|e }}</country>
        <phone>{{ order.shipping.phone|e }}</phone>
        <order_items>
		{% for item in order.order_items %}
			  <order_item>
			      <sku>{{ item.code|e }}</sku>
			      <quantity>{{ item.quantity|e }}</quantity>
			  </order_item>
		{% endfor %}
		</order_items>
	</order>
{% endfor %}
</orders>
```


# How to Use Barcodes

If you need a way to include barcodes in your email or receipt templates, you can do so with Order Desk and some [Twig](/technical-documentation/templates-and-documents/how-to-build-custom-templates).

### Adding QR Codes

To add a QR Code to a template using Twig, use this filter:

`|qrcode`

or:

`|qrcode(300)`

for a larger size. The default size is 150.

Example:

`<img src="{{ order.source_id|qrcode }}">`

### Adding Barcodes

To add a barcode, use this Twig filter:

`|barcode`

or:

`|barcode(type, width, height)`

Replace (type, width, height) with the values needed. The default values are (“C128”, 2, 80).

Example:

`<img src="{{ order.source_id|barcode("C39", 2, 80) }}">`

### Barcode Types

Available barcode options are

C39

C39+

C39E

C39E+

C93

S25

S25+

I25

I25+

C128

C128A

C128B

C128C

EAN2

EAN5

EAN8

EAN13

UPCA

UPCE

MSI

MSI+

POSTNET

PLANET

RMS4CC

KIX

IMB

CODABAR

CODE11

PHARMA

PHARMA2T

### Using Barcode Scanners

Order Desk can listen for your USB scanner input. Depending on how your barcodes are set up, you can do one of three things with a scanner.

Enable this functionality by adding **USBSCANNER** to the feature tag section of your [Store Settings](/guided-walkthroughs/using-order-desk/manage-store-settings#store-settings) page.

#### Access Order Detail Page

This works with regular QR codes or barcodes.

Example code to pull up the order number:

`<img src="{{ ("^#^" ~ order.id)|barcode("C128", 1, 40) }}">`

#### Move Order to Different Folder

This works with regular QR codes or barcodes.

Example code for moving an order to folder 300:

`<img src="{{ ("^F300^" ~ order.id)|barcode("C128", 1, 40) }}">`

#### Execute Button Action or Integration Submission

In order to execute a button action from Order Desk using your QR code and scanner you will need to use the following code (using a button called “Blue” as an example):

`<img src="{{ ("^submit_to_blue_zvoxh9^" ~ order.id)|qrcode(100) }}">`

Please note: You have to have the Order Desk app open and in focus to ensure this works. Also, the output from the QR code must end in a new line.

If you wish to test this we recommend opening a text-editor, such as notepad, scanning a QR code and you should see the output to the text-editor as below, with a new line at the end.

`^submit_to_blue_zvoxh9^<order-id>`

If you are not using a USB Scanner but just wish to use your phone to generate links that can be pressed to activate buttons, you need to be logged in on your phone and use the code below:

`<img src="{{ ("https://app.orderdesk.me/act/scanner?input=^submit_to_blue_zvoxh9^" ~ order.id)|qrcode(100) }}">`

Note: For best results, we recommend using a **WoneNice USB Laser Barcode Scanner**. Additionally, your keyboard language must be US.

### Sample Barcode Email Template

The following code is an example of an email template you can use in Order Desk that would send the customer a receipt and create barcodes on the spot. The variable field names are slightly different from the receipt template itself.

In this example a barcode is generated for every item on the order, and the barcode will read the item’s unique ID.

### Related Articles

* [How to Build Custom Templates](/technical-documentation/templates-and-documents/how-to-build-custom-templates)

### Embedded code sample

```
<!DOCTYPE html>
<html lang="en">
<head>
<meta charset="utf-8">
<title>{{ store_name }} Receipt</title>
<link rel="stylesheet" href="{{ base_url }}/css/receipt.css">

<style type="text/css">
/* CUSTOM CSS HERE */


</style>
</head>

<body id="printpage">

<a href="#" onclick="window.print(); return false;" id="printbutton" class="btn noprint">Print</a>

{% for key, order in orders %}

{{ key > 0 ? '<div class="page-break"></div>' }}
<div class="main">

	{# This is a good place to put in a logo if you want should be https: #}
	{# <img src="your_image_url" alt="{{ store_name|e }}"> #}
	<div class="header_logo">{{ store_name }}</div>

	<div class="wrapper">
		<div class="wrapper-table">
			<ul>
				<li class="invoice-title">Receipt</li>
				<li>&nbsp;</li>
				<li><b>Date:</b> {{ order.date_added|date_modify("+0 hours")|date(store_date_format, store_timezone) }}</li>
				<li><b>Order Number:</b> {{ order.source_id }}</li>
				<li><b>Email:</b> {{ order.email }}</li>
				{% if order.shipping.phone %}<li><b>Phone:</b> {{ order.shipping.phone }}</li>{% endif %}
				{% if order.shipping_method %}<li><b>Shipping:</b> {{ order.shipping_method }}</li>{% endif %}

				{# Checkout Data #}
				{% if order.checkout_data|length > 0 %}
					{% for key, val in order.checkout_data %}
					<li><b>{{ key }}:</b> {{ val }}</li>
					{% endfor %}
				{% endif %}
			</ul>
			<br>

			<table class="address_table" cellpadding="0" cellspacing="0" border="0">
				<tbody>
					<tr>
						<td>
							<b>Invoice Address:</b><br />
							{{ order.customer.first_name }} {{ order.customer.last_name }}<br>
							{% if order.customer.company %}{{ order.customer.company }}<br>{% endif %}
							{{ order.customer.address1 }}<br>
							{% if order.customer.address2 %}{{ order.customer.address2 }}<br>{% endif %}
							{{ order.customer.city }}, {{ order.customer.state }} {{ order.customer.postal_code }}<br>
							{{ order.customer.country != store_country ? order.customer.country }}<br>
						</td>
						<td>
							<b>Shipping Address:</b><br />
							{{ order.shipping.first_name }} {{ order.shipping.last_name }}<br>
							{% if order.shipping.company %}{{ order.shipping.company }}<br>{% endif %}
							{{ order.shipping.address1 }}<br>
							{% if order.shipping.address2 %}{{ order.shipping.address2 }}<br>{% endif %}
							{% if order.shipping.address3 %}{{ order.shipping.address3 }}<br>{% endif %}
							{% if order.shipping.address4 %}{{ order.shipping.address4 }}<br>{% endif %}
							{{ order.shipping.city }}, {{ order.shipping.state }} {{ order.shipping.postal_code }}<br>
							{{ order.shipping.country != store_country ? order.shipping.country }}<br>
						</td>
					</tr>
				</tbody>
			</table>

			{# Show Products #}
			<table class="product_table" cellpadding="5" cellspacing="5" border="0">
				<thead>
					<tr>
						<th class="product_header">Product</td>
						<th class="price_header" class="short_cell">Price</th>
						<th class="qty_header" class="short_cell">Qty</th>
						<th class="subtotal_header product_total_price_header" class="short_cell">Subtotal</th>
					</tr>
				</thead>
				<tbody>
				{# List of Items in Order #}
				{% for item in order.order_items %}
					<tr>
						<td>
							{{ item.name }}
				                        <img src="{{ item.code|barcode("C128", 2, 80) }}">
							
							{# Checkout Data and Variations #}
							{% if item.variation_list|length > 0 %}
								<ul>
								{% for key, val in item.variation_list %}
									<li><b>{{ key }}:</b> {{ val }}</li>
								{% endfor %}
								</ul>
							{% endif %}
						</td>

						<td>{{ item.price|money_format }}</td>
						<td>{{ item.quantity }}</td>
						<td>{{ (item.quantity * item.price)|money_format }}</td>
					</tr>
				{% endfor %}

				{# Show Totals #}

				{% if order.shipping_total > 0 %}
				<tr>
					<td colspan="3" align="right"><b>Shipping:</b></td>
					<td>{{ order.shipping_total|money_format }}</td>
				</tr>
				{% endif %}

				{% if order.tax_total > 0 %}
				<tr>
					<td colspan="3" align="right"><b>Tax:</b></td>
					<td>{{ order.tax_total|money_format }}</td>
				</tr>
				{% endif %}
				{% if order.discount_list|length > 0 %}
					{% for discount in order.discount_list %}
					<tr>
						<td colspan="3" align="right"><b>{{ discount.name|e }}:</b></td>
						<td>{{ discount.amount|money_format }}</td>
					</tr>
					{% endfor %}
				{% endif %}

				<tr>
					<td colspan="3" align="right"><b>Total:</b></td>
					<td>{{ order.order_total|money_format }}</td>
				</tr>

				</tbody>
			</table>
		</div>
	</div>

	{# Show a Nice Shadow Image at the Bottom of The Table #}
	<div class="shadowimg"><img src="{{ base_url }}/images/paper-shadow.png" width="505" height="8" alt="shadow" /></div>

	{# This is a nice place to put a thank-you message #}
	<p class="receipt_footer"></p>
</div>


{% endfor %}


</body>
</html>
```


# Shipping, Fulfillment, and Returns


# How to Split and Dropship Orders for Separate Vendors

If you work with more than one fulfillment service or vendor, you can use Order Desk to send dropship emails to each separate service for the items they need to fulfill. For this to happen, you will need to set up your Order Desk store to split your orders whenever an order has items for more than one fulfillment service. Once split, order details can be emailed to each separate fulfillment service.

This guide will walk you through the steps for setting up your products so Order Desk knows which items are for which vendors, and then will give instructions for splitting orders, creating email templates and sending out email notifications about new orders that need to be fulfilled.**IMPORTANT**\
If you use Shopify or BigCommerce, make sure you’re following the instructions in our How to Split by Vendor with [Shopify](/guided-walkthroughs/integration-specific-walkthroughs/how-to-split-by-vendor-with-shopify) and [BigCommerce](/guided-walkthroughs/integration-specific-walkthroughs/how-to-split-by-vendor-with-bigcommerce) guides.

### Add Inventory to Order Desk

To properly split orders and notify your vendors that they have items to fulfill, you’ll need to first add your inventory to Order Desk.

**Order Desk Inventory**

Let’s first look at where inventory is stored in Order Desk and what each item should look like.

Click on **Inventory Items** under the **Tools** menu in the left sidebar.

![](https://251457507-files.gitbook.io/~/files/v0/b/gitbook-x-prod.appspot.com/o/spaces%2FAQOLMUJWMYtrpQ7Oxxca%2Fuploads%2Fa3cWF70oB7DeezLQdOOY%2Flegacy-53c98ced4fb572b3f48d.png?alt=media)

In our example store, we have two items, Blue Whale Mug and Giraffe Figurine. We can click on the item name to look at the details saved to it. Every item needs to have two main details: a unique Code/SKU that isn’t shared with any other product you sell and a Location name, which is the name of the vendor or fulfillment service

For the Blue Whale Mug, the SKU is BWM911 and the vendor’s name is MugRunner, set in the Location field:

![](https://251457507-files.gitbook.io/~/files/v0/b/gitbook-x-prod.appspot.com/o/spaces%2FAQOLMUJWMYtrpQ7Oxxca%2Fuploads%2FSU5B3PuZzMH9tCoah8Ro%2Flegacy-c522609b5bd2130363b5.png?alt=media)

For the Giraffe Figurine, the SKU is GF008 and the vendor’s name is Safari Depot, set in the Location field:

![](https://251457507-files.gitbook.io/~/files/v0/b/gitbook-x-prod.appspot.com/o/spaces%2FAQOLMUJWMYtrpQ7Oxxca%2Fuploads%2Fenkp4kaoYqbHBOGI67t7%2Flegacy-416d9d3be070c2e46141.png?alt=media)

A unique SKU is needed for each item because this is how Order Desk matches the items in the order with the items saved here. When the SKUs match, the extra details saved to the item will be synced into the order, so each item in the order will include the vendor location.

**IMPORTANT**\
To sync inventory details into your orders when they import, make sure **Add Inventory Details to Order Items** in your Store Settings is enabled. For instructions, please refer to our [Store Settings guide](/guided-walkthroughs/using-order-desk/manage-store-settings).

Make sure the vendor location name is consistent on all products for that vendor. Using Safari Depot as an example, all products should say “Safari Depot”. If some products are Safari Depot, others are safari depot, others are SafariDepot, etc., they will technically be different names from each other. It doesn’t matter what you use for the location name, just as long as you use the same spelling, punctuation, capitalization and spaces on each.

**Adding Inventory to Order Desk**

There are a few ways to add your inventory to Order Desk. You can add products one at a time from the Inventory Items page by clicking on the **+Add New Item** button in the top right.

![](https://251457507-files.gitbook.io/~/files/v0/b/gitbook-x-prod.appspot.com/o/spaces%2FAQOLMUJWMYtrpQ7Oxxca%2Fuploads%2FcDjr2Oo5BDaGlInWV5KI%2Flegacy-725baa657308b3e141cc.png?alt=media)

Or, if you have a large number of products, you can add them all at once from a spreadsheet using an import template. Please read [this guide](/guided-walkthroughs/templates-emails-and-order-documents/how-to-import-a-spreadsheet) for instructions on how to create an import template to match your file so you can add your items to Order Desk.

Be sure that your file includes a column with the location name. You may need other fields as well, depending on the data you want to save to your items, but the fields you will definitely want to include are the item name, the SKU and the location:

![](https://251457507-files.gitbook.io/~/files/v0/b/gitbook-x-prod.appspot.com/o/spaces%2FAQOLMUJWMYtrpQ7Oxxca%2Fuploads%2FMVw5WwJQDX0uV37dpei0%2Flegacy-ecd5bb4628e8b197bdd3.png?alt=media)

When setting up your import template, you will need to match each of the columns in your file that you want to import to the field names Order Desk uses. Make sure the vendor name is mapped to the location field:

![](https://251457507-files.gitbook.io/~/files/v0/b/gitbook-x-prod.appspot.com/o/spaces%2FAQOLMUJWMYtrpQ7Oxxca%2Fuploads%2Fe6oE3NqiR2XMR7G3bGEE%2Flegacy-a0432a3f4a21db08c7a5.png?alt=media)

### Split Orders

Once your inventory is saved to Order Desk, you can set up your split rules.

The location that we set on each item is called item metadata—extra details added to the item. This is how you will split orders.

If you aren’t yet familiar with the Order Desk Rule Builder, please take a few minutes to [read through this guide](/start-here/getting-started-series/quick-start-how-customizable-is-order-desk-really#the-order-desk-rule-builder) for a brief overview of what the rule builder does and how it works before continuing on with the instructions in this guide.

To create your split rules, in the Rule Builder create an **Order Rule** rule type:

![](https://251457507-files.gitbook.io/~/files/v0/b/gitbook-x-prod.appspot.com/o/spaces%2FAQOLMUJWMYtrpQ7Oxxca%2Fuploads%2FpR5E00sXVMd6ywhzLPal%2Flegacy-05042eccdb8f58aa60db.png?alt=media)

And then select **Order is Imported** for the event:

![](https://251457507-files.gitbook.io/~/files/v0/b/gitbook-x-prod.appspot.com/o/spaces%2FAQOLMUJWMYtrpQ7Oxxca%2Fuploads%2FAld5xNHjeTtsQxxPWXCI%2Flegacy-ac1add4e5d63ecaa35d4.png?alt=media)

Under the Filters & Actions tab, select **Split Order** as the action.\
For the **Split Type**, choose Metadata.\
In **Field Name**, type in inventory\_location.\
In **Values To Split**, type in your vendor name. For instance, a rule to split out MugRunner products would be:

![](https://251457507-files.gitbook.io/~/files/v0/b/gitbook-x-prod.appspot.com/o/spaces%2FAQOLMUJWMYtrpQ7Oxxca%2Fuploads%2FpD6d1HQoAy5nbpEoSvpf%2Flegacy-b775711a1f8b6faf9a3f.png?alt=media)

You can set up a separate split rule for each separate vendor, or you can split all orders by the inventory\_location field by leaving the **Values To Split** field empty. This allows you to split several vendors without setting up a separate rule for each, though be careful that all items have the inventory\_location name filled out appropriately. These fields are case sensitive, so mugrunner and MugRunnder would split into separate orders.

The **Reference Name** field is optional. When a split rule runs, a split\_title will be added to the order metadata. If the Reference Name is filled out, the name will be added to the split\_title info added in the order metadata.

### Create Dropship Email Templates

If you aren’t familiar with email templates, please read our [Working with Email Templates guide](/guided-walkthroughs/templates-emails-and-order-documents/how-to-work-with-email-templates) before continuing with the instructions in this section.

Follow the instructions for creating an email template in the Working with Email Templates guide. The default template created will be a shipment notification template. For this template, we will be using our Dropship Email Template code instead.

To add this code to your email template, delete all of the text in the existing template:

![](https://251457507-files.gitbook.io/~/files/v0/b/gitbook-x-prod.appspot.com/o/spaces%2FAQOLMUJWMYtrpQ7Oxxca%2Fuploads%2FgcDAsWyY9R5EzncjRr1V%2Flegacy-ce2878f02e7268abb857.gif?alt=media)

Go to [our Dropship Email Template guide](/technical-documentation/templates-and-documents/sample-dropship-email-template) and copy the entire email from line 1 through line 52. Paste this into the template that you just deleted.

You can see that your new email template now has information about the order that needs to be shipped, including a line asking your vendor to fulfill the order.

![](https://251457507-files.gitbook.io/~/files/v0/b/gitbook-x-prod.appspot.com/o/spaces%2FAQOLMUJWMYtrpQ7Oxxca%2Fuploads%2F0Dofwpf6EWrPbDgmJJT3%2Flegacy-2fd3f36d1b38f129d738.png?alt=media)

You can leave this template the way it is or customize it so it says exactly what you need it to say. You may want to add your vendor’s name or put in some other personal information. For example:

`<p>Hi Tom, please fulfill the following order for {{ store_name }}:</p>`

There are instructions in the [Sample Dropshipping Email Template](/technical-documentation/templates-and-documents/sample-dropship-email-template) guide for how to include a link to a printable packing slip in your vendor email template.

**IMPORTANT**\
If you are not familiar with code, be careful to only edit the text. Leave any tags and code as they are in the template. These format the email and automatically pull in the store and order information.

Next, change the **T** **emplate Name**, **Email Subject** and add your vendor’s email address to the **Email Delivery Override**.

![](https://251457507-files.gitbook.io/~/files/v0/b/gitbook-x-prod.appspot.com/o/spaces%2FAQOLMUJWMYtrpQ7Oxxca%2Fuploads%2FyhpAeOlUaPZv3d7tJYjU%2Flegacy-40b3199cf76df455a904.png?alt=media)

Make any other changes necessary following the Working with Email Templates guide for more information.

Once finished, click **Add New Template** below the email to save your template.

Create a separate email template for each vendor you use. You can do this by clicking on the copy button for your existing template:

![](https://251457507-files.gitbook.io/~/files/v0/b/gitbook-x-prod.appspot.com/o/spaces%2FAQOLMUJWMYtrpQ7Oxxca%2Fuploads%2FWCDxhaCm3N7sNgz0zvx8%2Flegacy-b52451f66d3d6d639833.png?alt=media)

Edit the details in any copied templates for your other vendors.

### Create Email Rules

Now that your inventory is saved in Order Desk, your orders are splitting by vendor location and you have email templates created, you can create the rules that will email your vendors about their orders.

Head back into the Rule Builder and create a rule for the event **When Order is Split**.

Add a filter for this rule, replacing XXX with your vendor name exactly as it is written in the location field on those products, that says:

**If Item Metadata Field inventory\_location Equals XXX**

Set up two actions. First, select the **Send Email To Customer** action and select that vendor’s dropship email template that you created in the last step. If you set the vendor’s email address as the delivery override in the template, the email will go to the vendor instead of the customer.

Second, add the **Change Folder** action and select the folder you want these orders to move into after the vendor is emailed. You may choose to move all of your orders to Prepared, or you may want to set up separate folders for each vendor called At MugRunner and At Safari Depot, etc., so you know which orders are still being fulfilled by specific vendors.

Your rule will look like this:

![](https://251457507-files.gitbook.io/~/files/v0/b/gitbook-x-prod.appspot.com/o/spaces%2FAQOLMUJWMYtrpQ7Oxxca%2Fuploads%2FI5Jn23wI0jrZH3Zbg0R0%2Flegacy-40c824ab43e5ceaa43a7.png?alt=media)

Set up a separate rule for each vendor.

### Get Tracking Details

The dropship email template you send to your vendors provides them with a link to click to add shipment details to each order. When they add the details, they will automatically be updated on the order in Order Desk.

Set up one last rule to move these orders to the Closed folder when shipment is added:

![](https://251457507-files.gitbook.io/~/files/v0/b/gitbook-x-prod.appspot.com/o/spaces%2FAQOLMUJWMYtrpQ7Oxxca%2Fuploads%2Fz1EmwGs1zSwLwqhlnsPp%2Flegacy-7817b181cf86148cd3ac.png?alt=media)

Check your shopping cart integration settings to see if you can sync tracking numbers back to the cart to notify your customer and close the order. You can also [email your customer](/guided-walkthroughs/shipping-fulfillment-and-returns/how-to-print-thermal-labels/how-to-send-shipment-tracking-info-to-customers) from Order Desk to notify them about the shipment.

### FAQ

**I have several vendors. Some require an email like this guide explains, but others require orders be sent to them in an exported file or through an integration directly. How do I do that?**

In this guide, we discuss how to set up different rules to email different vendors. Instead of choosing the email action in the rule for a vendor that is already integrated with Order Desk, choose the Submit to Vendor action instead.

For vendors that require an exported template, choose the Change Folder action and select the folder that your export template will pull orders from for that vendor. See our [Export Templates guide](/guided-walkthroughs/templates-emails-and-order-documents/how-to-build-export-templates) for more information.

**What do I do with any split orders that I don’t need to have fulfilled through Order Desk?**

Instead of selecting an action that will email or submit these orders to a vendor, select the action to Change Folder and move them to the Closed folder.


# How to Send Orders for Fulfillment

Once your orders have been [successfully imported](/guided-walkthroughs/orders-and-folders/how-to-begin-importing-orders) into Order Desk and prepared for your fulfillment process, the method you use to export them will vary depending on your setup.

### To an Integration

You can set up rules (which we’ll discuss in the [last getting started guide](/start-here/getting-started-series/quick-start-how-customizable-is-order-desk-really)) or adjust the settings in certain integrations to automatically submit orders. We recommend that you submit orders manually for the first few days until you have a better understanding of how the fulfillment process works in Order Desk. This also gives you the opportunity to correct any mistakes as you catch them, something that is harder to do when everything is running automatically.

After you are familiar with the flow of orders through Order Desk, have corrected any mistakes that cause errors, and you can trust that your integrations are set up properly by watching your orders pass through the app for a few days, it would be a good time to begin automating the process for your store. Before doing that, let’s look at how to submit orders manually.

To submit an order manually to an integration, open up the order and look under the order details for a little button with the name of the fulfillment service you are sending it to. Click the button to submit the order to that service. For this order, we want to send it to ShipStation, so we’ll click the submit to ShipStation button:

![](https://s3.amazonaws.com/helpscout.net/docs/assets/57b0032590336059d4edf94f/images/5a6ba3802c7d3a39e6266912/file-Dnuz7LlPYg.png)

However, there may be issues when you first submit an order. When you click to submit, the order queues up to go through to your fulfillment service. If you check back (or refresh the page) after a few seconds, scroll down and look at the order history section at the bottom of the page to see if the order submitted or not.

![](https://s3.amazonaws.com/helpscout.net/docs/assets/57b0032590336059d4edf94f/images/5a6bab020428632faf623a2f/file-qnWCqUkp2y.png)

In most cases orders submit without any issues, but occasionally an order is rejected because something is wrong in the order per the fulfillment service’s requirements for submission. When this happens, an error message is passed through to Order Desk from the fulfillment service that gives the reason the order was rejected:

![](https://s3.amazonaws.com/helpscout.net/docs/assets/57b0032590336059d4edf94f/images/5a6baaa92c7d3a39e626697d/file-MxezsGacM4.png)

Some common errors include the address format being wrong, the SKU missing or being incorrect, the shipping country being unavailable for that fulfillment service, the shipping method not matching what the fulfillment service is expecting or the print file missing for print on demand items.

Based on the error message, fix the problem with the order and re-submit it. If the error message doesn’t make sense, you can reach out to Order Desk Support or to your fulfillment service for more help. In some cases, we may ask you to contact them, as we aren’t familiar with every error message we see from different services, but we’ll be happy to take a look at your order to help you figure out the problem.

### To a Third Party Vendor

If you need to submit orders to a third party service that isn’t currently integrated with Order Desk, you can do this too. Typically the way Order Desk customers submit orders to third parties is to send them a dropship email with the order details. For more information on how to set up these emails, please review [this guide](/guided-walkthroughs/shipping-fulfillment-and-returns/how-to-split-and-dropship-orders-for-separate-vendors) on creating dropship email templates.

It isn’t necessary to create a rule yet to automate the process. If the email template has already been created, you can submit an order from the order details page by clicking on the email button and selecting the email template meant for your fulfillment service:

![](https://s3.amazonaws.com/helpscout.net/docs/assets/57b0032590336059d4edf94f/images/5a6ba8942c7d3a39e6266962/file-sAnjmALttA.png)

Another way to submit an order to a third party vendor is to export a CSV file. This is a more advanced option, requiring an export template to be created and sent through email or FTP. For more information on how to do this, please review this guide on [How to Building Export Templates](/guided-walkthroughs/templates-emails-and-order-documents/how-to-build-export-templates). If you need any help with this, please contact Order Desk Support.


# How to Work with Shipments

### Overview

Shipments in Order Desk store tracking and shipping details for fulfilled orders. A shipment typically includes the tracking number, shipping carrier, shipping method, and the items that were shipped.

Shipments are usually added automatically when fulfillment services send tracking information back to Order Desk, but they can also be added manually or through the API.

Once a shipment is added, Order Desk can send tracking updates to your sales channels and trigger email notifications if your store is set up to do so.

This guide explains how shipments work in Order Desk and how to manage them.

### Automatically Adding Shipments to Orders

#### From a Fulfillment Integration

Most commonly, shipments are created when a fulfillment service ships the order and sends tracking information back to Order Desk. The shipment is then attached to the order automatically.

Some integrations include a **Check for Shipments** setting that lets you choose how often Order Desk checks for shipment updates from your fulfillment service.

![](https://251457507-files.gitbook.io/~/files/v0/b/gitbook-x-prod.appspot.com/o/spaces%2FAQOLMUJWMYtrpQ7Oxxca%2Fuploads%2FGLCFibutFwOLIogJ13PA%2Flegacy-7274a0aff90f21b38a73.png?alt=media)

Other integrations may require you to copy a **Notification URL** from Order Desk and add it to your fulfillment service dashboard so it can notify Order Desk automatically when orders are shipped.

![](https://251457507-files.gitbook.io/~/files/v0/b/gitbook-x-prod.appspot.com/o/spaces%2FAQOLMUJWMYtrpQ7Oxxca%2Fuploads%2FbWD10dRTeAbRJTgqCth0%2Flegacy-23623621b000b70a82e9.png?alt=media)

#### From Shipping Integrations

Order Desk integrates with several shipping services that let you create shipments and purchase labels directly from the order page or automatically with [**rules**](/guided-walkthroughs/rules-and-automations/how-to-work-with-rules).

**TIP:**

You can view our [**list of shipping service integrations here**](/integration-setup-guides/shipping-services). Each integration guide includes details on how to create and manage shipments when using that service.

#### From the Order Desk API

For developers working with custom integrations, the Order Desk API lets you add shipments to orders programmatically.

You can check out [**our API documentation here**](https://apidocs.orderdesk.com/#shipments).

#### From a Dropship Vendor

Order Desk allows you to send orders to non-integrated vendors using dropship email templates. These emails include a link your vendor can use to submit shipment details for the order.

Once the vendor adds the shipment details through that link, the shipment information will automatically be added to the order in Order Desk.

If you’re interested in working with dropship vendors for fulfillment, you can [**learn more about the setup process here**](/guided-walkthroughs/shipping-fulfillment-and-returns/how-to-split-and-dropship-orders-for-separate-vendors).

### Adding Shipments Manually

Within an order, you can quickly add a shipment by entering a tracking number in the **Tracking** field beneath the order totals and clicking **Add**.

![](https://251457507-files.gitbook.io/~/files/v0/b/gitbook-x-prod.appspot.com/o/spaces%2FAQOLMUJWMYtrpQ7Oxxca%2Fuploads%2F2rm1x12jwR5FEztgsFxq%2Flegacy-da32ac4a318557689db8.png?alt=media)

This creates a shipment with only a tracking number and no carrier details. The shipment date will be set to the current date.

If you’d like more control over the shipment information, you can use the **Add More Fields to Shipment** option and fill out the additional details below:

![](https://251457507-files.gitbook.io/~/files/v0/b/gitbook-x-prod.appspot.com/o/spaces%2FAQOLMUJWMYtrpQ7Oxxca%2Fuploads%2FfZDCKengcbybyyOPnQ4t%2Flegacy-5f2c79d3bd3e0eae5d40.gif?alt=media)

#### Shipment Fields

You can add or edit the following information when creating shipments in Order Desk.

| Field           | Description                                                                                                                                                                                                  |
| --------------- | ------------------------------------------------------------------------------------------------------------------------------------------------------------------------------------------------------------ |
| Tracking #      | The tracking number for the shipment. **Required**. A shipment cannot be created without one.                                                                                                                |
| Carrier Code    | The carrier code for the shipping carrier used.                                                                                                                                                              |
| Shipment Method | The specific shipment method used by the carrier.                                                                                                                                                            |
| Weight          | The weight of the shipment package.                                                                                                                                                                          |
| Cost            | The shipment cost.                                                                                                                                                                                           |
| Status          | The status of the shipment.                                                                                                                                                                                  |
| Tracking URL    | The tracking link. If left blank, Order Desk will try to generate a tracking link based on the carrier and tracking number.                                                                                  |
| Date Shipped    | The date the shipment was sent.                                                                                                                                                                              |
| Order Items     | By default, a shipment applies to all items in the order. To assign a tracking number to specific items for partial shipments, untick the **All Items** option and select the relevant items and quantities. |

![](https://251457507-files.gitbook.io/~/files/v0/b/gitbook-x-prod.appspot.com/o/spaces%2FAQOLMUJWMYtrpQ7Oxxca%2Fuploads%2FL2uIauaQ3KtwFea8MgAh%2Flegacy-f2fbd3da48259d0efbe5.png?alt=media)

#### Using the Add Shipments Tool

Order Desk includes an **Add Shipments Tool** that lets you quickly add shipments to multiple orders at once.

This tool is useful if you have a list of tracking numbers from a fulfillment partner or shipping provider and want to apply them to orders without opening each one individually.

To access the tool, go to **Tools** in the left sidebar of your Order Desk account and select **Add Shipments**. From there, enter the order numbers and tracking information in the format shown below and click **Import Now** to create shipments in bulk.

![](https://251457507-files.gitbook.io/~/files/v0/b/gitbook-x-prod.appspot.com/o/spaces%2FAQOLMUJWMYtrpQ7Oxxca%2Fuploads%2FFKshZrN9MJHnmKmzACfH%2Flegacy-11720944c9c4c9c3bc14.png?alt=media)

The expected format for each line is:

```
[Order Source ID] [Tracking Number] [Optional Carrier Code]
```

For example:

```
12235574324 1Z51451549564657 UPS  
  
12235574214 1Z51451547452147 UPS
```

### Importing Shipments with a Spreadsheet

Shipments can also be added in bulk by importing a spreadsheet into Order Desk. This option is especially helpful when working with large numbers of orders or when your fulfillment partner provides shipment data in spreadsheet format.

To import shipments, prepare a spreadsheet with the order numbers and tracking numbers for each shipment, then upload it [**through an Import Template**](/guided-walkthroughs/templates-emails-and-order-documents/how-to-import-a-spreadsheet).

### Managing Shipments

Shipments are displayed directly on the order page. Click any tracking number to view the full shipment details. Shipments can also be edited or deleted from the order page.

![](https://251457507-files.gitbook.io/~/files/v0/b/gitbook-x-prod.appspot.com/o/spaces%2FAQOLMUJWMYtrpQ7Oxxca%2Fuploads%2FFfwlb2pzORdvxPknu3zd%2Flegacy-d5a3d34bcb3a569021ac.gif?alt=media)

**NOTE:**

If a shipment has already been synced to your cart, updating or deleting it in Order Desk will **not** automatically update or remove it from your cart. You’ll need to make that change manually there as well.

#### Managing Shipments with Rules

Rules give you more control over how shipments are handled in your store. Using the Rule Builder, you can automate actions that would otherwise require manual steps on each order.

For example, you can update shipment fields automatically as they come in, move orders into different folders after a shipment is added, or trigger other actions immediately after a shipment is added to an order.

To learn more about Shipment rules, check out the [**Rules Reference guide**](/resources/rules-reference-events-filters-and-actions).

### Sending Tracking Updates Back to Your Cart

#### Automatic Sync

In many integrations, Order Desk can send shipment and tracking information back to your cart automatically, marking the order as shipped as soon as tracking information comes in. To enable this, turn on the **Sync Tracking Numbers** setting in your cart integration settings.

![](https://251457507-files.gitbook.io/~/files/v0/b/gitbook-x-prod.appspot.com/o/spaces%2FAQOLMUJWMYtrpQ7Oxxca%2Fuploads%2FYnPzvtB7Alj8u0Rl2HNb%2Flegacy-774c4f31a09dd2ee12b7.png?alt=media)

**TIP:**

The exact location of this setting varies by integration. Check your cart integration guide to learn where to find it.

***What If I enable Automatic sync after orders have already shipped?***

If you enable automatic sync after shipments have already been added to orders, those earlier shipments will not be synced automatically. You can sync them manually using the steps in the **Manual Sync** section below.

#### Manual Sync

You can manually sync a shipment to your cart if automatic sync was not enabled at the time, or in rare cases where an automatic sync fails.

To set up manual sync, create a rule using a [**Custom Button**](/guided-walkthroughs/rules-and-automations/how-to-use-custom-buttons).

* **Rule Type:** Order Rule
* **Event:** Select or create a Custom Button
* **Action:** Process Shipments Manually

You can then open the order page and click your **Custom Button** to manually sync the shipments on the order back to your cart.

**IMPORTANT:**

The **Sync Tracking Numbers** setting must be enabled in your cart integration settings for manual sync to work.

### Directly Sending Tracking Updates to Customers

When a shipment is added to an order, you can automatically notify customers with their tracking information directly from Order Desk. [**Check out this guide**](/guided-walkthroughs/shipping-fulfillment-and-returns/how-to-print-thermal-labels/how-to-send-shipment-tracking-info-to-customers) to learn how to set it up.

### Handling Shipments Without Tracking Numbers

**IMPORTANT:**

This workaround may not work for all carts. Some services require valid tracking numbers on shipments, and others may **penalize** sellers for using invalid tracking numbers. It’s best to confirm first with your cart service before using this workaround.

Order Desk can only store shipments that include a tracking number. If you need to mark an order as shipped without one, you can use `N/A` as the tracking number and then save the shipment.

This allows Order Desk to create the shipment and mark the order as shipped in your cart.

### Notes and Limitations

The following notes cover shipment behaviors that may vary depending on your cart or fulfillment setup.

#### Partial Shipment Support

Some cart platforms do not support partial shipment updates. When these carts receive a shipment update from Order Desk, they may mark the entire order as fulfilled even if the shipment only includes some of the items.

If you plan to ship items separately, keep this behavior in mind when working with carts that do not support partial shipments.

For carts that do support partial shipments, you can optionally force the cart to mark the entire order as fulfilled by adding the following checkout data field to the order:

`fulfill_entire_order = 1`

![](https://251457507-files.gitbook.io/~/files/v0/b/gitbook-x-prod.appspot.com/o/spaces%2FAQOLMUJWMYtrpQ7Oxxca%2Fuploads%2FKyAiPZtxi7UaMUO0qMnY%2Flegacy-14c4eef18b1adeae5db4.png?alt=media)

When this field is present, Order Desk will try to submit the shipment in a way that tells the cart to mark the entire order as fulfilled.

**NOTE:**

Not all carts support this behavior. Check your cart integration guide to see if this option is available.

### Extra Options

The following options give you additional control over how shipment updates are handled.

#### Delaying Shipment Updates Sent to the Cart

Order Desk normally sends shipment updates to your cart as soon as a shipment is added to an order.

If you would like to delay when shipment information is sent back to your cart, add the following order metadata field:

`shipment_delay_hours`

Set the value to the number of hours Order Desk should wait before sending the shipment update.

For example:

`shipment_delay_hours = 2`

In this case, Order Desk will wait two hours after the shipment is added before sending the shipment update to the cart.

**TIP:**

You can set order metadata automatically using rules. See the [**How to Work with Rules guide**](/guided-walkthroughs/rules-and-automations/how-to-work-with-rules) for more details

### Related Guides

The following guides cover additional topics related to shipments and shipping setups.

#### Shipping Method Match

Order Desk integrates with several retail middleware platforms such as [**DSCO Supplier**](/integration-setup-guides/sales-channels/dsco-supplier-integration),[ **Logicbroker**](/integration-setup-guides/sales-channels/logicbroker-integration),[ **SPS Commerce** ](/integration-setup-guides/sales-channels/sps-commerce-integration)and [**Rithum**](/integration-setup-guides/sales-channels/rithum-integration). These services connect retailers to multiple vendors and often require shipments to use specific supported shipping services.

Because of this, the shipping method sent with a shipment must match one of the services supported by the retailer.

If the shipping method on your shipment does not match the format required by the retailer, you can use **Shipping Method Matches** to map your shipment details to the format expected by your vendors.

For more details, check out the [**Shipping Method Match guide**](/guided-walkthroughs/shipping-fulfillment-and-returns/how-to-set-up-shipping-method-matches).

#### Shipping Class Match

Shipping method names on orders often do not match the shipping methods used by fulfillment services. Shipping Class Matches let you translate the shipping method on an order into the method your fulfillment service recognizes.

**NOTE:**

Shipping Class Matches are used to translate methods between Order Desk and your fulfillment service. They are not related to sending shipment updates back to your cart. [**Learn more about this here**](/guided-walkthroughs/shipping-fulfillment-and-returns/how-to-set-up-shipping-class-matches).


# How to Set Up Shipping Class Matches

Because shipping method names on orders rarely match the shipping method names a fulfillment service uses, you can create shipping class matches to tell your fulfillment service what shipping method and carrier they should use for each of your orders.

If your integration has this, you will find it near the bottom of the integration settings page:

![](https://251457507-files.gitbook.io/~/files/v0/b/gitbook-x-prod.appspot.com/o/spaces%2FAQOLMUJWMYtrpQ7Oxxca%2Fuploads%2FcICMUC2RyH4xoAX3wH4r%2Flegacy-79fa26a8b4dc401f69fe.png?alt=media)

All of your shipping method names must be matched—if they aren’t already the exact shipping method name the fulfillment service uses. If no match is made, the default shipping class will be used instead.

### Default Shipping Classes

Most fulfillment integrations have a default shipping class or default mail class setting:

![](https://251457507-files.gitbook.io/~/files/v0/b/gitbook-x-prod.appspot.com/o/spaces%2FAQOLMUJWMYtrpQ7Oxxca%2Fuploads%2FtXeDzsOZqx2gUFmeoGcX%2Flegacy-7c07ccebf5934a4baf79.png?alt=media)

This setting lets you tell the fulfillment service what method you want them to ship your orders by default. This means that if you don’t have any shipping class matches set up and the shipping method on your order isn’t a method name the fulfillment service uses, they will use this default mail setting for that order.

To avoid your fulfillment service using the default method for every order, set up shipping class matches for each of your method names.

### Shipping Class Match

Check the name of the shipping method on your orders by looking at the order details page:

![](https://251457507-files.gitbook.io/~/files/v0/b/gitbook-x-prod.appspot.com/o/spaces%2FAQOLMUJWMYtrpQ7Oxxca%2Fuploads%2FwAqFSPypTjqJn4q7m3HR%2Flegacy-e76ffeec9eb0cd14bebe.png?alt=media)

This is called the **Shopping Cart Name** —that is, the method name that is coming in on the order *from* the shopping cart.

In your integration settings, scroll down to the Shipping Class Match section.

To set up your matches, click on **–Select Carrier Class–** next to \[service name] Classes. The dropdown will show all available shipping methods that the fulfillment service uses. Choose the method you want the fulfillment service to use for the method you have set up in your shopping cart

![](https://251457507-files.gitbook.io/~/files/v0/b/gitbook-x-prod.appspot.com/o/spaces%2FAQOLMUJWMYtrpQ7Oxxca%2Fuploads%2FYAlJjwuuNzoHDG8LQK3e%2Flegacy-8ea9397eee747e6847d5.gif?alt=media)

Next, add the shipping method name from the shopping cart to the **Shopping Cart Name** field. In the above example, that would be Gelato Priority. Click **Add** to create the match.

![](https://251457507-files.gitbook.io/~/files/v0/b/gitbook-x-prod.appspot.com/o/spaces%2FAQOLMUJWMYtrpQ7Oxxca%2Fuploads%2FZhVugzXJnx3qXNbI2SyC%2Flegacy-0ac98e99d6660786e631.png?alt=media)

In this example, any time an order comes in with Gelato Priority as the shipping method, Gelato will know to ship it Priority.

Add as many matches as necessary. The column to the right of the Shipping Class Match area will show the matches that have already been made.

![](https://251457507-files.gitbook.io/~/files/v0/b/gitbook-x-prod.appspot.com/o/spaces%2FAQOLMUJWMYtrpQ7Oxxca%2Fuploads%2FAt52TXeXasfklUMInzbi%2Flegacy-4bb8445132ceed0db573.png?alt=media)

**NOTE:** If a direct match to the shipping method in your cart can’t be found in your Shipping Class Match options, we will check for a partial match. If a partial match exists, that is what will be used. If no direct *or* partial match is found, the shipping will default to the Default Mail Class in your integration settings.


# How to Set Up Shipping Method Matches

Order Desk integrates with several retail middleware cart platforms (such as [**DSCO Supplier**](/integration-setup-guides/sales-channels/dsco-supplier-integration), [**Rithum**](/integration-setup-guides/sales-channels/rithum-integration) and more). These services connect to multiple retail vendors, and each vendor may require a specific, supported shipping service whenever a shipment is created for an order.

This guide explains how to set up **Shipping Method Matches**, which let you map your shipment details into the format your retail vendors expect.

### Overview

Some middleware retail vendors require a specific *shipping service value* to be passed back when submitting shipments. However, the shipping carrier and shipping method values on your shipments might not always match what the vendor is expecting.

The Shipping Method Match feature lets you map carrier and method combinations on incoming shipments to the shipping service your vendor requires.

**TIP**

Order Desk has some built-in logic to estimate what the shipping service value should be when sending shipment details back to your integration.

The Shipping Method Match setting gives you an extra layer of control by letting you define exactly how the matching should work.

### Shipping Method Match Settings

If you’re using a supported middleware integration, you’ll find the Shipping Method Match section in the integration settings page.

![](https://251457507-files.gitbook.io/~/files/v0/b/gitbook-x-prod.appspot.com/o/spaces%2FAQOLMUJWMYtrpQ7Oxxca%2Fuploads%2FXBX3DlZM8LKfJzPy7S61%2Flegacy-62bb48f3558366725a42.png?alt=media)

**TIP**

\[Integration] here is just a placeholder. If you’re using Rithum, for example, you’ll see **Rithum Class** instead:

![](https://251457507-files.gitbook.io/~/files/v0/b/gitbook-x-prod.appspot.com/o/spaces%2FAQOLMUJWMYtrpQ7Oxxca%2Fuploads%2FqCv0FdqUTY6pZngSLbO8%2Flegacy-2456657267791e6ad5d5.png?alt=media)

**\[Integration] Class**

Set the shipping service or method you want Order Desk to send back to your middleware cart service. This is the value your retail vendor is expecting to receive.

**Shipping Carrier**

Set the carrier code you expect to receive from your fulfillment service. Order Desk will look at the carrier value on the shipment and, if it matches, will use the shipping service you’ve entered above in the *\[Integration] Class* field.

If you expect shipments to come in without a carrier, leave this field blank.

To match **any** carrier on your shipments, enter `_ANY_` .

**Shipping Method**

Set the shipping method name you expect to receive from your fulfillment service. Order Desk will look at this value on the shipment and try to match it to the *\[Integration] Class* you’ve specified.

If you expect shipments to come in without a method, leave this field blank.

To match **any** method, enter `_ANY_` .

**IMPORTANT**

Shipping Method Matches are *case-insensitive*.

#### Examples

For these examples, we’d imagine using DSCO Supplier as the integration of choice:

**Matching a specific carrier and method**

* **DSCO Supplier Class:** FESP
* **Shipping Carrier:** FedEx
* **Shipping Method:** Ground

![](https://251457507-files.gitbook.io/~/files/v0/b/gitbook-x-prod.appspot.com/o/spaces%2FAQOLMUJWMYtrpQ7Oxxca%2Fuploads%2FHPvZ8QpLGFmVrfcNCrL0%2Flegacy-be366607ce323f923f87.png?alt=media)

**Result**

When a shipment comes in with **FedEx** as the carrier and **Ground** as the method, Order Desk will send back **FESP** to DSCO supplier.

**Matching any method for a specific carrier**

* **DSCO Supplier Class:** FESP
* **Shipping Carrier:** FedEx
* **Shipping Method:** *ANY*

![](https://251457507-files.gitbook.io/~/files/v0/b/gitbook-x-prod.appspot.com/o/spaces%2FAQOLMUJWMYtrpQ7Oxxca%2Fuploads%2FLaFMTB8EBUUGwTonkdtF%2Flegacy-e17807c512ef7bd6a9e2.png?alt=media)

**Result**

Any **FedEx** shipment will be matched, regardless of method. Order Desk will send back **FESP**.

**Matching any carrier and any method**

* **DSCO Supplier Class:** FESP
* **Shipping Carrier:** *ANY*
* **Shipping Method:** *ANY*

![](https://251457507-files.gitbook.io/~/files/v0/b/gitbook-x-prod.appspot.com/o/spaces%2FAQOLMUJWMYtrpQ7Oxxca%2Fuploads%2FBOcdVlbnyfXVOUUS4R4g%2Flegacy-590ad2d16f3db797a9de.png?alt=media)

**Result**

This is a catch-all. Any shipment carrier or method will default to **FESP**.


# How to Print Thermal Labels

Printing labels on a label printer can be tricky because data needs to be sent in raw format instead of printing like a traditional printer.

In order to facilitate reliable printing to your label printer, Order Desk uses a service called [PrintNode](https://www.printnode.com/) which involves installing a small app on your computer. The label is sent to the PrintNode server which then pushes it to your computer and automatically prints the label from your label printer.

### Get Started

If you are connecting a Mac, it’s important that you set up your computer for RAW printing. PrintNode offers a [helpful guide](https://www.printnode.com/docs/raw-printing-for-osx/) for getting this setup. You should do this before installing the PrintNode application.

Enable the PrintNode integration from the **Productivity** tab on the integration page. Confirm your name and email and click the **Setup Account Now** button. We’ll provision your PrintNode account and assign you a password. On the next page, download the Windows or Mac OSX app and install. When prompted, paste the provided login details into the PrintNode app. After the app has connected to the service, click the “Connect Now” button within Order Desk, and we’ll display your available printers. Select your printer and you’ll be all set.

Within EasyPost, make sure to set your domestic label format to EPL2 so the prints will be created in the proper format. You may want to continue to print international shipments in PDF format for proper customs form handling.

If you have any questions or need any assistance, please contact Order Desk for support.


# How to Send Shipment/Tracking Info to Customers

Order Desk can be configured to automatically send shipment and tracking information to your customers when their packages have been shipped.

In order to take advantage of this feature you will need to create an email template and then a rule that will email your customer whenever a shipment is added to an order. Follow the instructions in this guide to set this up in your store.

### Create Email Template

To send shipment and tracking notifications to your customers, you first need to create the email template that will be used for these emails. To do this, click on **Templates** under the Settings menu in the left sidebar, then click to **Add New Email Template**.

![](https://251457507-files.gitbook.io/~/files/v0/b/gitbook-x-prod.appspot.com/o/spaces%2FAQOLMUJWMYtrpQ7Oxxca%2Fuploads%2FJV2MQLuFy7GkALbfPn9c%2Flegacy-c761e8b385b3ac31a9af.png?alt=media)

The default email template added in Order Desk is the shipment notification template:

![](https://251457507-files.gitbook.io/~/files/v0/b/gitbook-x-prod.appspot.com/o/spaces%2FAQOLMUJWMYtrpQ7Oxxca%2Fuploads%2F3mdY6rBEI0qTmRRzkiJl%2Flegacy-5b429b61c41c789fea4e.png?alt=media)

You can use the default template or make any changes if you want to personalize the email. For a detailed explanation of each field, see the [working with email templates guide](/guided-walkthroughs/templates-emails-and-order-documents/how-to-work-with-email-templates#edit-email-templates).

### Create Rule to Send Email

Now that your template is created, you will need to create a rule that will send the email when shipment is added to an order.

If you are unfamiliar with the Rule Builder, see the [How to Work with Rules guide](/guided-walkthroughs/rules-and-automations/how-to-work-with-rules) for more information.

To create your rule, click on **Rule Builder** from the Settings menu in the left sidebar, choose the Order Rule type:

![](https://251457507-files.gitbook.io/~/files/v0/b/gitbook-x-prod.appspot.com/o/spaces%2FAQOLMUJWMYtrpQ7Oxxca%2Fuploads%2F3r7qFNtP9NwrwXavYxwU%2Flegacy-9e467512c3ac72b29944.png?alt=media)

For the Event, select Shipment is Added:

![](https://251457507-files.gitbook.io/~/files/v0/b/gitbook-x-prod.appspot.com/o/spaces%2FAQOLMUJWMYtrpQ7Oxxca%2Fuploads%2FyVzO2e08M1oSeZk3PKGr%2Flegacy-2e40b144eb41da2e027f.png?alt=media)

For the Action, choose **Send Email to Customer**, select your shipment notification template from the list, and set a delay (if any):

![](https://251457507-files.gitbook.io/~/files/v0/b/gitbook-x-prod.appspot.com/o/spaces%2FAQOLMUJWMYtrpQ7Oxxca%2Fuploads%2F3vQcCiEbWhZvDard68VC%2Flegacy-c4e4edf4eae10f0ed752.png?alt=media)

Give your rule a name and save it.

Now, when shipment is added to an order, Order Desk will email this template to your customer to let them know the tracking details.

### Send Details to Specific URL

If you want to send the shipment info to a specific URL, Order Desk can create a built-in webhook for you. To do this, set the URL as an order metadata value called **ship\_notify\_url** with a value of the URL which should receive the post:

![](https://251457507-files.gitbook.io/~/files/v0/b/gitbook-x-prod.appspot.com/o/spaces%2FAQOLMUJWMYtrpQ7Oxxca%2Fuploads%2F16n2kwP8opPGaa9PyyXX%2Flegacy-38b7800177e118df6387.png?alt=media)

Order Desk will send the shipment details to this URL when they are added to the order.

The following info is what will be included with the shipment details.

### Embedded code sample

```
{
    "shipment": {
        "id": "1057432",
        "order_id": "535255",
        "store_id": "113247",
        "tracking_number": "1Z1233456789",
        "carrier_code": "UPS",
        "shipment_method": "UPS Ground",
        "weight": "0",
        "cost": "0",
        "status": "",
        "tracking_url": "https://wwwapps.ups.com/WebTracking/track?track=yes&trackNums=1Z1233456789",
        "label_format": "",
        "label_image": "",
        "print_status": "1",
        "order_items": "",
        "source": "Manual",
        "cart_shipment_id": "",
        "label_shipment_id": "",
        "date_shipped": "2018-11-23",
        "date_added": "2018-11-23 17:39:10"
    },
    "order": {
        "id": "535255",
        "email": "",
        "shipping_method": "Ground",
        "quantity_total": 1,
        "weight_total": 0,
        "product_total": 0,
        "shipping_total": 0,
        "handling_total": 0,
        "tax_total": 0,
        "discount_total": 0,
        "order_total": 0,
        "cc_number_masked": "",
        "cc_exp": "",
        "processor_response": "",
        "payment_type": "",
        "payment_status": "Approved",
        "processor_balance": 0,
        "refund_total": 0,
        "customer_id": "",
        "email_count": "0",
        "ip_address": "",
        "tag_color": "",
        "source_name": "Order Desk",
        "source_id": "D5548847",
        "fulfillment_name": "",
        "fulfillment_id": "",
        "tag_name": "info",
        "folder_id": 12548,
        "date_added": "2018-11-21 23:32:00",
        "date_updated": "2018-11-23 17:38:53",
        "shipping": {
            "first_name": "John",
            "last_name": "Doe",
            "company": "",
            "address1": "123 Main St",
            "address2": "",
            "address3": "",
            "address4": "",
            "city": "Anytown",
            "state": "CA",
            "postal_code": "55555",
            "country": "US",
            "phone": ""
        },
        "customer": {
            "first_name": "John",
            "last_name": "Doe",
            "company": "",
            "address1": "123 Main St",
            "address2": "",
            "city": "Anytown",
            "state": "CA",
            "postal_code": "55555",
            "country": "US",
            "phone": ""
        },
        "return_address": {
            "title": "",
            "name": "",
            "company": "",
            "address1": "",
            "address2": "",
            "city": "",
            "state": "",
            "postal_code": "",
            "country": "",
            "phone": ""
        },
        "checkout_data": [],
        "order_metadata": [],
        "discount_list": [],
        "order_notes": [],
        "order_items": [
            {
                "id": "86596",
                "name": "Test",
                "price": 0,
                "quantity": 1,
                "weight": 0,
                "code": "testsku",
                "delivery_type": "ship",
                "category_code": "",
                "fulfillment_method": "",
                "variation_list": [],
                "metadata": []
            }
        ],
        "order_shipments": [
            {
                "id": "1057432",
                "order_id": "535255",
                "store_id": "113247",
                "tracking_number": "1Z1233456789",
                "carrier_code": "UPS",
                "shipment_method": "",
                "weight": "0",
                "cost": "0",
                "status": "",
                "tracking_url": "https://wwwapps.ups.com/WebTracking/track?track=yes&trackNums=1Z1233456789",
                "label_format": "",
                "label_image": "",
                "print_status": "1",
                "order_items": "",
                "source": "Manual",
                "cart_shipment_id": "",
                "label_shipment_id": "",
                "date_shipped": "2018-11-23",
                "date_added": "2018-11-23 17:39:10"
            }
        ]
    }
}
```


# How to Handle Returns

A common question about Order Desk is how to handle returns, or if it’s even possible.

Because Order Desk is a uniquely customizable order management app, the answer is that it really depends on many factors. These factors include the integrations being used, the workflow in place in a particular account, and the details for each specific store.

### How to Designate a Returned Order

There are a few options in Order Desk for marking orders as returned. The most common are to use [folders](#folders), [notes](#notes) or [tags](#tags). It is also possible to come up with your own custom solutions that could work.

#### Folders

If you want, you can create a folder specifically for all returned orders.

![](https://251457507-files.gitbook.io/~/files/v0/b/gitbook-x-prod.appspot.com/o/spaces%2FAQOLMUJWMYtrpQ7Oxxca%2Fuploads%2Ff3x0JgHxLGRFTbaECVt0%2Flegacy-62a25db4b61c2ccffdea.png?alt=media)

When you handle a return, move the order into the Returns folder. Keep in mind that the folder is only a label. If you need to take any actions on the orders when it is moved into the Returns folder, you will either need a rule to tell Order Desk what to do or you will have to manually act on the order. If you are unfamiliar with the Rule Builder, see the [How to Work with Rules guide](/guided-walkthroughs/rules-and-automations/how-to-work-with-rules).

Folders can be created from your [Store Settings](/start-here/getting-started-series/quick-start-overview#working-with-folders).

#### Notes

A second option is to leave an internal note on the order for your own reference.

Notes can be added in the order directly. Scroll below the item information to find the notes section. When a note is added, it will include the name of the store user who wrote it as well as the date and time it was added.

![](https://251457507-files.gitbook.io/~/files/v0/b/gitbook-x-prod.appspot.com/o/spaces%2FAQOLMUJWMYtrpQ7Oxxca%2Fuploads%2FSE6mv9IFloLKCfbuUGUw%2Flegacy-af2ab31e7d73da4acedb.png?alt=media)

#### Tags

A third option is to use a tag color to represent returned orders.

Tags come in six colors: green, red, blue, yellow, orange and purple. Red is sometimes used to tag fraud risk orders and green to tag orders that are waiting for action to be taken on them, however you can decide what the colors mean and how to apply them within your own store.

Orders can be tagged from the top right corner of the order details page:

![](https://251457507-files.gitbook.io/~/files/v0/b/gitbook-x-prod.appspot.com/o/spaces%2FAQOLMUJWMYtrpQ7Oxxca%2Fuploads%2FAJnysfc2SqCafpGGbeVx%2Flegacy-5b61a2ea07558f156cd8.png?alt=media)

Tags can also be applied from the top right in the folder view:

![](https://251457507-files.gitbook.io/~/files/v0/b/gitbook-x-prod.appspot.com/o/spaces%2FAQOLMUJWMYtrpQ7Oxxca%2Fuploads%2F9X8s5XHtq2WMPvUTLkNb%2Flegacy-1f0ba4568bd769e1f812.png?alt=media)

A faster way to tag orders is to use a rule when certain events take place on an order, such as being moved into a specific folder:

![](https://251457507-files.gitbook.io/~/files/v0/b/gitbook-x-prod.appspot.com/o/spaces%2FAQOLMUJWMYtrpQ7Oxxca%2Fuploads%2FTkymjVXP0QoczzNbMiTW%2Flegacy-18b99d2f1f5afb0b0984.png?alt=media)

### How to Re-Send an Order for Fulfillment

If an entire order or a partial order needs to be re-submitted to an integration for fulfillment, this can be done from Order Desk. Most integrations will not accept an order that has already been sent to them. Duplicate orders are almost always rejected with the error “order has already been submitted.” The way around this is to change the order number first.

Follow the steps below for how to resubmit a [partial order](#partial-order-manually-split-the-order-first) or a [full order](#full-order-duplicate-the-order-first) to an integration.**IMPORTANT**\
If you use OIA Global for fulfillment, they have a different process for resubmitting orders. Please see the [OIA Global Integration](/integration-setup-guides/fulfillment-services/oia-global-integration#resubmitting-or-canceling-an-order) guide for specific instructions.

#### Partial Order: Manually Split the Order First

To re-submit part of an order, first split the order. This creates a new order for the item(s) that need to be sent for fulfillment again.

To split one or more items out of an order, select the items that need to be fulfilled again and click on **Split Order**:

![](https://251457507-files.gitbook.io/~/files/v0/b/gitbook-x-prod.appspot.com/o/spaces%2FAQOLMUJWMYtrpQ7Oxxca%2Fuploads%2FywLxTBynJXroWoSnmPO1%2Flegacy-b60f74c509ab8b712feb.png?alt=media)

The items split into their own order and a suffix (-S2, -S3, etc.) will be added to the order number:

![](https://251457507-files.gitbook.io/~/files/v0/b/gitbook-x-prod.appspot.com/o/spaces%2FAQOLMUJWMYtrpQ7Oxxca%2Fuploads%2FN4XKaV2wtzjYi36Jlugh%2Flegacy-fff774bfd609b2e633ea.png?alt=media)

This new order can be manually submitted to your fulfillment integration now that it has a new order number and only has the item(s) from the original order that need to be fulfilled.

#### Full Order: Duplicate the Order First

If the entire order needs to be resubmitted for fulfillment, the order number will need to be changed so the fulfillment service will accept it as a new order. You can quickly do this by duplicating the order:

![](https://251457507-files.gitbook.io/~/files/v0/b/gitbook-x-prod.appspot.com/o/spaces%2FAQOLMUJWMYtrpQ7Oxxca%2Fuploads%2FMfHDJddb3JxgZNNncn4A%2Flegacy-be7972e422b299da6bb8.png?alt=media)

The order now has a new number and can be manually resubmitted to your fulfillment integration.

If you choose to change the order number directly, please be aware that this may trigger the same order to reimport from the shopping cart or marketplace again as that order number no longer exists in Order Desk.

### Refunds from Order Desk

Depending on the shopping cart integration and the payment processor being used, in some cases, you will be able to process full or partial refunds directly from Order Desk. For more information on refunds, please read the [Refunding and Capturing Payments guide](/guided-walkthroughs/shipping-fulfillment-and-returns/how-to-refund-and-capture-payments).

### Inventory Stock

If your inventory is not being updated by your fulfillment service, you will need to add stock back directly to your returned items in Order Desk.

Do this by clicking on **Inventory Items** in the left sidebar. Manually add the accurate stock back to the necessary items:

![](https://251457507-files.gitbook.io/~/files/v0/b/gitbook-x-prod.appspot.com/o/spaces%2FAQOLMUJWMYtrpQ7Oxxca%2Fuploads%2FmjvilMxFU1n7kyTfD3p7%2Flegacy-ba8bf04804858568181c.png?alt=media)

This will sync the correct inventory back to your shopping cart.

For more information, see the [How to Work with Inventory Counts](/guided-walkthroughs/products-and-inventory/how-to-work-with-inventory-quantities) guide.

### FAQ

#### Does Order Desk process returns?

Order Desk does not process returns, but the app can be used for orders that need to be returned, refunded, exchanged and/or re-shipped, depending on the specific setup of the account.

What works for one store may not work for another depending on preferences, workflow, settings and integrations, among other factors. Once an order has been imported or added to Order Desk, it is usually best to manage that order from within Order Desk, including handling returns when possible.

This may be as simple as refunding the customer’s payment, making a note on the order about what happened and moving the order to a different custom folder. If your shopping cart integration and payment processor don’t allow you to make refunds through Order Desk, be sure to update orders Order Desk as well, if necessary.

#### What is the best way to return an order?

As with any process in Order Desk, this will depend on your specific store. Please read through this guide for suggestions and options for dealing with returns in Order Desk.

#### How do I mark a return?

There are a number of ways to mark an order in Order Desk as being a return. This guide goes over these options in more detail, but some of the ways to mark a return are to use a specific tag color to signify returned orders, create a custom folder for returns or add order notes to provide more information about the order and its return status.

#### How do I process refunds?

Depending on the integrations and payment processors your cart uses, you might be able to process full or partial refunds from within Order Desk. For more information on processing refunds, please refer to the [Refund and Capture Payments](/guided-walkthroughs/shipping-fulfillment-and-returns/how-to-refund-and-capture-payments) guide.

#### What if I need to cancel an order?

For information on canceled orders, please refer to the [How to Cancel an Order](/guided-walkthroughs/orders-and-folders/how-to-cancel-an-order) guide.

#### Can I create a return label with EasyPost?

Yes, you can create an EasyPost return label and send it to your customer from Order Desk. For more information on how to work with return labels using EasyPost in Order Desk, please read the guide on [Create Labels with EasyPost](/integration-setup-guides/shipping-services/how-to-create-labels-with-easypost#sending-return-labels-to-customers).


# How to Refund and Capture Payments

The payment gateway integrations for Order Desk allow you to refund payments right from Order Desk. The integrations do this by passing the original payment details on to your payment gateway with a refund request. Some gateways support void requests and others support capturing payments from a previous authorization. Please refer to your specific integration docs for more details.

## Issuing A Full or Partial Refund

If the transaction processing code matches your gateway, you’ll see a payment processing box under the order totals. The default amount shows the balance that is available for refunding at the processor. Enter the amount you want to refund (partial refunds are okay) and press Refund. If you only process a partial refund you can come back and do more later until the entire transaction has been refunded.

## Voiding a Transaction

Some gateways support voiding a transaction. This takes place before a transaction has been settled and means that it won’t show up at all on the customer’s credit card statement so if a full refund is desired, this is generally the preferred method. You can always try voiding a transaction first and if that fails you can run a regular transaction. The void button gets automatically removed three days after the purchase. Most processors only accept full voids.

## Capturing a Previously Authorized Transaction

If your original transaction was just an authorization, you can capture that authorization (or part of the authorization). You can’t capture more than was originally authorized. If your transactions will be coming in as authorizations and not captures, please set up your integration settings to expect this.

## Setting Payment Details Manually

If you need to change the payment status manually this can be done by editing the order details and setting the payment status. More details are available by selecting the “Additional Details” link at the bottom of the window.

## Rule Events

There are rule events that you can target for partial refund, full refund, payment capture, and void.


# Integration Specific Walkthroughs


# How To Use Integrations

Order Desk builds integrations to a wide variety of services, apps, suppliers, websites, and tools to help data flow securely between them. While it isn’t necessary to have integrations to use Order Desk, it does make order fulfillment quite a bit easier. If you’re planning to use any integrations, please enable them in your store before beginning this tutorial.

**IMPORTANT**

Many integrations have an option to download or submit orders automatically. It’s best to leave that setting disabled until you are familiar with Order Desk. You can still download, move and submit orders manually until you are ready to automate your store.

### Watch and Learn

For a quick visual explanation of how integrations function on Order Desk, check out the following video:

{% embed url="<https://player.vimeo.com/video/604143848?color&amp;autopause=0&amp;loop=0&amp;muted=0&amp;title=1&amp;portrait=1&amp;byline=1#t=>" %}

To connect to an integration, begin by navigating to Manage Integrations under the Integrations section in your store’s sidebar.

[![](https://251457507-files.gitbook.io/~/files/v0/b/gitbook-x-prod.appspot.com/o/spaces%2FAQOLMUJWMYtrpQ7Oxxca%2Fuploads%2Fu0DNqpfYP80SJau6HiFo%2Flegacy-c8bfa90abfcf29ae6b1d.png?alt=media)](https://github.com/Lippins/v2-kb-backup/tree/main/.gitbook/assets/legacy-cdfc177b6088977a569d.png)

On the Manage Integrations page, select the integration you’d like to enable and follow the on-screen prompts to begin the connection:

[![](https://251457507-files.gitbook.io/~/files/v0/b/gitbook-x-prod.appspot.com/o/spaces%2FAQOLMUJWMYtrpQ7Oxxca%2Fuploads%2FadkjueS3UlrQ53329BsQ%2Flegacy-8511aff9d79ea977907b.png?alt=media)](https://github.com/Lippins/v2-kb-backup/tree/main/.gitbook/assets/legacy-4fc1a5863c3b07039a49.png)

Some services support a one-click connection through *OAuth*, while others will require you to manually add your credentials.

Each connected service requires its own unique connection credentials. If you’re having trouble finding them then you’ll need to contact the service you’re working with directly, as the Order Desk team does not have access to your third-party accounts. Many of our guides also provide suggestions on where to find credentials for popular services we integrate with.

### New integrations

We’ve built to hundreds of services already, but that doesn’t mean we’re done! If you’d like to submit a request for us to build a new integration, please fill out [this form](https://www.orderdesk.com/requests/). A member of our integrations team will follow up with you about it once your request has been reviewed.

While we do keep track of every integration request we receive, we receive far more requests than we could ever realistically build, so we have to take certain considerations into mind when deciding which integrations will be built.

When choosing a new integration to build, we typically ask ourselves the following questions:

1. Is this integration technically feasible for our development team to build and support it?
2. Will this integration benefit many Order Desk merchants, or only a few?
3. Is this an integration that is frequently requested?

### I need a private integration. Can you help?

All integrations built by Order Desk are meant to be visible to anyone who needs them. If you need Order Desk to connect to a private service, we invite you to build one of your own using [our public API](broken://pages/acRxeXiEEk56fGX7v4W9).


# Using Gelato with Order Desk

This walkthrough is designed as a hands-on experience to take you through the steps of getting started with using Order Desk to send orders to Gelato.

Using these steps, you’ll manually create an order here in Order Desk, add print details to it, and send the order to Gelato’s system for fulfillment. These instructions are straightforward, but we recommend keeping the following guides handy:

* [Print on Demand Fulfillment Guide](/guided-walkthroughs/print-on-demand-walkthrough/print-on-demand-fulfillment)
* [Setting Up the Gelato Integration](/integration-setup-guides/print-on-demand/gelato-integration)

### Follow along with Yambo from Order Desk!

Visual learner? Watch Yambo complete the steps in this guide in the video below.

{% embed url="<https://www.youtube.com/embed/8t3Gd8bdCbg>" %}

### Creating a Manual Order in Order Desk

{% hint style="info" %}
If you’ve already connected your sales channel to Order Desk and have imported some orders, [click here](#getting-your-order-ready-for-gelato) to skip to the next step. To keep things simple, it would be best to choose an order with just one item for this walkthrough.
{% endhint %}

If you don’t currently have any orders in Order Desk, you can manually create one. You’ll use the order you create to complete this activity.

Click **Add New Order** under the “Tools” menu in the left-hand sidebar of Order Desk.

<div align="left"><figure><img src="https://251457507-files.gitbook.io/~/files/v0/b/gitbook-x-prod.appspot.com/o/spaces%2FAQOLMUJWMYtrpQ7Oxxca%2Fuploads%2FIrXuxwPbaMCWHYFo1dVx%2Flegacy-246d154cef1267a220fe.gif?alt=media" alt=""><figcaption></figcaption></figure></div>

Next, give your new order an Order ID. You’ll use this ID to find the order in your store later. For the sake of this exercise, use “Test Order 1”.

<div align="left"><figure><img src="https://251457507-files.gitbook.io/~/files/v0/b/gitbook-x-prod.appspot.com/o/spaces%2FAQOLMUJWMYtrpQ7Oxxca%2Fuploads%2F6aInG42VKX481F96Qu8g%2Flegacy-264ae23a4a57379f0929.gif?alt=media" alt=""><figcaption></figcaption></figure></div>

Add a complete shipping address, which should include: First and Last Name, Address 1, City, State, Postal Code, and Country.

<div align="left"><figure><img src="https://251457507-files.gitbook.io/~/files/v0/b/gitbook-x-prod.appspot.com/o/spaces%2FAQOLMUJWMYtrpQ7Oxxca%2Fuploads%2FoF7xcXvUzObwXekilXmg%2Flegacy-a5f2f7ec2970995eddca.gif?alt=media" alt=""><figcaption></figcaption></figure></div>

This is the address Gelato needs to ship your order. If some of these details are missing, the order may be rejected.

Now you can add an item to the order. Order Desk differentiates inventory items by SKU, so each one must have a SKU and an Item Name. For the sake of this walkthrough, use **Test Item** as the Item Name and **12345** as the SKU.

<figure><img src="https://251457507-files.gitbook.io/~/files/v0/b/gitbook-x-prod.appspot.com/o/spaces%2FAQOLMUJWMYtrpQ7Oxxca%2Fuploads%2FMnOgfy0ivYunY2tYxJqS%2Flegacy-0045e0681d3e56305028.gif?alt=media" alt=""><figcaption></figcaption></figure>

Your order should now look like this. If it does, click the Save New Order button at the bottom of the page.

<figure><img src="https://251457507-files.gitbook.io/~/files/v0/b/gitbook-x-prod.appspot.com/o/spaces%2FAQOLMUJWMYtrpQ7Oxxca%2Fuploads%2F8vBnxOB7sTPaSD8NEF4o%2Flegacy-f85595ec8fa98dab767f.png?alt=media" alt=""><figcaption></figcaption></figure>

Once your order is saved, you’ll be redirected right to your brand-new order that can be used to test the Print on Demand process. We call this an order details page.

### Getting Your Order Ready for Gelato

Gelato needs to know exactly what image you’d like them to print and which item you want them to print it on for them to be able to accept the order. Every print on demand item in the order needs to have the following fields:

* **print\_sku:** This is the product code that Gelato uses to identify the blank items in their system.
* **print\_url:** This is a link to the design you’d like printed on the item.

Gelato will be able to provide you a complete list of their product codes to add to the print\_sku field in Order Desk, but the print\_url is something you need to create yourself after storing your designs somewhere online like Dropbox.

{% hint style="info" %}
Remember, the links to your artwork files **must be visible to anyone** who opens the link, even if they're stored privately. If Gelato can't open the file, they can't print it!
{% endhint %}

First, you'll need to add the print\_sku and print\_url variations to your order item. In your order, click on the item name, then find and click the **Add Variation** button at the bottom of the window that pops up.

In the Name field, add **print\_sku.** Then, in the Value field, you can use **mug\_product\_msz\_11-oz\_mmat\_ceramic-pink\_cl\_4-0** as your print\_sku. That long string is Gelato’s code for a specific “item” in their system.

Next, click the Add Varation button again to create another new field. This time, add **print\_url** in the Name field. For the print\_url, you can use the following link as your value:

> <https://www.orderdesk.com/wp-content/uploads/2025/03/Order-Desk-O-logo-bondi-blue.png>

That's a link to the Order Desk logo, but you're welcome to use your own artwork file instead.

Once these details have been added to the item, click **Save Item**.

<figure><img src="https://251457507-files.gitbook.io/~/files/v0/b/gitbook-x-prod.appspot.com/o/spaces%2FAQOLMUJWMYtrpQ7Oxxca%2Fuploads%2FBFy2y96AxU8clVUCiEOz%2Flegacy-e40201aea74624147fc2.gif?alt=media" alt=""><figcaption></figcaption></figure>

### Sending the Order to Gelato

{% hint style="info" %}
Following the steps in this section **will send an actual order to Gelato**. Unless you're looking at add an Order Desk mug to your coffee bar, you might want to further customize your order before submitting the order.
{% endhint %}

Now that the item in the order has all of the required details, you can send the order to Gelato. On the order page, click the Gelato button underneath the order items. If this button doesn't appear on your orders, this means that the Gelato integration isn't set up yet!

<figure><img src="https://251457507-files.gitbook.io/~/files/v0/b/gitbook-x-prod.appspot.com/o/spaces%2FAQOLMUJWMYtrpQ7Oxxca%2Fuploads%2FlxhnhfqbGvRSGUPldycd%2Flegacy-9abbe776e788854c36cf.png?alt=media" alt=""><figcaption></figcaption></figure>

Scroll to the bottom of the order details page to find the Order History section. Here, you'll be able to monitor any changes that have been made to the order, including whether or not it was sent to Gelato successfully.

If you refresh the page shortly after clicking the button to submit the order to Gelato, you may see a record that says “Order Scheduled To Be Sent To Gelato”. This means that Order Desk has placed the order into a submission queue and it will be submitted to Gelato shortly.

You may need to wait a few seconds and refresh the page again to see the result of the order submission. If it's successful, you’ll see a new record in the Order History that says, “Order Submitted to Gelato”. This means that your order has been placed with Gelato, so you can log into your Gelato account to confirm that you see the order.

<figure><img src="https://251457507-files.gitbook.io/~/files/v0/b/gitbook-x-prod.appspot.com/o/spaces%2FAQOLMUJWMYtrpQ7Oxxca%2Fuploads%2FgWeQcL4ZKPTP04zyR779%2Flegacy-e9aeea3e0c2cd9db1700.png?alt=media" alt=""><figcaption></figcaption></figure>

The Order History will also update if the order isn’t successfully submitted. The message will typically show an error message that Order Desk receives from Gelato that explains why their system didn't accept the order. The most common error message usually says: “Order Could Not Be Submitted to Gelato Because it was Missing Print on Demand Details”.

If you ran into any trouble while following this walkthrough, or if you have any questions about the process that weren't answered here, feel free to reach out to us at <support@orderdesk.com>.


# Amazon MCF: Settings

#### Amazon Multi-Channel Fulfillment (MCF) Guides

[Setup](/integration-setup-guides/fulfillment-services/amazon-mcf-integration-setup) | [Integration Settings](/guided-walkthroughs/integration-specific-walkthroughs/amazon-mcf-settings) | [Products and Shipping](/guided-walkthroughs/integration-specific-walkthroughs/amazon-mcf-products-and-shipping) | [Canceling Orders and Removal Requests](/guided-walkthroughs/integration-specific-walkthroughs/amazon-mcf-cancel-orders-and-removal-requests) | [Limitations and Special Features](/guided-walkthroughs/integration-specific-walkthroughs/amazon-mcf-limitations-and-special-features) | [Common MCF Errors](/guided-walkthroughs/integration-specific-walkthroughs/amazon-mcf-common-errors) | [Sending Orders for Fulfillment](/guided-walkthroughs/integration-specific-walkthroughs/amazon-mcf-send-orders-for-fulfillment)

With Order Desk, you can connect to any Amazon Multi-Channel Fulfillment (MCF) region to send your orders for fulfillment. Shipment information will be synced from Amazon (MCF) to Order Desk once daily.

This guide covers the settings found in the Amazon MCF integration. If you haven’t enabled the connection yet, see the [MCF Setup guide](/integration-setup-guides/fulfillment-services/amazon-mcf-integration-setup) for details.

### Settings

Once your integration is connected, the Amazon MCF settings will be available.

![](https://251457507-files.gitbook.io/~/files/v0/b/gitbook-x-prod.appspot.com/o/spaces%2FAQOLMUJWMYtrpQ7Oxxca%2Fuploads%2Fvll1QdlJOsNiwqtRP6z5%2Flegacy-ca9da85cb882505cbd1b.png?alt=media)

#### Default Marketplace

The default marketplace is selected when setting up the integration. If you need to change the market you initially selected, do so here. This default should be set to the primary market in which you do business in the connected MCF region.

If you need to change the region rather than the marketplace, connect that region by enabling [one of the other MCF integrations](/integration-setup-guides/fulfillment-services/amazon-mcf-integration-setup#integration-setup). The North America, Europe, Japan, China and India regions are all separate integrations.

#### After Submit, Move To

Select the folder orders should be moved to after they are sent to MCF from Order Desk. Typically this is set to Prepared, but any [custom folder](/start-here/getting-started-series/quick-start-overview#working-with-folders) can be used.

#### After Shipment, Move To

Select the folder orders should be moved to when MCF sends tracking details back to Order Desk about them. Typically this is set to Closed, but any [custom folder](/start-here/getting-started-series/quick-start-overview#working-with-folders) can be used.

#### Default Mail Class

MCF uses two mail classes:

* Standard (3-5 Days)
* Expedited (2 Business Days)

Choose the *default* mail class you want to use for your orders. This shipping class will be used for any orders sent to MCF that aren’t mapped to one of the two mail classes they use, if different from Standard, or Expedited on the order.

To set up more than one shipping method, see the [Shipping Class Match](/guided-walkthroughs/integration-specific-walkthroughs/amazon-mcf-products-and-shipping#shipping-class-match) section for instructions.

#### Automatically Send Imported Orders to Amazon MCF

If you plan to automatically submit *every* order to MCF for fulfillment, you can enable this setting. All orders will be sent to MCF as they come in to Order Desk.

Import all historical orders into Order Desk (if applicable), and configure your rules and preferences before enabling this. You can [submit orders to MCF manually](/guided-walkthroughs/integration-specific-walkthroughs/amazon-mcf-send-orders-for-fulfillment#send-orders-manually) while setting up your store.

If you have any other fulfillment services, will have any orders you *don’t* want to send to MCF, or are sending orders to more than one MCF region, keep this disabled. Use rules to submit orders to the appropriate vendor or fulfillment service instead.

If you are unfamiliar with the Rule Builder, see the [How to Work with Rules guide](/guided-walkthroughs/rules-and-automations/how-to-work-with-rules) for more information.

### Advanced Settings

**NOTE:**

Some of the settings in this section are only available when connected to Amazon MCF North America.

#### Fulfillment Policy

MCF has three fulfillment policies:

* **Fill All**: Fill all order items that can be filled and put any items that cannot be filled on hold. They will be shipped when stock comes in.
* **Fill Or Kill**: If all order items cannot be filled, the order will be canceled.
* **Fill All Available**: Fill all order items that can be filled and cancel any that cannot be filled.

By default, Order Desk will send orders to MCF with a Fill All policy, but this can be changed from the fulfillment policy dropdown in the Advanced Settings section.

If you would like to set the fulfillment policy on an order-by-order basis that will override your default setting, set a Checkout Data Field, found in the upper right corner of the order page.

Use **AMAZON\_FULFILLMENT\_POLICY** as the field name and set the value as **FillAll**, **FillOrKill** or **FillAllAvailable**:

![](https://251457507-files.gitbook.io/~/files/v0/b/gitbook-x-prod.appspot.com/o/spaces%2FAQOLMUJWMYtrpQ7Oxxca%2Fuploads%2FGcn2o4EY0nWfR9V1Drzm%2Flegacy-f016e793ba80da688dec.png?alt=media)

This can also be set on orders automatically with a rule using **Set Checkout Data Value** as the action:

![](https://251457507-files.gitbook.io/~/files/v0/b/gitbook-x-prod.appspot.com/o/spaces%2FAQOLMUJWMYtrpQ7Oxxca%2Fuploads%2FUm1l6UvBCOSLbRfv7ZMp%2Flegacy-3a5ddc4cca446674f840.png?alt=media)

More information can be found about Amazon’s fulfillment policies [here](http://docs.developer.amazonservices.com/en_US/MCF_outbound/MCFOutbound_CreateFulfillmentOrder.html).

If you are unfamiliar with the Rule Builder, see the [How to Work with Rules guide](/guided-walkthroughs/rules-and-automations/how-to-work-with-rules) for more information.

#### **Send Customer Email Address to Amazon MCF**

If you want Amazon to notify your customers when their order has shipped, check the **Send Customer Email Address to Amazon MCF** option. Some customers do not want Amazon sending these notifications since they are branded as an Amazon shipment.

#### Require Blank Box

Enable this when you need your orders to be shipped in a blank box, with no Amazon branding on the package. If you’re using Amazon MCF for North America and the marketplace is set to US, this is automatically enabled for all outgoing Walmart or eBay orders.

If you only need to fulfill certain orders without the Amazon branding, you can set **blank\_box=1** in the order’s [checkout data field](/guided-walkthroughs/orders-and-folders/how-to-work-with-checkout-data).

To skip the blank box requirement on an order by order basis, use **SkipBlankBox=1** in the checkout data field.

Additionally this does not automatically block Amazon Logistics. To block Amazon Logistics, you will need to add **block\_amazon\_logistics=1** or **BlockAmazonLogistics=1** as checkout data.

#### Block Amazon Logistics

Prevent your orders from being shipped through Amazon Logistics and use an alternative instead. (UPS, FedEx, etc.) If you’re using Amazon MCF for North America and the marketplace is set to US, this is automatically enabled for outgoing Walmart or eBay orders.

#### Allow Amazon MCF Removal Requests

Enable this setting to make removal requests. For in-depth instructions on how this works, please see the [MCF: Cancel Orders and Removal Requests guide](/guided-walkthroughs/integration-specific-walkthroughs/amazon-mcf-cancel-orders-and-removal-requests).

For more information about the products and shipping settings in the MCF integration, click through to the next guide in the MCF series: [MCF: Products and Shipping](/guided-walkthroughs/integration-specific-walkthroughs/amazon-mcf-products-and-shipping).

#### Fetch Confirmed Shipments Only

Enable this setting to only fetch shipments for orders that have been scanned.


# Amazon MCF: Products and Shipping

#### Amazon Multi-Channel Fulfillment (MCF) Guides

[Setup](/integration-setup-guides/fulfillment-services/amazon-mcf-integration-setup) | [Integration Settings](/guided-walkthroughs/integration-specific-walkthroughs/amazon-mcf-settings) | [Products and Shipping](/guided-walkthroughs/integration-specific-walkthroughs/amazon-mcf-products-and-shipping) | [Canceling Orders and Removal Requests](/guided-walkthroughs/integration-specific-walkthroughs/amazon-mcf-cancel-orders-and-removal-requests) | [Limitations and Special Features](/guided-walkthroughs/integration-specific-walkthroughs/amazon-mcf-limitations-and-special-features) | [Common MCF Errors](/guided-walkthroughs/integration-specific-walkthroughs/amazon-mcf-common-errors) | [Sending Orders for Fulfillment](/guided-walkthroughs/integration-specific-walkthroughs/amazon-mcf-send-orders-for-fulfillment)

With Order Desk, you can connect to any Amazon Multi-Channel Fulfillment (MCF) region to send your orders for fulfillment.

This guide covers the inventory, product, and shipping settings found in the Amazon MCF integration. If you haven’t enabled the connection yet, see the MCF Setup guide for details.

### Inventory Syncing

![](https://251457507-files.gitbook.io/~/files/v0/b/gitbook-x-prod.appspot.com/o/spaces%2FAQOLMUJWMYtrpQ7Oxxca%2Fuploads%2FrsFPahVAUzzO8hloqh2r%2Flegacy-afba082f5535c845a15e.png?alt=media)

#### Sync Inventory

Enable this setting to have MCF send inventory reports to Order Desk. They will send back the amount of stock they have for the items recently shipped.

When first enabled, inventory will not be updated in Order Desk immediately. MCF will only send updates for items they have shipped within the previous hours.

To request a more complete view of your inventory, scroll to the bottom of the MCF integration settings page to the **Sync Inventory** section. Choose the time frame from which you would like Order Desk to check for stock details, going as far back as 1 year, then click the **Download Inventory** button:

![](https://251457507-files.gitbook.io/~/files/v0/b/gitbook-x-prod.appspot.com/o/spaces%2FAQOLMUJWMYtrpQ7Oxxca%2Fuploads%2FkPN1BMR5dv80ZwDExTdK%2Flegacy-b899d2d47757b17c5dbd.png?alt=media)

If you need to update the quantity displayed at Order Desk and/or your shopping cart for any items that MCF has not recently shipped and that are not updated by downloading inventory from a longer timeframe, update the stock manually within Order Desk from your [inventory items page](https://app.orderdesk.com/inventory).

{% hint style="info" %}
**DEALING WITH ASIN DUPLICATES**

If you have multiple SKUs that share the same ASIN in Amazon FBA, you can use the `amazonfba_na_asin_duplicates`, `amazonfba_eu_asin_duplicates` or `amazonfba_au_asin_duplicates` metadata field on the main inventory item to keep them all updated, depending on your connected FBA region.

Add a comma-separated list of duplicate SKUs in the metadata. When Order Desk pulls in the inventory for the main SKU, it will also update the stock for all SKUs listed in this field using the same stock level.

This solves the issue where Amazon’s API only returns a single SKU for items sharing the same ASIN, which previously prevented updates to the other related SKUs.
{% endhint %}

![](https://251457507-files.gitbook.io/~/files/v0/b/gitbook-x-prod.appspot.com/o/spaces%2FAQOLMUJWMYtrpQ7Oxxca%2Fuploads%2FTEXJUBvGWfWIywHafCed%2Flegacy-9de3b0ac32d034a84c83.png?alt=media)

You can learn more about how to [**store metadata on inventory items here**](/guided-walkthroughs/products-and-inventory/how-to-work-with-inventory-details#store-extra-item-details-in-order-desk).

#### Sync Update Interval

Choose how often you would like Order Desk to check MCF for inventory reports.

#### Inventory Location Name

If this field is left empty, inventory updates from MCF will have the MCF integration region set in the location field of each item updated:

![](https://251457507-files.gitbook.io/~/files/v0/b/gitbook-x-prod.appspot.com/o/spaces%2FAQOLMUJWMYtrpQ7Oxxca%2Fuploads%2F6OuMm2x5XcumT9U2UPZF%2Flegacy-6f7a81745555ca06e426.png?alt=media)

To use your own custom name as the location instead, set it in the inventory location name field in the MCF settings.

![](https://251457507-files.gitbook.io/~/files/v0/b/gitbook-x-prod.appspot.com/o/spaces%2FAQOLMUJWMYtrpQ7Oxxca%2Fuploads%2FgvO8RmZL3KvOJD617tIR%2Flegacy-2f43a730fcc3f719b8e7.png?alt=media)

This name will be added to your items when inventory reports are sent back from MCF:

![](https://251457507-files.gitbook.io/~/files/v0/b/gitbook-x-prod.appspot.com/o/spaces%2FAQOLMUJWMYtrpQ7Oxxca%2Fuploads%2FvQXmPNuMm548eBqbwBZt%2Flegacy-e0a641b2bcc7e5f82e9b.png?alt=media)

#### Sync Unlisted Items

Enable this setting to create new items when inventory is synced. If disabled, no new items will be created upon inventory sync.

### Product Settings

![](https://251457507-files.gitbook.io/~/files/v0/b/gitbook-x-prod.appspot.com/o/spaces%2FAQOLMUJWMYtrpQ7Oxxca%2Fuploads%2FnVffR9tmItx5phoStCfp%2Flegacy-93b5ded1409446970ac7.png?alt=media)

![](https://s3.amazonaws.com/helpscout.net/docs/assets/57b0032590336059d4edf94f/images/59e644a62c7d3a752de12bb8/file-IPM9qf2rf0.png)

For more information on what these product settings in the MCF integration are for and how to use them, read the [Fulfillment Integration Product Settings](/integration-setup-guides/fulfillment-services/fulfillment-integration-product-settings) guide.

### Shipping Class Match

![](https://251457507-files.gitbook.io/~/files/v0/b/gitbook-x-prod.appspot.com/o/spaces%2FAQOLMUJWMYtrpQ7Oxxca%2Fuploads%2FWikBmttYUkCllCi67kWg%2Flegacy-775ee1bbb18b696363b3.png?alt=media)

MCF will only ship your orders as **Standard** (3-5 Days), or **Expedited** (2 Business Days).

Using the shipping class match feature, you can match as many different shipping methods as you offer to the three methods MCF uses to ensure your customers are getting the closest shipping option to what they selected at checkout.

For information on how to set up your shipping preferences, please see the [shipping class match](/guided-walkthroughs/shipping-fulfillment-and-returns/how-to-set-up-shipping-class-matches) guide.

#### Retrieving Tracking Numbers

To retrieve shipment information about your orders, Order Desk checks for shipments one by one multiple times a day as well as running a backup report once a day. This report pulls all shipments from the previous twelve hours, with a small overlap in the time for appointments that run more often than 12 hours, in case any order shipments were missed on a previous check.

If you need to, you can also look up shipment details directly from within an order by clicking on the **Check Amazon MCF for Shipment** button:

![](https://251457507-files.gitbook.io/~/files/v0/b/gitbook-x-prod.appspot.com/o/spaces%2FAQOLMUJWMYtrpQ7Oxxca%2Fuploads%2FoS8zwASVP3rI4QW00M0w%2Flegacy-6c3e275683969a27fddd.png?alt=media)

After clicking, look at the top of the page for a message from MCF about the status of the order. If the order has already shipped but Order Desk hasn’t yet pulled the report about it, the shipment will be added at this time. Otherwise, it will say when the estimated shipment date will be:

![](https://251457507-files.gitbook.io/~/files/v0/b/gitbook-x-prod.appspot.com/o/spaces%2FAQOLMUJWMYtrpQ7Oxxca%2Fuploads%2F7l44HWOwDM50zVrqmACc%2Flegacy-e684521b81829b3e0e16.png?alt=media)

When MCF sends a shipment report back to Order Desk, the shipment info will be added to the order and sent back to the original cart if your shopping cart integration is configured for it. Every shopping cart integration works a little differently. To see if your cart accepts tracking numbers from Order Desk, check your shopping cart integration settings for a Sync Tracking Numbers option.

The shipment being added to the order will also trigger any other actions that you have set up with a rule for the event **When Shipment is Added**, such as sending out a [shipment notification email](/guided-walkthroughs/shipping-fulfillment-and-returns/how-to-print-thermal-labels/how-to-send-shipment-tracking-info-to-customers) to your customer.

#### Report Log

At the bottom of the MCF integration settings page, there is a Report Log section. You can click the **Get Report Log** button to see your store’s shipment request reports and their statuses:

![](https://251457507-files.gitbook.io/~/files/v0/b/gitbook-x-prod.appspot.com/o/spaces%2FAQOLMUJWMYtrpQ7Oxxca%2Fuploads%2FCW0p6m1NJ3S4W4tzcqP1%2Flegacy-5abc5a09575be4472eee.png?alt=media)

If reports are requested too close together, the new request will be canceled due to MCF’s request limits. In this case, Order Desk will process the latest report in the DONE status. You can then view the generated report by clicking on the report number:

![](https://251457507-files.gitbook.io/~/files/v0/b/gitbook-x-prod.appspot.com/o/spaces%2FAQOLMUJWMYtrpQ7Oxxca%2Fuploads%2FTgki4roX0rjmDSZc9IVY%2Flegacy-7978acbcb7813ea88b74.png?alt=media)

Or click the Request Appt link to process the specified report and open up your store’s [appointment page](https://app.orderdesk.com/tools/appointments), where you can click Run for the “Process Amazon MCF Shipment Report” appointment:

![](https://251457507-files.gitbook.io/~/files/v0/b/gitbook-x-prod.appspot.com/o/spaces%2FAQOLMUJWMYtrpQ7Oxxca%2Fuploads%2FbPADRum7CoLkIr8Ekez3%2Flegacy-ae56da69b80ffc092f04.png?alt=media)

***

Click through to the next guide in the MCF series: [Cancel Orders and Removal Requests](/guided-walkthroughs/integration-specific-walkthroughs/amazon-mcf-cancel-orders-and-removal-requests).


# Amazon MCF: Send Orders for Fulfillment

#### Amazon Multi-Channel Fulfillment (MCF) Guides

[Setup](/integration-setup-guides/fulfillment-services/amazon-mcf-integration-setup) | [Integration Settings](/guided-walkthroughs/integration-specific-walkthroughs/amazon-mcf-settings) | [Products and Shipping](/guided-walkthroughs/integration-specific-walkthroughs/amazon-mcf-products-and-shipping) | [Canceling Orders and Removal Requests](/guided-walkthroughs/integration-specific-walkthroughs/amazon-mcf-cancel-orders-and-removal-requests) | [Limitations and Special Features](/guided-walkthroughs/integration-specific-walkthroughs/amazon-mcf-limitations-and-special-features) | [Common MCF Errors](/guided-walkthroughs/integration-specific-walkthroughs/amazon-mcf-common-errors) | [Sending Orders for Fulfillment](/guided-walkthroughs/integration-specific-walkthroughs/amazon-mcf-send-orders-for-fulfillment)

If you need to send orders to Amazon for fulfillment, follow the instructions in this guide. You will learn how to manually send orders to MCF, how to automatically send all orders to MCF, and how to send certain orders to MCF or to different MCF regions.

After orders are fulfilled by MCF, the tracking info will be pulled into Order Desk and, in most cases, can be sent back to the original shopping cart.

### Send Orders Manually

To submit an order to MCF manually, click the Amazon MCF button in the order.

![](https://251457507-files.gitbook.io/~/files/v0/b/gitbook-x-prod.appspot.com/o/spaces%2FAQOLMUJWMYtrpQ7Oxxca%2Fuploads%2FJ7el9K4boCKDrUfxfGWC%2Flegacy-cb1c181e0bb3d8d3122d.png?alt=media)

If you need to select a specific region to send the order to, based on the shipping country, select the region from the dropdown next to the submit button. Do this *before* clicking the submit to MCF button.

![](https://251457507-files.gitbook.io/~/files/v0/b/gitbook-x-prod.appspot.com/o/spaces%2FAQOLMUJWMYtrpQ7Oxxca%2Fuploads%2FwGDAwp1RrEfE2OcFGZll%2Flegacy-194a4bb50b033b75db35.png?alt=media)

### Send All Orders Automatically

If you aren’t using any other fulfillment service and your store only has orders for one MCF region, you can automatically send all of your orders to MCF.

To do this, open the **Amazon MCF** integration settings, which can be found under the Integrations menu in the left sidebar.

![](https://251457507-files.gitbook.io/~/files/v0/b/gitbook-x-prod.appspot.com/o/spaces%2FAQOLMUJWMYtrpQ7Oxxca%2Fuploads%2FelagXhb0r6WQgKh3MCQK%2Flegacy-219d8f0af69550fe245e.png?alt=media)

Enable the option to **Automatically Send Imported Orders to Amazon MCF**:

![](https://251457507-files.gitbook.io/~/files/v0/b/gitbook-x-prod.appspot.com/o/spaces%2FAQOLMUJWMYtrpQ7Oxxca%2Fuploads%2FX44KjfG0VeZAjZeUMK5u%2Flegacy-c6de152c55c8390439d7.png?alt=media)

**DON’T WANT TO SEND FULFILLED ORDERS?**

If you are bringing any fulfilled or historical orders into Order Desk when you initially set up your account, wait to enable this setting until all old orders have imported. Once you are only importing new, unfulfilled orders, this setting can be used to send them to MCF.

### Send Specific Orders

If only certain orders will be sent to MCF, you can tell Order Desk which orders to send by using the [Rule Builder](/guided-walkthroughs/rules-and-automations/how-to-work-with-rules).

**Split**

If you need to split your orders first, to remove any items that aren’t meant for MCF, please read the [splitting orders guide](/guided-walkthroughs/orders-and-folders/how-to-split-orders) or the vendor splitting guide specifically for [Shopify](/guided-walkthroughs/integration-specific-walkthroughs/how-to-split-by-vendor-with-shopify) or [BigCommerce](/guided-walkthroughs/integration-specific-walkthroughs/how-to-split-by-vendor-with-bigcommerce) stores.

Once your orders are split, set up rules to send orders to MCF following the instructions in the next section.

**Submit**

In the Rule Builder, use the **Submit Order To Amazon MCF** action to send an order to MCF:

![](https://251457507-files.gitbook.io/~/files/v0/b/gitbook-x-prod.appspot.com/o/spaces%2FAQOLMUJWMYtrpQ7Oxxca%2Fuploads%2FnoBcL6jeqHDUDs3UDjpt%2Flegacy-bce5fcfd29d63cdc5894.png?alt=media)

Add any filters necessary to tell Order Desk which orders you want sent to MCF. For example:

**Event: Order is Imported**

**Filter: If Order Source** ***Equals*** **Shopify**

**Action: Submit to Amazon MCF North America**

This means all Shopify orders will be sent to MCF.

The Rule Builder is versatile and has many options for setting filters for which orders should be submitted to MCF. The rules you set up should be customized to your needs.

### Send to Different MCF Regions

If your products are available to purchase in or be shipped to multiple international regions, you will need MCF for each of those regions. If an order has an American address but is being submitted to MCF Europe Italy, MCF will not accept the order because that warehouse region doesn’t ship to America. The order will need to be submitted to the MCF NA (North American) region.

Using the Rule Builder, you can submit your orders by matching the shipping country on the order with the correct MCF region and integration.

For instance:

**Event: Order is Imported**

**Filter: If Shipping Country** ***Contains*** **US**

**Action: Submit Order to Amazon MCF North America**

or

**Event: Order is Imported**

**Filter: If Shipping Country** ***Contains*** **FR**

**Action: Submit Order to Amazon MCF Europe – France**

You can further specify this to include all the countries in a specific region with your filter by using the operator “in list”.

**Event: When Order is Imported**

**Filter: If Shipping Country** ***In List*** **AT,DE,NL,SI,HU,SK,BG,RO,PL,LV,LT,CZ,LU,DK,EE,FI**

**Action: Submit Order to Amazon MCF Europe – Germany**

This means if the shipping country on the order is *in* the list of country codes, submit the order to MCF Europe Germany.

**AMAZON Europe COUNTRIES**

Amazon MCF Europe has a different sets of countries that they ship to depending on which export plan your account uses. Check your MCF account settings at Amazon if you are having trouble submitting European orders to MCF Europe. For a list of country codes, scroll down to the [Europe Country Codes section](#europe-country-codes).

### Copy Orders to Different Stores

If you use separate Order Desk stores for your separate shopping carts and/or MCF regions, you can copy orders from one store to another to submit your orders to the appropriate MCF integration.

**Send Primary Store Orders to MCF**

Orders in the store with the right MCF integration can be sent using rules as described earlier in this guide.

**Event: Order is Imported (or Split)**

**{set filters}**

**Action: Submit Order to Amazon MCF**

**Copy Orders to Secondary Store**

If the MCF integration your orders need to be sent to are in a different store, copy your orders from your primary store to the other store with a rule.

**Event: Order is Imported**

**{set filters}**

**Action: Copy to Store**

You might want to include a second action in this rule to move the order to a different folder in the primary store, such as Prepared or a custom folder, to hold copied orders waiting for fulfillment.

For more information on copy orders between stores, see [this guide](/guided-walkthroughs/using-order-desk/how-to-manage-multiple-stores-on-one-account#copying-and-moving-orders-between-stores).

**Send Copied Orders to MCF**

In the second store where orders are being copied to, create a rule to send those orders to MCF.

**Event: Order is Copied From Another Store**

**Action: Submit to Amazon MCF**

### Europe Country Codes

If you use MCF in Europe, you will likely want to send orders to the different MCF locations based on the shipping address in the order.

You can use these country codes to make setting up your rules easier, but please check your Amazon account directly if you have any question about which countries MCF will ship to for you based on your account settings.

**MCF UK 9 Country Set**

DE,FR,ES,IT,BE,LU,NL,IE,PT

**MCF UK 26 Country Set**

DE,FR,ES,IT,BE,LU,NL,IE,PT,AT,BG,CY,CZ,DK,EE,FI,GR,HU,LV,LT,MT,PL,RO,SK,SI,SE,GB,JE,GG,UK

**Ship from United Kingdom**

United Kingdom, Ireland, Sweden, Isle of Man, Jersey

Country codes: **GB,UK,IE,SE,IM,JE**

**Ship from Germany**

Austria, Germany, Netherlands, Slovenia, Hungary, Slovakia, Bulgaria, Romania, Poland, Latvia, Lithuania, Czech Republic, Luxembourg, Denmark, Estonia, Finland

Country codes: **AT,DE,NL,SI,HU,SK,BG,RO,PL,LV,LT,CZ,LU,DK,EE,FI**

**Ship from France**

Belgium, France

Country codes: **BE,FR**

**Ship from Italy**

Italy, Croatia, Malta, Cyprus, Greece

Country codes: **IT,HR,MT,CY,GR**

**Ship from Spain**

Spain, Portugal

Country codes: **ES,PT**

### FAQ

**Can I send Shopify orders to any MCF region?**

Yes. Order Desk supports every international MCF endpoint. If you have an account with MCF, Order Desk can submit your Shopify orders as long as the MCF warehouse is in the same region as the shipping address on the order, and it adheres to the account settings you have with Amazon.

**Can I connect multiple MCF regions to the same Order Desk account?**

Yes. Each region is a separate integration within Order Desk. Connect to each integration as needed in one store.

**Why won’t MCF accept my international order?**

If the shipping country on the order does not match the MCF region the order is being submitted to, MCF will reject the order. Make sure the order is being submitted to the proper MCF region. Please read the [Send to Different MCF Regions](#send-to-different-mcf-regions) section of this guide for detailed instructions.

**Why won’t my Canadian order submit to my North American MCF account?**

Some older MCF accounts for the North American region do not include all of North America. If you already have the original MCF integration enabled and set up for the US, you can enable the MCF NA integration to log into and connect your Canadian MCF account, or vice versa. This also applies to Mexico.

If you have three separate MCF accounts for the North American regions, you will need to have multiple Order Desk stores to connect to all three MCF regions. Please see the instructions in the [Copy Orders to Different Stores](/guided-walkthroughs/using-order-desk/how-to-manage-multiple-stores-on-one-account) section of this guide for instructions.

**Can I submit only orders to MCF that have inventory in stock and the rest of my orders to another fulfillment service?**

Yes. To do this, select **Fill or Kill** in the MCF integration settings for the [Fulfillment Policy](/guided-walkthroughs/integration-specific-walkthroughs/amazon-mcf-settings#fulfillment-policy). Any orders sent to MCF with items that aren’t in stock will be rejected.

You can then set up a rule with the event **When Order Not Submitted to Amazon MCF Because No Products Available**. Add the actions to the rule that you would like to happen in this event, such as submit to another integration.


# Amazon MCF: Cancel Orders and Removal Requests

#### Amazon Multi-Channel Fulfillment (MCF) Guides

[Setup](/integration-setup-guides/fulfillment-services/amazon-mcf-integration-setup) | [Integration Settings](/guided-walkthroughs/integration-specific-walkthroughs/amazon-mcf-settings) | [Products and Shipping](/guided-walkthroughs/integration-specific-walkthroughs/amazon-mcf-products-and-shipping) | [Canceling Orders and Removal Requests](/guided-walkthroughs/integration-specific-walkthroughs/amazon-mcf-cancel-orders-and-removal-requests) | [Limitations and Special Features](/guided-walkthroughs/integration-specific-walkthroughs/amazon-mcf-limitations-and-special-features) | [Common MCF Errors](/guided-walkthroughs/integration-specific-walkthroughs/amazon-mcf-common-errors) | [Sending Orders for Fulfillment](/guided-walkthroughs/integration-specific-walkthroughs/amazon-mcf-send-orders-for-fulfillment)

With Order Desk, you can connect to any Amazon Multi-Channel Fulfillment region to send your orders to MCF for fulfillment. This guide will cover how to cancel orders that were sent to MCF and how to make removal requests.

### Cancel Orders

To cancel an order that has already been sent to MCF, click the **Cancel Order at Amazon MCF** button on the order detail page:

![](https://251457507-files.gitbook.io/~/files/v0/b/gitbook-x-prod.appspot.com/o/spaces%2FAQOLMUJWMYtrpQ7Oxxca%2Fuploads%2Fk6f9E2oJxndK7FWNdfF2%2Flegacy-3b0a67fbe9f1a495528a.png?alt=media)

Amazon will attempt to cancel the order. In some cases, it may have already shipped or be too far along within their own system to stop it. Follow up in your Amazon account if you are unclear on the status of the order after requesting shipment cancellation.

For more information on working with canceled orders in Order Desk, please see [this guide](/guided-walkthroughs/orders-and-folders/how-to-cancel-an-order).

### Removal Requests

To request inventory be removed from MCF’s warehouse system, **Allow Amazon MCF Removal Requests** in the MCF integration settings must be enabled.

![](https://251457507-files.gitbook.io/~/files/v0/b/gitbook-x-prod.appspot.com/o/spaces%2FAQOLMUJWMYtrpQ7Oxxca%2Fuploads%2FTPctegdC4bfj0nfqukhm%2Flegacy-9e10635c33008e0f91d1.png?alt=media)

Create an order in Order Desk for any products you want returned to you. On the order details page, click the **Amazon MCF Removal Request** button.

If you have more than one MCF region integrated to Order Desk, select the region where the inventory is stored that should be removed:

![](https://251457507-files.gitbook.io/~/files/v0/b/gitbook-x-prod.appspot.com/o/spaces%2FAQOLMUJWMYtrpQ7Oxxca%2Fuploads%2FrC6VZMIdJsdANOgmryig%2Flegacy-8fa77850f96481cf0156.png?alt=media)

This queues up the process, and Order Desk will send the feed with the removal request to Amazon. After a few minutes, the app will check to see if the request was successful or not. If so, the order will be moved to the folder specified in the [After Submit, Move To](/guided-walkthroughs/integration-specific-walkthroughs/amazon-mcf-settings#settings) setting in the MCF integration. If it was not successful, the store admin will receive an email with further details.

#### Amazon Requirements

To set up an order for a removal request, please keep in mind these Amazon requirements:

* Removal requests must include the phone number of the recipient. Make sure the shipping address has a phone number before submitting.
* The ID number of the order being submitted must not be over 10 characters long. If you need to shorten your Order ID before submitting a removal request, edit it by clicking **Edit Order Details** under the order details section on the order page:![](https://s3.amazonaws.com/helpscout.net/docs/assets/57b0032590336059d4edf94f/images/59ea54482c7d3a055035cdcb/file-fyZYbjCR6o.gif)
* For more information, please see [Amazon’s removal request overview](https://www.amazon.com/gp/help/customer/display.html/?nodeId=200280670).

Order Desk will check the tracking info for these shipments once a day. If a tracking number is found, it will be added to the removal request order like a regular order.

#### Additional notes about removal requests

* If your SKUs end with `-REFURB` or start with `REFURB-` these will be stripped out of the SKU before being sent to Amazon.
* If you have a specific SKU that you would like to send rather than the value found in the item code field of your product, you can set a variation or metadata value of `MCFRemovalSku` ![](https://s3.amazonaws.com/helpscout.net/docs/assets/57b0032590336059d4edf94f/images/657b6842a55b5524fb50d70d/file-HfcZFH1IlF.png) Be sure to sync this into your order. For instructions on order syncing, please read [this guide](/guided-walkthroughs/products-and-inventory/how-to-sync-item-details-into-orders).
* If you would like to remove some sellable inventory, you can set a variation or metadata field on your product(s) called `SellableQuantity` with a value for the number of items you’d like to have removed: ![](https://251457507-files.gitbook.io/~/files/v0/b/gitbook-x-prod.appspot.com/o/spaces%2FAQOLMUJWMYtrpQ7Oxxca%2Fuploads%2FXmQUK7xNWCZnseq9C9ct%2Flegacy-6d692fc6e01f8f9c1184.png?alt=media)
* By default, unsellable inventory will be removed in the amount of the quantity for the item in the order. If you need to customize this, set a variation or metadata field called `UnsellableQuantity`.

***

Click through to the next guide in the MCF series: [Limitations and Special Features](/guided-walkthroughs/integration-specific-walkthroughs/amazon-mcf-limitations-and-special-features).


# Amazon MCF: Common Errors

#### Amazon Multi-Channel Fulfillment (MCF) Guides

[Setup](/integration-setup-guides/fulfillment-services/amazon-mcf-integration-setup) | [Integration Settings](/guided-walkthroughs/integration-specific-walkthroughs/amazon-mcf-settings) | [Products and Shipping](/guided-walkthroughs/integration-specific-walkthroughs/amazon-mcf-products-and-shipping) | [Canceling Orders and Removal Requests](/guided-walkthroughs/integration-specific-walkthroughs/amazon-mcf-cancel-orders-and-removal-requests) | [Limitations and Special Features](/guided-walkthroughs/integration-specific-walkthroughs/amazon-mcf-limitations-and-special-features) | [Common MCF Errors](/guided-walkthroughs/integration-specific-walkthroughs/amazon-mcf-common-errors) | [Sending Orders for Fulfillment](/guided-walkthroughs/integration-specific-walkthroughs/amazon-mcf-send-orders-for-fulfillment)

Ever get an error with your MCF integration that you can’t figure out how to fix? We hear about these errors from our customers all the time and have added some of the more common ones here for your reference so you can troubleshoot and fix issues that come up from time to time on your own.

For errors that occur with other integrations, please refer to the main [Common Errors](/technical-documentation/api-and-integration-reference/common-errors-from-integrations) guide.

### Errors When Setting up the Integration

[Invalid Seller Account Type](#invalid-seller-account-type)

[Access to Sellers List Denied](#access-to-sellers-list-denied)

#### Invalid Seller Account Type

Invalid seller account type. You have signed in with an account that is not eligible for Amazon MWS. For a list of eligible Amazon seller accounts, please go here… To sign in again with an eligible account, please click here…

WHAT IT MEANS

Amazon requires that your seller account be eligible for MWS to connect to outside integrations like ours. If you get this error when trying to connect to the integration, it means your account is not eligible and you don’t have the right permissions.

WHAT CAUSED IT

Your settings in Amazon don’t meet their requirements to connect to the integration.

HOW TO FIX IT

[Register your account for MWS](http://docs.developer.amazonservices.com/en_US/dev_guide/DG_Registering.html) and ensure it meets Amazon’s requirements. This has to be done in Amazon and cannot be fixed by Order Desk.

#### Access to Sellers List Denied

Connection to Amazon MCF EU failed: Connection Error: Access to Sellers.ListMarketplaceParticipations is denied

WHAT IT MEANS

If you try to submit an order after already connecting to the integration and get this error, it may mean that you don’t have the right API permissions within your seller account yet.

HOW TO FIX IT

Contact Amazon to find out how to get the right permissions.

### Errors When Sending Orders to MCF

[Destination Address Country Code Invalid](#destination-address-country-code-invalid)

[All Order Items Skipped](#all-order-items-skipped)

[Invalid SKU](#invalid-sku)

[Delivery Option Unavailable](#delivery-option-unavailable)

[SIPS Invalid Request](#sips-invalid-request)

[SellerId Invalid](#sellerid-invalid)

If MCF throws and error and won’t accept an order you are trying to send, you can check two places for a little more information about what the problem is.

First, scroll down to the Order History near the bottom of the order page and read the error message.

![](https://251457507-files.gitbook.io/~/files/v0/b/gitbook-x-prod.appspot.com/o/spaces%2FAQOLMUJWMYtrpQ7Oxxca%2Fuploads%2FEoO6n1TrPpVXyq7Tbohs%2Flegacy-745684d1ced6fe8d3767.png?alt=media)

Second, click on the **Amazon MCF Preview** button for the correct region.

![](https://251457507-files.gitbook.io/~/files/v0/b/gitbook-x-prod.appspot.com/o/spaces%2FAQOLMUJWMYtrpQ7Oxxca%2Fuploads%2FFO8vy4mnvnRyNdCu6Rc0%2Flegacy-df0b116259ba0b659080.png?alt=media)

This will show a message from MCF at the top of the order page with more details about the situation.

#### Destination Address Country Code Invalid

Value for parameter DestinationAddress.CountryCode is invalid. Reason: InvalidValue.

WHAT IT MEANS

The shipping country on the order doesn’t match the MCF region.

WHAT CAUSED IT

The shipping address is incompatible with the MCF warehouse either due to your MCF account settings or to their specific policies for the region.

HOW TO FIX IT

Send the order to the MCF region that supports the shipping country.

If the shipping address on the order matches the MCF region and the error is more specific, like “Value FRA for parameter CountryCode is invalid”, double check that the shipping address country code is correct and only two digits.

FYI

Some MCF regions will ship internationally if you have export enabled with them, however they will typically only ship media items. If any other items are included in the order, they won’t accept the order. Contact MCF for more details about what international shipping might be available for the regions you use.

#### All Order Items Skipped

Order Not Submitted to Amazon MCF Because All Order Items Were Skipped

WHAT IT MEANS

MCF doesn’t see any items in the order. To confirm this, click the **Amazon MCF Preview** button. The message from MCF will usually say “No items found to send.”

WHAT CAUSED IT

Some or all of the items in the order do not have a SKU. Even if the product names are included in the order, without a SKU, MCF doesn’t know what items you want them to fulfill.

HOW TO FIX IT

Click on the Item Name and add the SKU. Resubmit the order to MCF:

![](https://251457507-files.gitbook.io/~/files/v0/b/gitbook-x-prod.appspot.com/o/spaces%2FAQOLMUJWMYtrpQ7Oxxca%2Fuploads%2FNq68nkR9KXGuRTq7fhCt%2Flegacy-b896e22d19bfdb78a137.gif?alt=media)

#### Invalid SKU

Order Could Not Be Submitted to Amazon MCF Because it Has An Invalid SKU

WHAT IT MEANS

The SKU is incorrect or the item for that SKU is out of stock. Click the **Amazon MCF Preview** button for more information.

WHAT CAUSED IT

MCF either doesn’t recognize the SKU being sent to them or they don’t have any inventory in stock for that particular SKU.

HOW TO FIX IT

Double check that your SKU is correct. If it isn’t correct, click on the Item Name and edit the SKU, then resubmit to MCF.

If it is correct and the inventory is out of stock or another message is displayed on the preview, contact MCF for more help.

FYI

If the SKU in your shopping cart is different from the SKU MCF uses for the same item, you have a couple options to fix this before sending orders to MCF. To learn about your options, read the [Product Code guide](/guided-walkthroughs/products-and-inventory/how-to-use-code-replace).

#### Delivery Option Unavailable

This delivery option is not available for this address. Please adjust and try again.

WHAT IT MEANS

MCF won’t use the shipping method selected for the order with the shipping address. Click the **Amazon MCF Preview** button for more information.

The message from MCF will show you which shipping methods, of the three they use (Standard, Expedited) are unavailable for the address on the order, saying DeliverySLAUnavailable:

![](https://251457507-files.gitbook.io/~/files/v0/b/gitbook-x-prod.appspot.com/o/spaces%2FAQOLMUJWMYtrpQ7Oxxca%2Fuploads%2FPLyhEs6cUbIjGKDtufP3%2Flegacy-4bf46be48c1bfc382c3c.png?alt=media)

WHAT CAUSED IT

MCF doesn’t ship the specific methods specified to the address on the order. This is often the case with PO boxes. In some cases, it could be that the address is not correct.

HOW TO FIX IT

Check that the address is accurate. If it is, change the shipping method and resubmit the order to MCF. If neither of these resolve the issue, contact MCF for more help.

#### SIPS Invalid Request

amazon.SSOFStatefulWorkflow\.common.WorkflowPermanentException: SIPS invalid request on fulfillmentOrder=’amazon.ShipmentInjectionWorkflow\.data.MerchantRequest….

WHAT IT MEANS

If you get a long technical error like this that doesn’t reveal any clues to the problem, it may just be a temporary error. Try to resubmit the order and if that doesn’t work, click the **Amazon MCF Preview** button for more information from MCF.

When it doesn’t resubmit, it tends to be an error with the shipping method and/or shipping address.

WHAT CAUSED IT

Sometimes there is an interruption in the connection between services which can occasionally cause an error like this.

If it turns out to be a shipping method or address error instead, it will likely mean that either MCF won’t use the shipping method on the order for the shipping address or the shipping address has a country or state/province code that MCF doesn’t recognize or support.

HOW TO FIX IT

Wait a couple of minutes and resubmit the order. If it was temporary, the order should submit the second time without any issues.

If the order doesn’t submit the second time, click the **Amazon MCF Preview** button for more information. If the preview info from MCF comes back with shipping methods listed, check to make sure the shipping method on the order isn’t the problem. If it is, change the shipping method and resubmit.

If neither of the above happen, check that the shipping address doesn’t have anything abnormal or unnecessary in it, such as an international province code.

If the preview gives a different message or you are unable to figure it out, contact Order Desk or Amazon MCF for assistance. We are happy to look for anything off about the order but will typically still advise contacting MCF to find out what the error means.

#### SellerId Invalid

Value for parameter SellerId is invalid. Reason: InvalidValue.

WHAT IT MEANS

Click on the **Amazon MCF Preview** button for more information. If the message is “Seller is not registered for Basic Fulfillment”, there is a problem with your Seller account at Amazon.

WHAT CAUSED IT

This is a seller issue and is not related to anything with the order itself, typically caused by the seller account [being on the wrong plan](https://developer.amazonservices.com/gp/mws/faq.html/140-0988686-5710302#mawsportal-faq-mwsSellers).

HOW TO FIX IT

Check that your account is set up properly and on the right payment plan with MCF. Contact MCF for more help if this doesn’t resolve the issue.

***

Click through to the next guide in the MCF series: [Sending Orders for Fulfillment](/guided-walkthroughs/integration-specific-walkthroughs/amazon-mcf-send-orders-for-fulfillment).


# Amazon MCF: Limitations and Special Features

#### Amazon Multi-Channel Fulfillment (MCF) Guides

[Setup](/integration-setup-guides/fulfillment-services/amazon-mcf-integration-setup) | [Integration Settings](/guided-walkthroughs/integration-specific-walkthroughs/amazon-mcf-settings) | [Products and Shipping](/guided-walkthroughs/integration-specific-walkthroughs/amazon-mcf-products-and-shipping) | [Canceling Orders and Removal Requests](/guided-walkthroughs/integration-specific-walkthroughs/amazon-mcf-cancel-orders-and-removal-requests) | [Limitations and Special Features](/guided-walkthroughs/integration-specific-walkthroughs/amazon-mcf-limitations-and-special-features) | [Common MCF Errors](/guided-walkthroughs/integration-specific-walkthroughs/amazon-mcf-common-errors) | [Sending Orders for Fulfillment](/guided-walkthroughs/integration-specific-walkthroughs/amazon-mcf-send-orders-for-fulfillment)

With Order Desk, you can connect to any Amazon Multi-Channel Fulfillment (MCF) region to send your orders for fulfillment. The MCF integration has a few limitations and special features that are important to know about. This guide explains what those limitations and features are.

### Limitations

When you send an order to MCF, a URL is passed through Amazon’s API to pass the order data into Amazon’s system. The size of this URL is determined by the amount of data in the order.

Amazon’s API has a limit on the size of this URL. What this means is that orders with more than 8 line items may not be accepted by MCF if the URL is too long. To avoid any potential problems, limit line items on a single order to 8 or fewer.

If you expect to receive large orders regularly, you can create a rule to send an alert to yourself for orders with more than 8 line items. Add any additional actions to your rule, such as changing folders to hold it for review or tagging it a specific color.

An example rule for this scenario would look like this:

![](https://251457507-files.gitbook.io/~/files/v0/b/gitbook-x-prod.appspot.com/o/spaces%2FAQOLMUJWMYtrpQ7Oxxca%2Fuploads%2FcJxANXdXf6RSrvsPEl10%2Flegacy-d28712a5cb6b57654a97.png?alt=media)

The order may need to be split into multiple orders or entered manually at Amazon.

For more information on setting up custom alerts in your store, read the [How to Work with Rules](/guided-walkthroughs/rules-and-automations/how-to-work-with-rules) and [How to Work with Email Templates](/guided-walkthroughs/templates-emails-and-order-documents/how-to-work-with-email-templates) guides.

### Special Features

#### Email Notification CC

MCF sends shipment notifications to your customers. If you want to be CC’d on these emails, you can add your email address to your orders using **NotificationEmailCC** as checkout data. Set the value as your email address.

Checkout Data can be found in the upper right corner of the order page:

![](https://251457507-files.gitbook.io/~/files/v0/b/gitbook-x-prod.appspot.com/o/spaces%2FAQOLMUJWMYtrpQ7Oxxca%2Fuploads%2FoCMG0lXUCBR1twvDbNH6%2Flegacy-06bc52166d3bfc0236e7.png?alt=media)

If you want to add this automatically, use a rule with any applicable filters for the specific orders where it should be added.

The action in your rule should say **NotificationEmailCC|email-address** replacing the email address with your own:

![](https://251457507-files.gitbook.io/~/files/v0/b/gitbook-x-prod.appspot.com/o/spaces%2FAQOLMUJWMYtrpQ7Oxxca%2Fuploads%2FHLYJ4tZuSFcSZey0Hicr%2Flegacy-7a4a183506eff37e74af.png?alt=media)

#### Marketplace ID

When sending orders to MCF, the [Marketplace ID](http://docs.developer.amazonservices.com/en_US/dev_guide/DG_Endpoints.html) of the shipping country on the order will be included with the data sent to MCF.

If you need to specify a different Marketplace ID for the order, you can set checkout data called **MARKETPLACE\_ID** and add the ID you need to send through in the value field:

![](https://251457507-files.gitbook.io/~/files/v0/b/gitbook-x-prod.appspot.com/o/spaces%2FAQOLMUJWMYtrpQ7Oxxca%2Fuploads%2F6US3qnC8YjI41QM9jKo8%2Flegacy-840a97638cfb9defb39e.png?alt=media)

If the value field is left blank for a MARKETPLACE\_ID checkout data field, no Marketplace ID will be submitted with the order at all.

Checkout data can be set manually or automatically on your orders. See the [Email Notification CC ](#email-notification-cc)instructions above for how to set checkout data automatically with a rule.

#### Declared Value

The value of the products in an order is passed through to MCF in the declared value fields so they are in the same currency as the warehouse receiving the order. This may not always be the same currency as the original transaction.

This may not be an issue for your store unless your customer will be charged customs fees. If you need to ensure an approximate currency adjustment to account for exchange rate, set a checkout data field called **DECLARED\_VALUE\_MULTIPLIER** on the order. The declared value of each line item will be multiplied by this number.

If you would like to explicitly set the currency code, set checkout data on the order with a name of **DECLARED\_VALUE\_CURRENCY**.

If you are experiencing issues and would like to disallow the currency declarations completely, set a checkout data name of **SKIP\_DECLARED\_VALUE** with a value of 1:

![](https://251457507-files.gitbook.io/~/files/v0/b/gitbook-x-prod.appspot.com/o/spaces%2FAQOLMUJWMYtrpQ7Oxxca%2Fuploads%2FF3H6l8X4zID1CdnYnUDT%2Flegacy-0c44c1e25854fe0be5d6.png?alt=media)

See the [Email Notification CC](#email-notification-cc) instructions above for how to set checkout data on orders automatically with a rule.

#### Packing Slip Notes

Amazon MCF includes a section for notes that should be included on a packing slip:

![](https://251457507-files.gitbook.io/~/files/v0/b/gitbook-x-prod.appspot.com/o/spaces%2FAQOLMUJWMYtrpQ7Oxxca%2Fuploads%2FXYxWiqy1rqS3LIQDckr8%2Flegacy-28e1db4ddd4fcccf8cde.png?alt=media)

To pass information into this field from Order Desk, use **OrderComment** as checkout data on the order. Whatever is entered as the value will pass into MCF in this field.

![](https://251457507-files.gitbook.io/~/files/v0/b/gitbook-x-prod.appspot.com/o/spaces%2FAQOLMUJWMYtrpQ7Oxxca%2Fuploads%2F6wsxNtjNrc8IRufADY32%2Flegacy-38c39a65b1e4bcf52143.png?alt=media)

#### Replace source\_id

If you need to replace the source\_id for an order, you can set **DisplayableOrderID** as checkout data to add a different value. If left blank, source\_id will be used by default.

***

Click through to the next guide in the MCF series: [Common MCF Errors](/guided-walkthroughs/integration-specific-walkthroughs/amazon-mcf-common-errors).


# How to Send Orders to Shopify

Some merchants may need to send orders from other carts to Shopify for fulfillment through a Shopify app. This guide will show you how to set up a rule to do this and then how to get the shipment info back to Order Desk and back to the customer.

### Sending Orders to Shopify

To send orders to Shopify, create a rule that tells Order Desk which orders you want sent.

From the Rule Builder, select the Order Rule rule type:

![](https://d33v4339jhl8k0.cloudfront.net/docs/assets/57b0032590336059d4edf94f/images/5d28dcf2042863478674da45/file-x4LjGyRWaP.png)

Select the event that will trigger the rule to run. Most merchants will choose Order is Imported.

![](https://d33v4339jhl8k0.cloudfront.net/docs/assets/57b0032590336059d4edf94f/images/5d28dd362c7d3a2ec4bed0e2/file-d2CCig55O1.png)

Next set the filters that will tell Order Desk which orders should go to Shopify (for example, all Amazon orders), and select the **Submit Order to Shopify** action:

![](https://d33v4339jhl8k0.cloudfront.net/docs/assets/57b0032590336059d4edf94f/images/5d28dda6042863478674da50/file-oiBTQzOCVN.png)

This is just one example of a rule that can be made.

Depending on where your orders are coming from and which orders (if not all of them) need to be submitted to Shopify, you will need to create the necessary filter(s) for this rule to work properly. For more information on the Order Desk Rule Builder, read the [How to Work with Rules guide](/guided-walkthroughs/rules-and-automations/how-to-work-with-rules).

### Checkout Data Features

Checkout Data is a field in each order in Order Desk that gives you a place to store custom data about your order. We have a few special features that can be added as checkout data to your orders to pass information through to Shopify.

Checkout Data can be set manually on each order:

![](https://d33v4339jhl8k0.cloudfront.net/docs/assets/57b0032590336059d4edf94f/images/5a8c332d04286305fbc9a87a/file-FHnOGjsqL5.png)

Or it can be set automatically [with a rule](/guided-walkthroughs/rules-and-automations/how-to-work-with-rules) using the Set Checkout Data Value action.

The following checkout data or order metadata fields can be used to pass information through to Shopify:

| Field Name                    | Description                                                                                                                                                                                                                                                                                                                                                                                                           |
| ----------------------------- | --------------------------------------------------------------------------------------------------------------------------------------------------------------------------------------------------------------------------------------------------------------------------------------------------------------------------------------------------------------------------------------------------------------------- |
| DraftOrder                    | Set to 1 in order to create a new draft order instead of sales order. Please be aware that if fulfillment is added to a draft order in Shopify, Shopify will automatically create a new, live order that is no longer linked to Order Desk, and the fulfillment will not be added to the draft order. Because of this, Shopify will not pass shipment information back into Order Desk on any orders sent as a draft. |
| SendInvoice                   | Set to 1 to send the draft order invoice using the default at Shopify.                                                                                                                                                                                                                                                                                                                                                |
| FulfillmentStatus             | Pass the fulfillment status of the order through to Shopify so the order can be updated there with the same status. Default is set to null (same as open). Set to “fulfilled” to close the order in Shopify.                                                                                                                                                                                                          |
| FinancialStatus               | Pass the financial status of the order. Available values are: pending, authorized, partially\_paid, paid, partially\_refunded, refunded, voided                                                                                                                                                                                                                                                                       |
| Gateway                       | Pass the name of the transaction gateway that was used for order.                                                                                                                                                                                                                                                                                                                                                     |
| Currency                      | The three-letter code ( [ISO 4217](https://en.wikipedia.org/wiki/ISO_4217) format) for the currency used for the payment (optional)                                                                                                                                                                                                                                                                                   |
| ShopifySendFulfillmentReceipt | Determines whether a fulfillment confirmation will be sent to the customer. Enter true or false. Defaults to false.                                                                                                                                                                                                                                                                                                   |
| ShopifyInventoryBehavior      | Options are decrement\_ignoring\_policy, decrement\_obeying\_policy, or bypass. Default is bypass.                                                                                                                                                                                                                                                                                                                    |
| SourceName                    | Add the source name to pass it through as the SourceName in the Additional Details section of the order in Shopify.                                                                                                                                                                                                                                                                                                   |
| ShopifyOrderNumber            | If you want to pass a custom order number to Shopify, you can use this field. Set the value to the custom order number you intend to use.                                                                                                                                                                                                                                                                             |
| SetOrderNumber                | To send the original order number through to Shopify, set value to 1. For more information, scroll down to [Keeping the Same Order Number](#keeping-the-same-order-number).                                                                                                                                                                                                                                           |
| ShopifyNoPrices               | To send orders through to Shopify with the prices removed, set checkout data value to 1.                                                                                                                                                                                                                                                                                                                              |
| ShopifyTags                   | Add any tags you want to have passed through to Shopify. Separate multiple tags with a comma.                                                                                                                                                                                                                                                                                                                         |
| ShopifyNote                   | Add a note you want to have passed through to Shopify.                                                                                                                                                                                                                                                                                                                                                                |
| shopify\_submit\_override     | Set to 1 to send an order back into the same Shopify store. Must be set as order metadata.                                                                                                                                                                                                                                                                                                                            |
| vat\_tax                      | Set the VAT tax to have it passed through to Shopify instead of the order tax total. For more information, scroll down to the [Vat Taxes](#vat-taxes) section.                                                                                                                                                                                                                                                        |

### Keeping the Same Order Number

When sending orders to Shopify, by default, they will show up in Shopify with the order number Shopify assigns to them. If you’d like to keep the same order number on the order when it gets to Shopify, you will need to set some checkout data on the order: SetOrderNumber=1.

Checkout data can be added manually to orders from the top right of the order details page:

![](https://d33v4339jhl8k0.cloudfront.net/docs/assets/57b0032590336059d4edf94f/images/5a8c35542c7d3a0806492f3c/file-VsU300jtFn.png)

It can also be added with a rule so you can apply it to all orders or specific ones, automatically, depending on the filters you set. The rule without any filters, to apply to all orders, would look like this:

![](https://d33v4339jhl8k0.cloudfront.net/docs/assets/57b0032590336059d4edf94f/images/5fcfe254388c5a0089e64c84/file-zQemWb47XS.png)

### Shopify Variant ID

While Order Desk matches products by SKU, Shopify matches products by their Shopify Variant ID. When sending orders to Shopify, if you need the products in the order to sync with your products in Shopify, they’ll have to have the Variant ID attached to them. We’ll go over how to set this up properly in this section of the guide.

First, though, if your products coming into Order Desk have SKUs that *don’t match* the SKUs you have in Shopify, you’ll need to replace those SKUs as soon as orders are imported to Order Desk. This is done with an item metadata field called code\_replace. For detailed instructions on how to set this up, please read through our [Code Replace guide](/guided-walkthroughs/products-and-inventory/how-to-use-code-replace#code-replace). Once you have your products saved here in Order Desk with code\_replace added to them, you can move on to the next step for how to get the Shopify Variant IDs in Order Desk.

If your SKUs already match the SKUs you have in Shopify, you can skip the code replace step and instead go straight to importing your Shopify products with their variant IDs.

The Shopify Variant ID is an item metadata field similar to code\_replace. When we send through an order to Shopify, if the variant ID is attached to any products in the order, Shopify will know what those products are and will sync them into the products you have saved there. To get this metadata field onto your items here in Order Desk, you’ll need to import your items from Shopify.

In your [Shopify integration settings](https://app.orderdesk.com/integration/shopify) on the **Manual Import** section, you’ll see where you can import your items.

![](https://d33v4339jhl8k0.cloudfront.net/docs/assets/57b0032590336059d4edf94f/images/68e7e6ea3679791e1646c44b/file-kmap6wihMk.png)

Click the **Import Inventory Items Now** button for Order Desk to automatically pull in all of your Shopify products with the Variant ID included as metadata.

You will also need to make sure your store is automatically syncing inventory items into orders as they are imported. To check this, go to your [Store Settings page](https://app.orderdesk.com/settings/details) and under the **Inventory Settings** over on the right side of the page, make sure the **Add Inventory Details to Order Items** option is enabled:

![](https://d33v4339jhl8k0.cloudfront.net/docs/assets/57b0032590336059d4edf94f/images/5dfa8e812c7d3a7e9ae54b17/file-HmmBfEb2lB.png)

With these settings in place, when an order comes in, it will look for the same item here in Order Desk. If it sees code\_replace on the item, the code will be swapped out with your Shopify SKU, then it will look at your Shopify products and sync any variant IDs into the appropriate items in the order. This will all happen automatically so the order can be sent to Shopify for fulfillment right after it imports to Order Desk.

### Vat Taxes

If your store handles VAT taxes and you need these included with your orders when sent to Shopify, you can set them as either a Checkout Data field or a Metadata Field called vat\_tax.

![](https://d33v4339jhl8k0.cloudfront.net/docs/assets/57b0032590336059d4edf94f/images/5a8c36fa2c7d3a0806492f57/file-avwWpzmnF6.png)

If vat\_tax is saved as checkout data or metadata, that value will be used instead of the order tax total, and the taxes will be included when orders are sent to Shopify.

This will automatically be done for orders from Amazon Marketplace EU.

If you need to set this up to happen automatically for orders from any other shopping cart integrations, create a rule with the action **Set Checkout Data Value – vat\_tax|{{ tax\_total }}**

![](https://d33v4339jhl8k0.cloudfront.net/docs/assets/57b0032590336059d4edf94f/images/5d28e0b9042863478674da6f/file-cpSD3emFrk.png)

If you have some orders that will have VAT tax and others that won’t, use filters in your rule to apply only to the specific shipping countries necessary, or, if they are all coming from one integration but not another, you can set a filter for the order source to equal the integration that is importing orders with VAT taxes.

### Getting Shipments from Shopify

Once an order is fulfilled in Shopify, you can pull the shipment info back into Order Desk. To make sure this info is synced back to the order, go into your [Shopify integration settings](https://app.orderdesk.com/integration/shopify) and enable the **Download Shopify Shipments** setting under the **Order Content** tab:

![](https://d33v4339jhl8k0.cloudfront.net/docs/assets/57b0032590336059d4edf94f/images/68e7e6b0af090528fe9adaff/file-wvAr6ITSA7.png)

With this setting enabled, orders that have been sent to Shopify will be marked as closed and tracking info added as that information is updated in Shopify.

Check the shopping cart integration where the orders came from (not Shopify) for a **Sync Tracking Numbers** setting, and enable it to pass the shipment info back through to the cart.

Alternatively, you can set up an email template to send a shipment notification to your customers directly from Order Desk. For instructions on how to do this, read the [Sending Tracking Details to Customers](/guided-walkthroughs/shipping-fulfillment-and-returns/how-to-print-thermal-labels/how-to-send-shipment-tracking-info-to-customers) guide.


# How to Split by Vendor with Shopify

### Overview

The Shopify integration makes splitting orders convenient with a few built in features. This guide will show you how to set up your products in Shopify so that Order Desk can automatically split your orders by vendor.

For a general walkthrough on creating email templates and rules for dropship orders, please see [this guide](/guided-walkthroughs/shipping-fulfillment-and-returns/how-to-split-and-dropship-orders-for-separate-vendors).

### Split Orders

Set a vendor for each dropshipper within Shopify. You can see your vendors from the Products page:

![](https://251457507-files.gitbook.io/~/files/v0/b/gitbook-x-prod.appspot.com/o/spaces%2FAQOLMUJWMYtrpQ7Oxxca%2Fuploads%2FvgiEDBWBCKEIJ1sgLBFN%2Flegacy-a6697f8c220021280022.png?alt=media)

Click on the product to add or change the vendor.

![](https://251457507-files.gitbook.io/~/files/v0/b/gitbook-x-prod.appspot.com/o/spaces%2FAQOLMUJWMYtrpQ7Oxxca%2Fuploads%2FIBnoDgxiPOM48pBD8mjJ%2Flegacy-4dda4dd681919fb74a16.png?alt=media)

Back in Order Desk, click on **Shopify** under **Integrations** in the left sidebar.

![choosing-shopify](https://251457507-files.gitbook.io/~/files/v0/b/gitbook-x-prod.appspot.com/o/spaces%2FAQOLMUJWMYtrpQ7Oxxca%2Fuploads%2FxttwVi24eMe0XkYFbarb%2Flegacy-e37c9fb640210262dd42.png?alt=media)

In the Shopify Settings, head into the **Order Import Settings** tab. Under the **Order Split dropdown, select the Split By Vendor** option.

![](https://251457507-files.gitbook.io/~/files/v0/b/gitbook-x-prod.appspot.com/o/spaces%2FAQOLMUJWMYtrpQ7Oxxca%2Fuploads%2FH4gHBwhV5IqUQyYKelDw%2Flegacy-234bc3085d4f67443631.png?alt=media)

You can also use the [**Vendor Filter**](/integration-setup-guides/sales-channels/shopify-integration#vendor-filter) (found under the **Order Filtering** tab) to add the names of the vendors you want imported into Order Desk. Separate multiple vendor names with a comma. Any item or order that is not for a vendor listed in the filter will not be imported into Order Desk.

**IMPORTANT**

If your Shopify theme shows the vendor in the design, you can either remove it, or give the vendor a generic name like “Acme On Demand Services” or “Acme On Demand Printing.”

### Send Split Orders for Fulfillment

To send your split orders for fulfillment, you’ll need to create some rules.

**Event**

In the Rule Builder, select the **Order Rule** rule type: ![](https://251457507-files.gitbook.io/~/files/v0/b/gitbook-x-prod.appspot.com/o/spaces%2FAQOLMUJWMYtrpQ7Oxxca%2Fuploads%2FVs9qms9OIoxTh8zpy4qx%2Flegacy-4551c0b8aa3285f8d721.png?alt=media)

Then select the **Order is Imported** event:

![](https://251457507-files.gitbook.io/~/files/v0/b/gitbook-x-prod.appspot.com/o/spaces%2FAQOLMUJWMYtrpQ7Oxxca%2Fuploads%2FPipSAPg92MvTGqlgcI9K%2Flegacy-086ba5f631de983fe3c8.png?alt=media)

You may notice an event called **Order is Split**. Despite how this sounds, this won’t be the event you need for your split orders. The vendor split feature with Shopify happens ***right before*** they import into Order Desk, so **Order is Imported** is the event that is needed for this rule.

**Filters**

Your filter will either be:

> **If Item Metadata shopify\_vendor Equals xxx**

or

> **If Order Metadata Field shopify\_vendor** ***Equals*** **xxx**

Replace **xxx** with your vendor name. This must be an exact match, taking into account spelling, punctuation, spaces and capitalization.

**Actions**

Once you have your filter(s) in place, you can set your actions. If you are sending your orders to one of our integrations, choose the **Submit to Integration** option as your action.

You can also choose to **Send Email To Customer** but have that email set up to go to your vendor instead of the customer. Return to the [dropship guide](/guided-walkthroughs/shipping-fulfillment-and-returns/how-to-split-and-dropship-orders-for-separate-vendors) for instructions on how to set up your email template.

Or you can choose the action to **Change Folder** and select that vendor’s folder. [See this guide](/start-here/getting-started-series/quick-start-overview#working-with-folders) for instructions on setting up custom folders.

Here’s an example where the vendor name is **BuckLtd** and the orders need to be moved into a folder for that specific vendor:

![](https://251457507-files.gitbook.io/~/files/v0/b/gitbook-x-prod.appspot.com/o/spaces%2FAQOLMUJWMYtrpQ7Oxxca%2Fuploads%2F58LvU1rey955K8TCy3P1%2Flegacy-891a0a418ef7633c5fc5.png?alt=media)

You can add more than one action to your rule. For instance, you may need to send an email *and* change the folder:

![](https://251457507-files.gitbook.io/~/files/v0/b/gitbook-x-prod.appspot.com/o/spaces%2FAQOLMUJWMYtrpQ7Oxxca%2Fuploads%2FjH7PhRdqsZeiWFtspYPA%2Flegacy-f457dc02edc50cf144b6.png?alt=media)

Once enabled, Order Desk will split your orders based on the vendor names you set in Shopify and then process those orders how you determine based on the rules.

If you need any help with setting up your rules, contact Order Desk support.


# How to Match Shopify to Amazon MCF SKUs

When submitting orders from Shopify to Amazon MCF, be sure that your SKUs from Shopify match the SKUs MCF has for your items. If they don’t match, you can map them to each other in Order Desk in one of two ways. You can match the codes to each other in your Amazon MCF settings or you can use a metadata field called *code\_replace* in your inventory items.

### Product Code Match

To match product codes from Shopify to Amazon MCF, navigate to your MCF settings by clicking on **Amazon MCF** under **Integrations** in the left sidebar.

![](https://251457507-files.gitbook.io/~/files/v0/b/gitbook-x-prod.appspot.com/o/spaces%2FAQOLMUJWMYtrpQ7Oxxca%2Fuploads%2FwZ8mlODGBSd8VCnGgHp2%2Flegacy-30e10e7e9413f5a6d954.png?alt=media)

Scroll down to the **Product Code Match** box. You can match the SKUs here, where the first SKU is your Shopify SKU and the second is your MCF SKU.

In this example, RX-78-2 is the SKU from Shopify, while RGM-79 is the SKU that MCF is expecting:

![](https://251457507-files.gitbook.io/~/files/v0/b/gitbook-x-prod.appspot.com/o/spaces%2FAQOLMUJWMYtrpQ7Oxxca%2Fuploads%2FZx7gXQ1ggUBS37KENWSi%2Flegacy-f46891df4fafc615ed64.png?alt=media)

Set one match per line.

**Product Bundles**

If you have bundled products in Shopify, use **Product Code Match** to match the SKU of the bundle to the SKUs MCF has for each item in the bundle.

This works the same as matching one SKU to another, but instead add multiple SKUs:

PCT099=SKU1,SKU2,SKU3

You can even add the same SKU more than once:

DGP123=SKU1,SKU1,SKU2

Like with product code match for single items, bundles will not be replaced with the new SKUs in Order Desk, but the order will be sent to the fulfillment service with the new SKUs.

### Code Replace

If you want to import your inventory from Shopify to Order Desk, you can go into each inventory item and add a metadata field called `code_replace` where the value is your MCF SKU for that item:

![](https://251457507-files.gitbook.io/~/files/v0/b/gitbook-x-prod.appspot.com/o/spaces%2FAQOLMUJWMYtrpQ7Oxxca%2Fuploads%2F6itjCCkiF1OTwUaWJk2p%2Flegacy-33552cfd680dc6a5de73.png?alt=media)

Go into your **Store Settings** (under the **Settings** menu in the left sidebar):

![](https://251457507-files.gitbook.io/~/files/v0/b/gitbook-x-prod.appspot.com/o/spaces%2FAQOLMUJWMYtrpQ7Oxxca%2Fuploads%2FrfaDVseGXGsyb2a1PI7Y%2Flegacy-c018999091e7d699eac6.png?alt=media)

Underneath the **Inventory Settings** section, enable **Add Inventory Details to Order Items**:

![](https://251457507-files.gitbook.io/~/files/v0/b/gitbook-x-prod.appspot.com/o/spaces%2FAQOLMUJWMYtrpQ7Oxxca%2Fuploads%2FXraZiMGE2CUcPPPsZI01%2Flegacy-166e75b2a5424eb32e20.png?alt=media)

As orders come into Order Desk, the items in the orders will sync with your inventory items already stored here, and any Shopify SKU that matches an item with the `code_replace` field in it will be replaced by the SKU set in the metadata.

For more details, including how to set up code replace bundles, see the [Code Replace guide](/guided-walkthroughs/products-and-inventory/how-to-use-code-replace#code-replace).


---

[Next Page](/llms-full.txt/1)