> For the complete documentation index, see [llms.txt](https://help.orderdesk.com/llms.txt). Markdown versions of documentation pages are available by appending `.md` to page URLs; this page is available as [Markdown](https://help.orderdesk.com/integration-setup-guides/shipping-services/easyship-integration.md).
# Easyship Integration
[Easyship](https://www.easyship.com/) allows you to compare couriers and find the best shipping rates. You can use the Easyship integration to request shipping rates, then create and print labels directly from your orders in Order Desk.
This guide will go over how to enable and set up the Easyship integration.
### Setup
In Order Desk, click on **Manage Integrations** in the left sidebar. Under the **Shipping** tab, enable the **Easyship** integration.

Once enabled, click the **Connect to Easyship** button to begin the connection process.

This will redirect you to a page where you’ll be asked to authorize Order Desk to connect to your Easyship account.

Click the **Authorize** button, and you’ll be redirected back to the integration settings page in Order Desk.
#### Default Settings
These settings let you define how labels are created and how rates are selected when using Easyship through Order Desk. The values you set here will apply by default, but you can further customize them on an order by order basis.

#### Units of Measure
Set whether your package dimensions will use imperial units (LB/IN) or metric units (KG/CM).
#### Default Box
Choose a default box type to use for your packages. The selectable boxes here are the ones *already* set up within your Easyship account.
#### Sender Address
Select the address you want to use as the sender on your Easyship labels. You can set up [Return Addresses](/guided-walkthroughs/using-order-desk/manage-store-settings.md#return-addresses) on your **Store Settings** page and we’ll pull them into the dropdown for you to choose from.
#### Rate Sorting Method
Choose how Order Desk should rank available rates when generating labels. For example, selecting *Value For Money* will prioritize a balance of price and delivery speed. This setting is also used when automatically [purchasing labels with rules](#purchasing-easyship-labels-with-rules).
#### Tracking Webhook

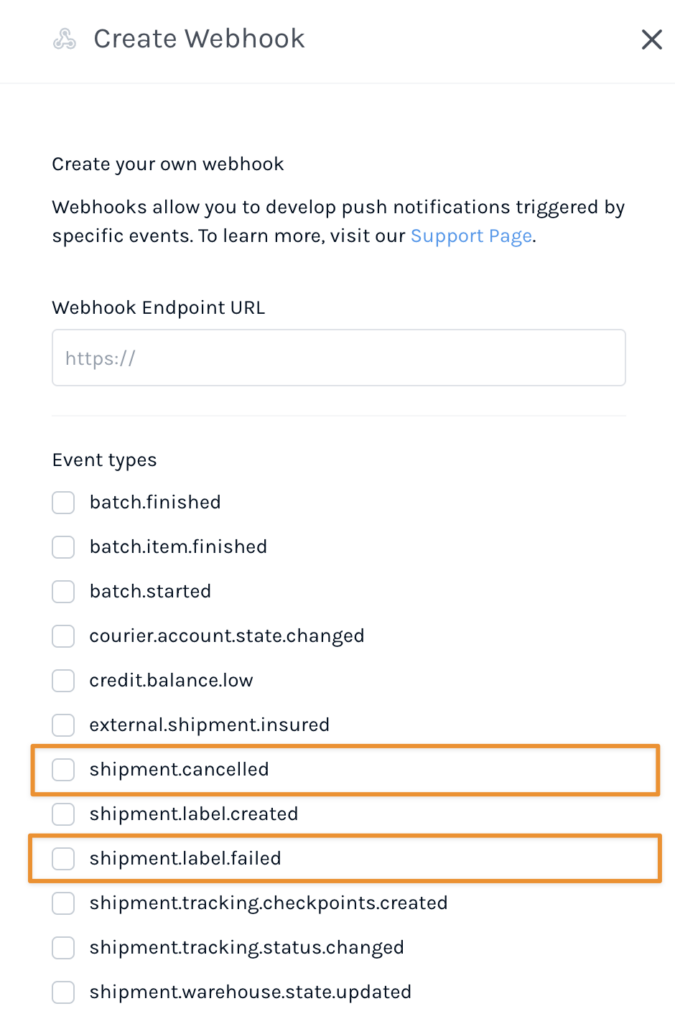
Copy the **Tracking** **Webhook URL** provided on the integration settings page and add it to your Easyship account under the **Webhooks** section. This allows Order Desk to receive updates about the status of your shipments.

**TIP**\
When adding the Webhook URL to your Easyship account, make sure to enable, at least, the following **Event types**:
* `shipment.cancelled`
* `shipment.label.failed`
#### Easyship Label Creator

Once the integration is enabled, a label creator will appear beneath the product details on every order. You can update the default box type here as well as set the package weight, then click on **Fetch Rates**.
Rates will be populated in a new dropdown box for you to choose before creating a label. If you need to, you can edit the settings and fetch the rates again.

#### Item Level Details
The following fields can be set as variations or item metadata for each item in an order.
| Field Name | Field Description |
| ---------- | ------------------------------------------------------------------------------------------------------------------------------------- |
| hs\_code | Use this to set the [harmonized system code](https://en.wikipedia.org/wiki/Harmonized_System) on an item-by-item basis. **Required**. |
| weight | Use this to set the weight of each item in your order. |
If you are unfamiliar with how to add item metadata or variations to your items in Order Desk, see the [How to Work with Inventory Details](/guided-walkthroughs/products-and-inventory/how-to-work-with-inventory-details.md#store-extra-item-details-in-order-desk) guide.
#### Order Level Details
The following fields can be set as checkout data or order metadata for your orders.
| Field Name | Field Description |
| ----------------------- | ------------------------------------------------------------------------------------------------------------------------------------------------------------------------ |
| easyship\_box\_slug | Pass the slug that relates to the box size you want to use for the package here. If unset, we’ll use the [Default Box](#default-box) type from the integration settings. |
| easyship\_total\_weight | Pass the total weight of your package here. |
If you are unfamiliar with checkout data, see the [How to Work with Checkout Data](/guided-walkthroughs/orders-and-folders/how-to-work-with-checkout-data.md) guide.
#### Purchasing Easyship Labels with Rules
**💡 TIP**\
Before using rules to purchase labels automatically, make sure your orders have the required item and order-level fields set. This helps ensure the correct labels are purchased and helps prevent errors.
It’s also a good idea to manually purchase a few labels first. This gives you a chance to test the setup and catch any issues early before automating the full process.
You can purchase labels automatically with the **Purchase Easyship Label** rule action. This sends a request to Easyship using data from your orders.

If ***easyship\_box\_slug*** isn’t set as checkout data or order metadata, we’ll fall back to the [Default Box](#default-box) type set in your integration settings.
We’ll also use the [Rate Sorting Method](#rate-sorting-method) from your integration settings to sort available rates and automatically choose the top option as the shipment method.
If you need a refresher on rules in general, you can [learn more here](/guided-walkthroughs/rules-and-automations/how-to-work-with-rules.md).
---
# Agent Instructions
This documentation is published with GitBook. GitBook is the documentation platform designed so that both humans and AI agents can read, navigate, and reason over technical content effectively. Learn more at gitbook.com.
## Querying This Documentation
If you need additional information that is not directly available in this page, you can query the documentation by asking a question.
Perform an HTTP GET request on the following URL with the `ask` and `goal` query parameters:
```
GET https://help.orderdesk.com/integration-setup-guides/shipping-services/easyship-integration.md?ask=&goal=
```
`ask` is the immediate question: it should be specific, self-contained, and written in natural language.
`goal` is what the user is ultimately trying to achieve, the reason they need the answer. Sharing it helps GitBook give you a better, more relevant answer. A goal is most helpful when it describes the outcome the user wants rather than restating the question. For example, with `ask=how do I create an API token`, a goal like `automate deployments from our CI pipeline` lets GitBook tailor the answer to that use case.
The response will contain a direct answer to the question and relevant excerpts and sources from the documentation.
Use this mechanism when the answer is not explicitly present in the current page, you need clarification or additional context, or you want to retrieve related documentation sections.